Various functions
Previewing media assets
Info
Only file-based media assets and live sources can be previewed. Placeholders can only be opened in the preview to display their metadata. Secondary events cannot be previewed.
To preview a media asset, proceed as follows:
-
On the right side, select the Media tab.
-
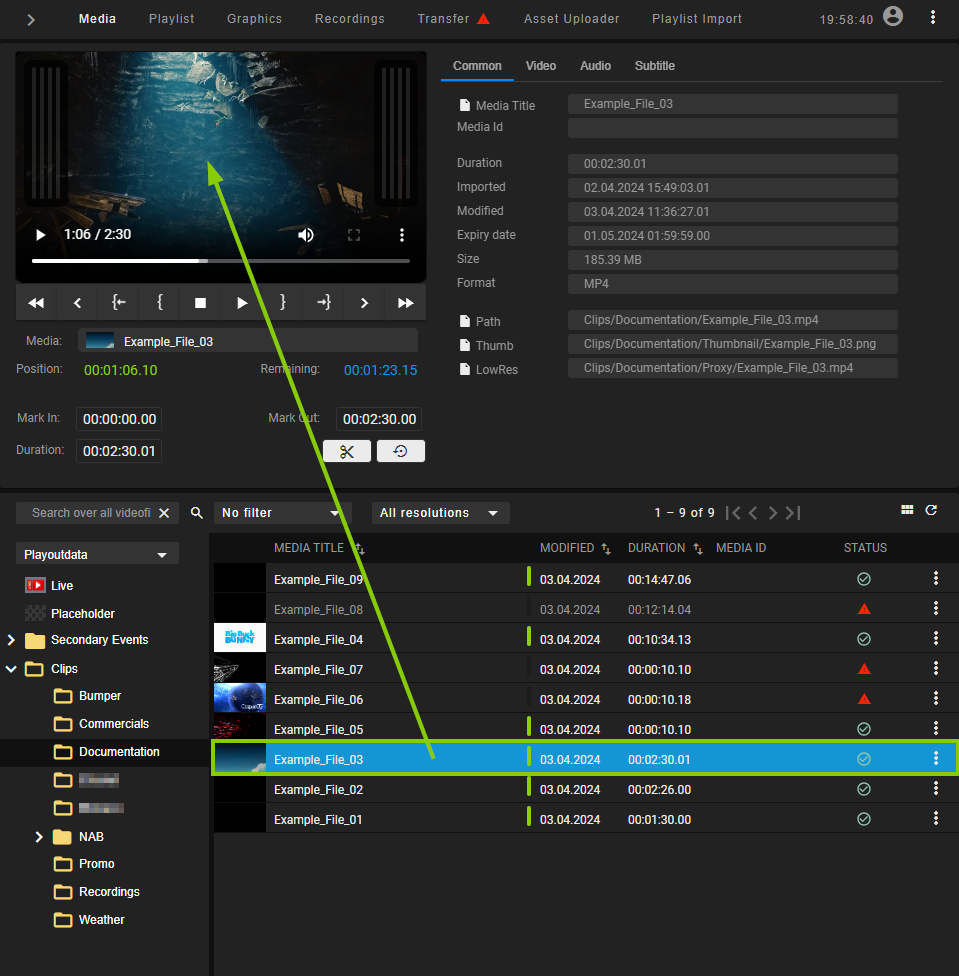
In the media asset list select the media type (live or clips) and the corresponding source folder that contains the media asset to be previewed.
-
(Optional) To filter the displayed media assets, either use the Search field (to filter by file name) or the dropdown menu to filter by modification date.
The media asset list is filtered based on your filter settings.
-
To preview a media asset, either click the Options icon
 at the right side of the corresponding list item and select Preview asset or drag the media asset on the preview player.
The media asset is loaded by the preview player.
Tip
Alternatively, you can also preview media assets, by dragging the corresponding clip from the rundown into the preview player. If the clip times were edited in the rundown (for example, clip start offset or duration were changed), these times are applied by the preview player as mark in and mark out.
-
Use the preview player controls to play the media asset.
Notice
If you preview a live source:
- the player controls are disabled, except the stop button
- you can copy the stream URL to the clipboard by clicking the corresponding Path icon in the Common metadata section
The preview playback starts.
Controlling the rundown playback
The rundown playback can either be triggered automatically (based on the scheduled playlist start time) or manually by using the rundown control via the buttons at the bottom left of the screen.
To manually start the playback, proceed as follows:
-
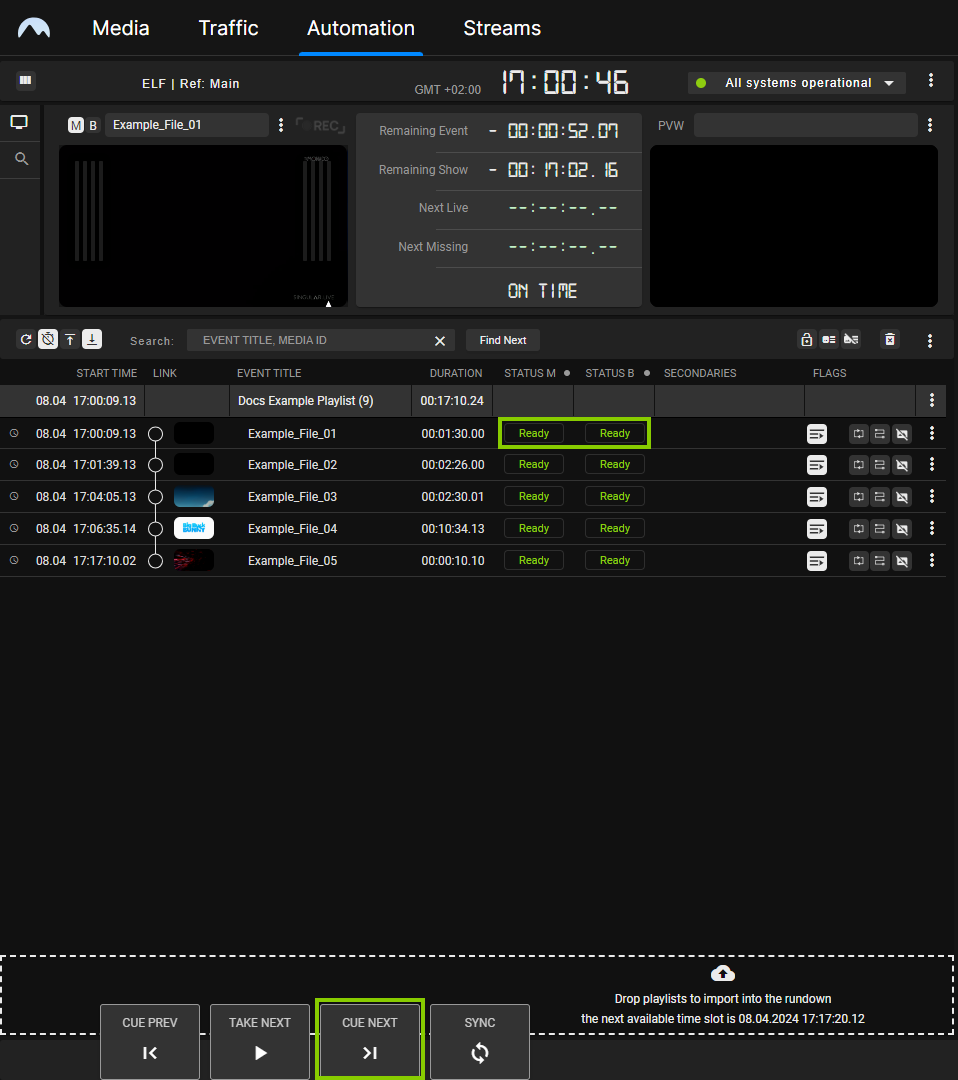
In the rundown cue a clip to prepare it for playback, by either:
-
clicking Cue next in the rundown control, or
-
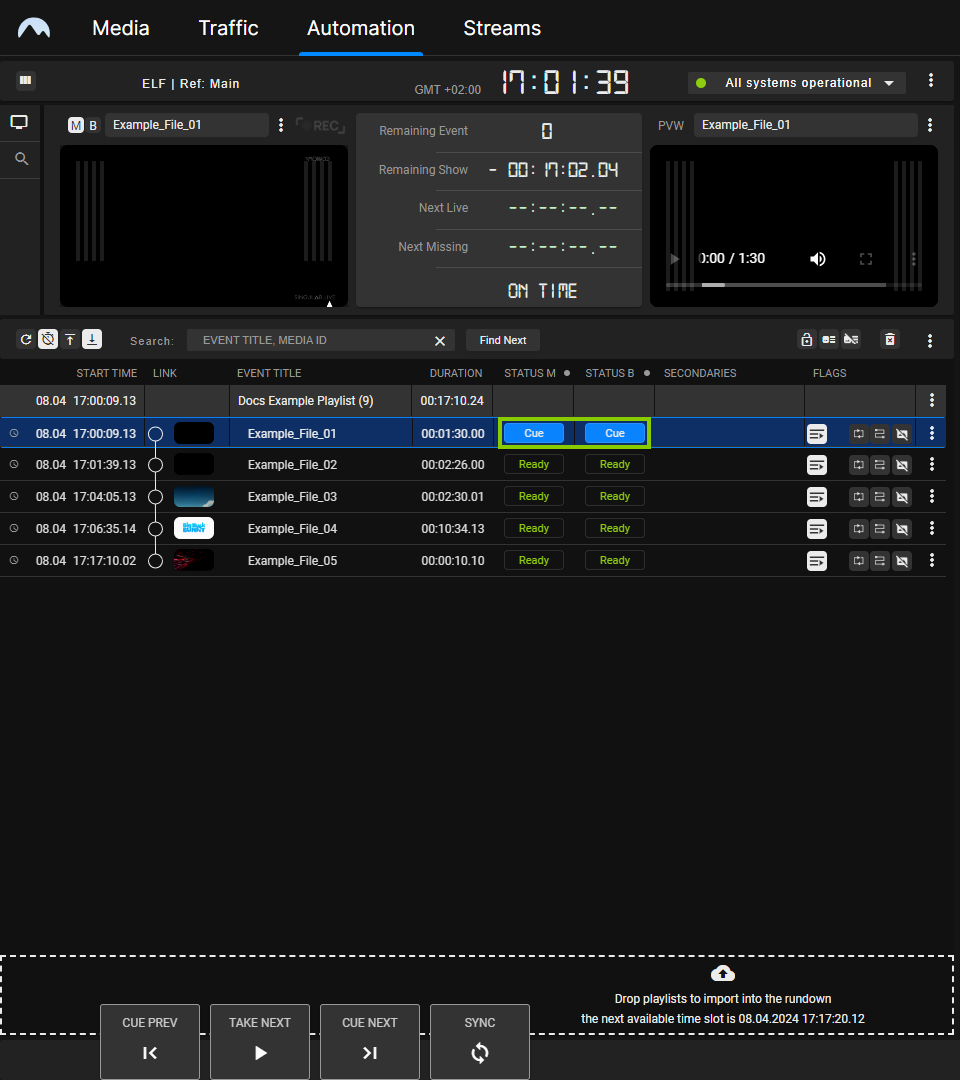
by clicking the clip status of a clip that is in status Ready.
Notice
If you use the first method, this either cues the first clip in the rundown (if no clip was cued before) or the next clip after the previously cued clip.
The clip status changes to Cue.
-
-
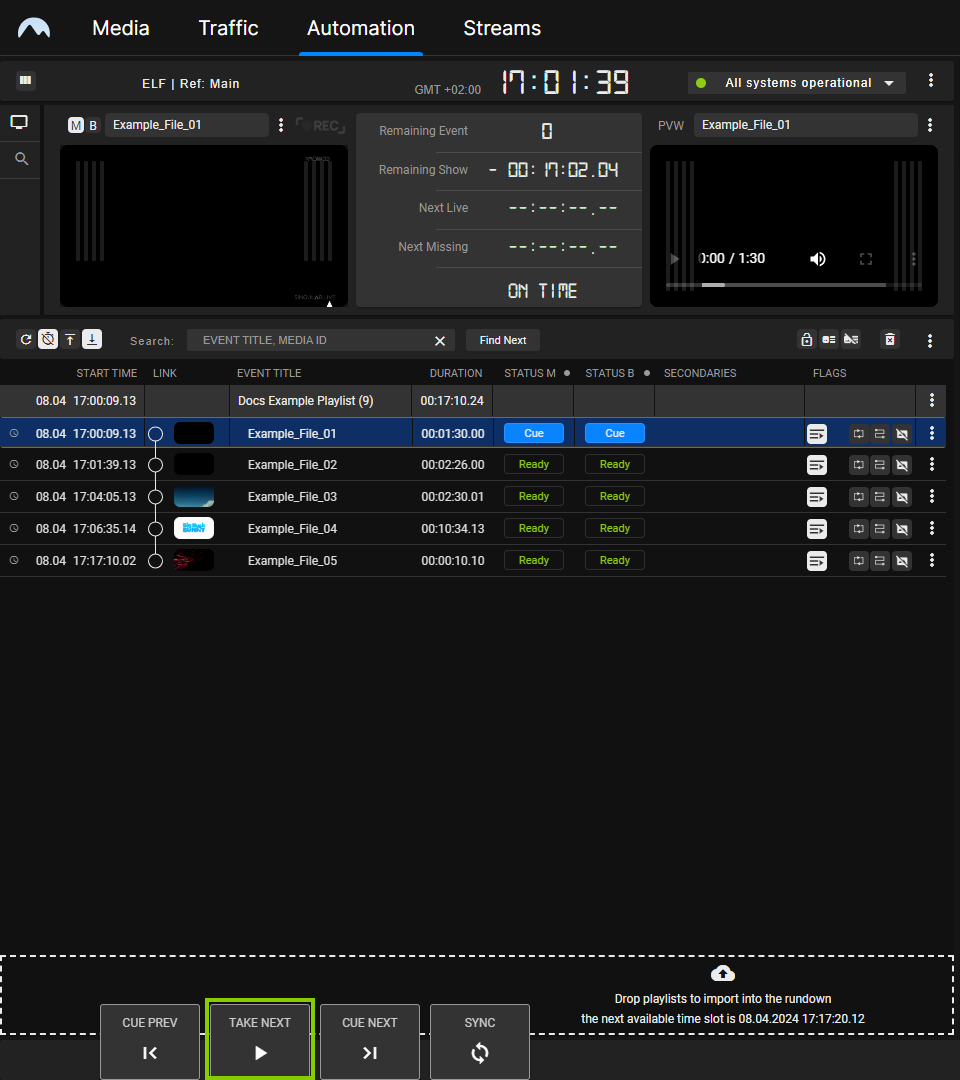
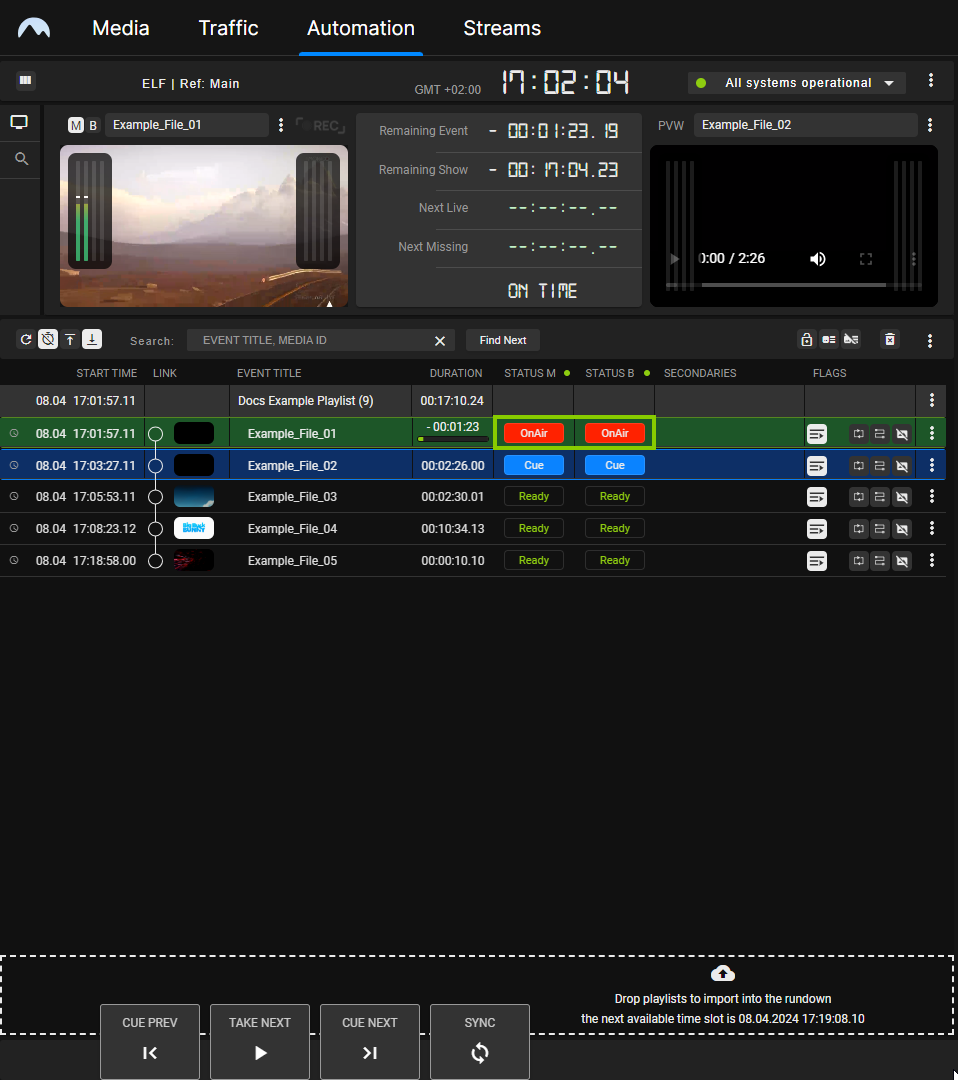
To start playback, click Take next in the rundown control.
The clip is played. The clip status changes to On Air.
Tip
If the Auto Follow flag of the following clip is enabled, the following clip is automatically cued. Alternatively, you can cue any other clip (that is in status Ready), by either clicking the clip status or Cue next.
To manually stop the playback of the current clip and start the playback of the next cued clip, click Take next in the rundown control. This is required if, for example, a clip of type live source is currently playing with the clip flag Open End enabled. Because of the flag, the clip is playing permanently. The playback stops only when you manually cue the next clip to be played and click Take next.
-
To manually stop playback, click Stop in the rundown control.
Notice
The Stop button is hidden by default. To display it, click the Show controls icon
 at the bottom right of the screen.
 -
Confirm the dialog by clicking Yes.
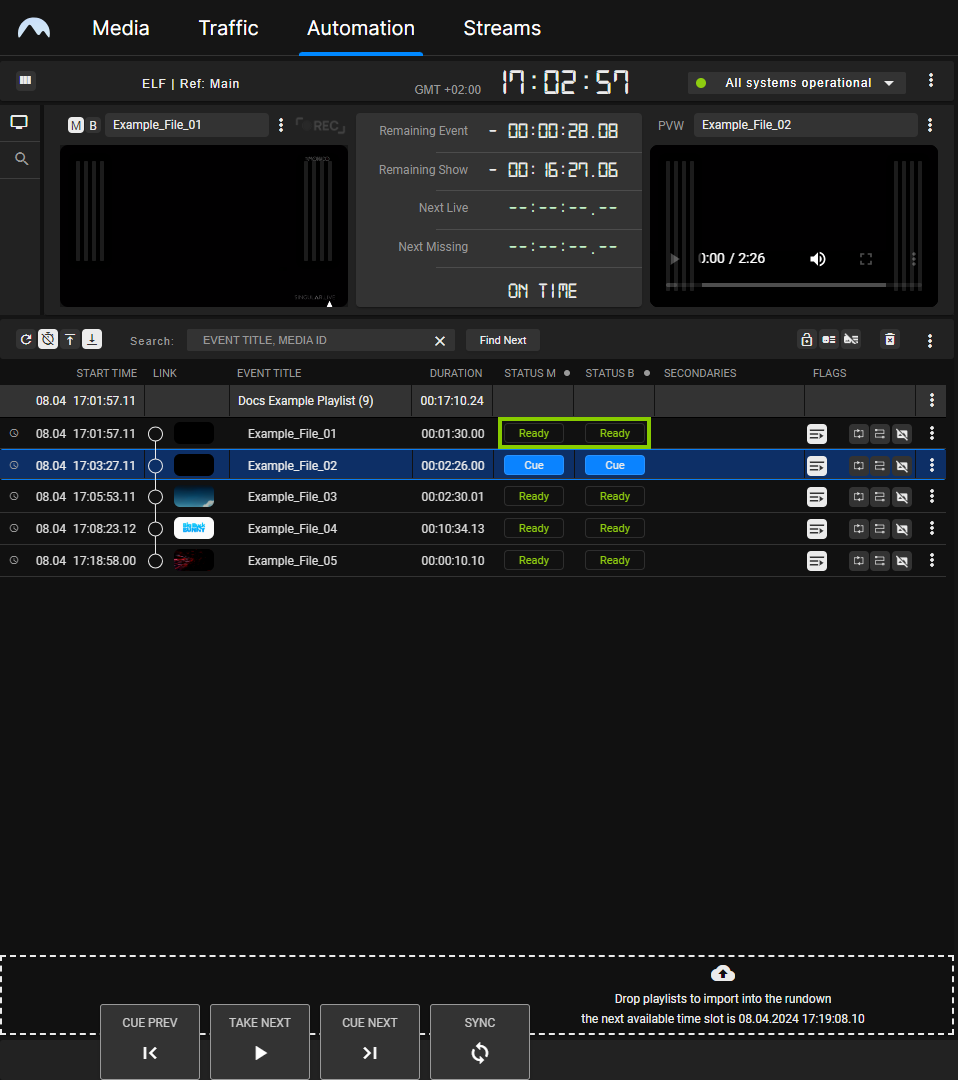
The playback is stopped. The clip status changes to Ready.
Notice
If you manually stop playback, the previously cued clip remains cued. To eject the player (setting it to idle) and reset the status of all clips (setting all available clips to status Ready), click the Eject player icon
 in the rundown control via the buttons at the bottom left of the screen and confirm the following dialog by clicking Yes.
File transfer
As described in section Ingest, all media files to be played are initially uploaded to the ingest storage. Afterward, each file, that is used in a rundown, must be copied to all playout nodes that are assigned to the corresponding channel.
Notice
If a file is already present on the local playout node storage and the file transfer is triggered again (for example, when the file processing is triggered again manually), the file is overwritten on the local playout node storage if it is not currently on-air.
The file transfer between ingest and playout storage can be triggered in the following ways:
- add an existing playlist to the rundown, which automatically triggers transfers for all used files that are not yet available on the playout nodes
- add a media file to an existing show in a playlist in the rundown, which automatically triggers transfers for all used files that are not yet available on the playout nodes
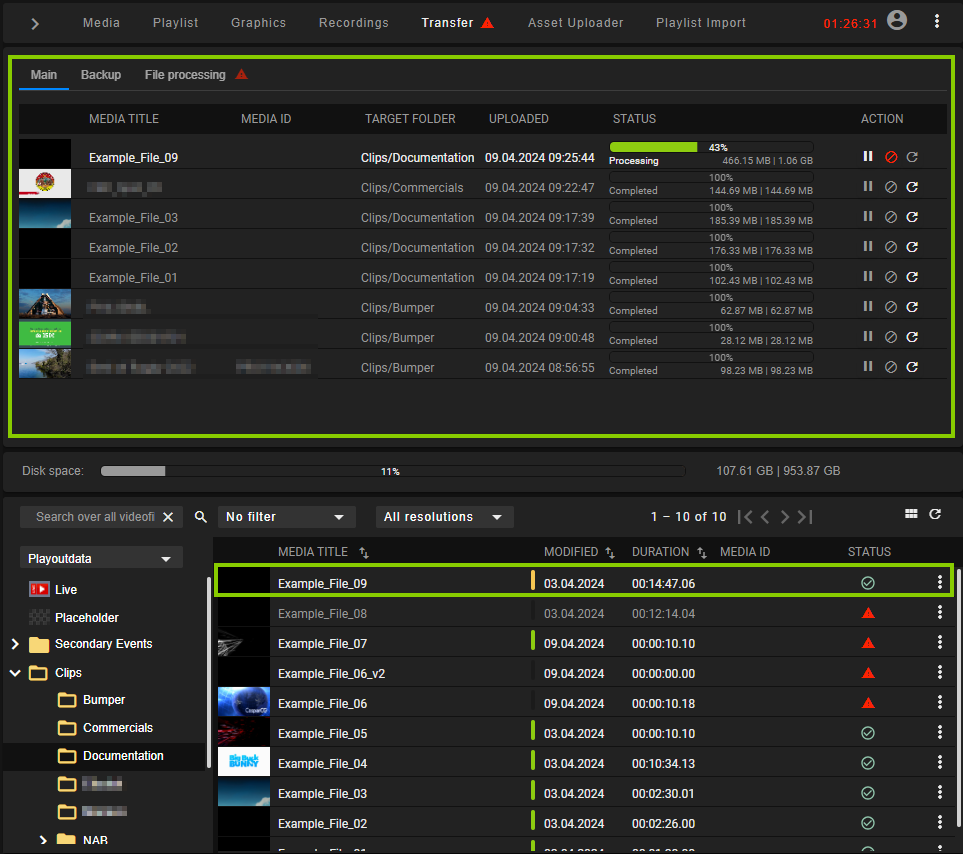
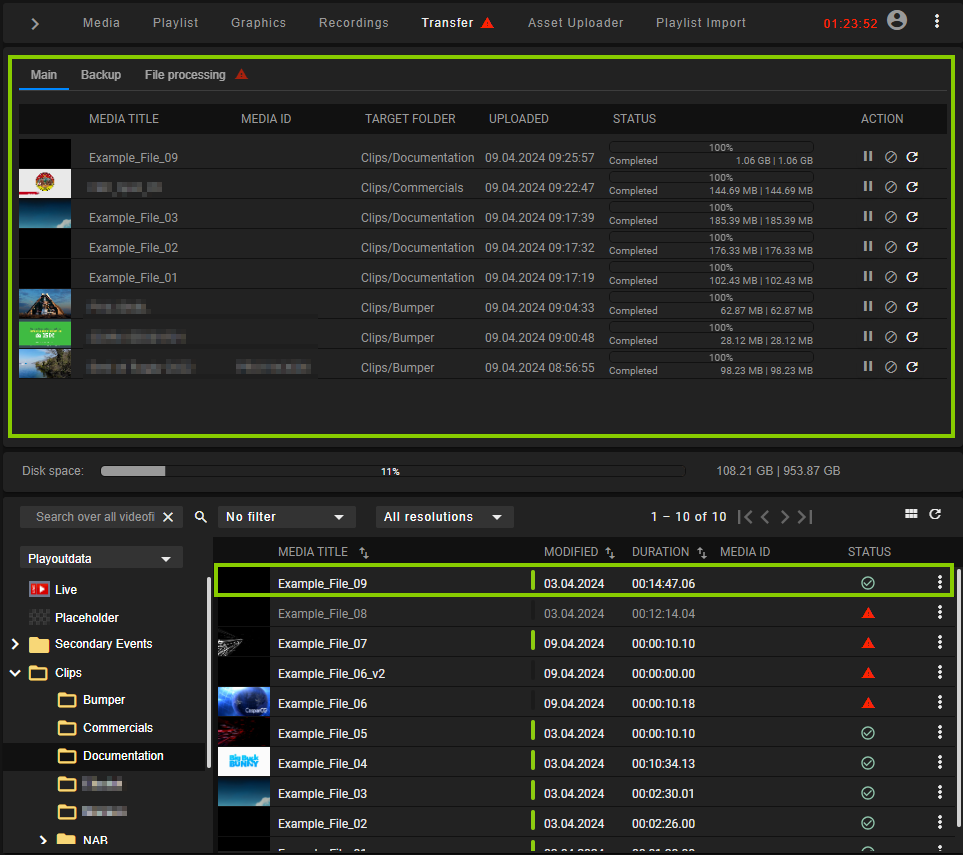
- trigger a file transfer manually via the media asset list (either via the Media tab or Transfer tab)
- trigger file processing manually (which afterward triggers the file transfer) via the media asset list
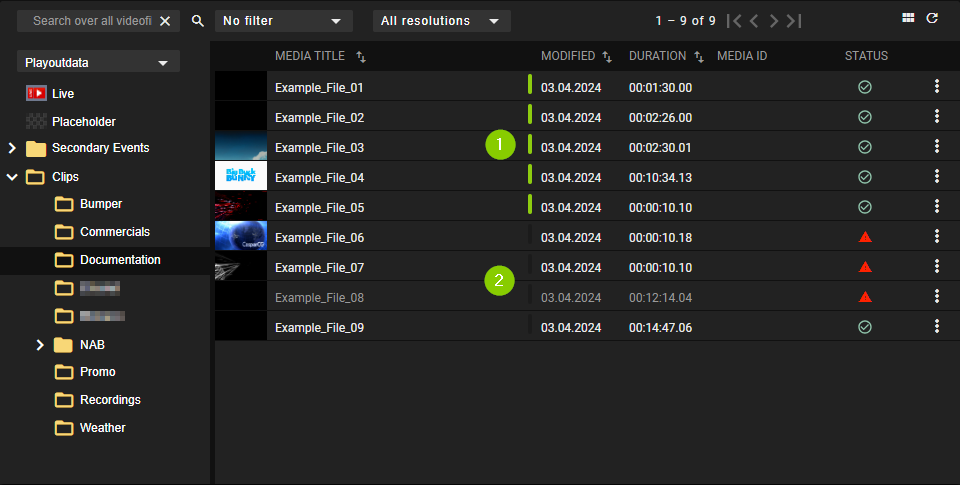
The file transfer status (that indicates if a file is already available on all related playout nodes) is recognizable by colored bars in the media asset list:
 Green bar - the file transfer is completed, the file is already available on the playout nodes
 Black bar - the file is only available on the ingest storage but not available on the playout nodes
A list of all currently running and recent file transfers is available in the Transfer tab.
Notice
The number of file transfers running at the same time is configurable and set by default to five parallel file transfers.
Triggering a file transfer manually
To trigger a file transfer from ingest storage to playout nodes manually, proceed as follows:
-
Select the Media tab or the Transfer tab.
-
In the Source dropdown menu select the ingest storage (usually named Playoutdata).
-
Select a folder that contains a file that is not available on playout nodes (indicated by a black bar to the left of the file modified date).
-
Select the file to be transferred.
-
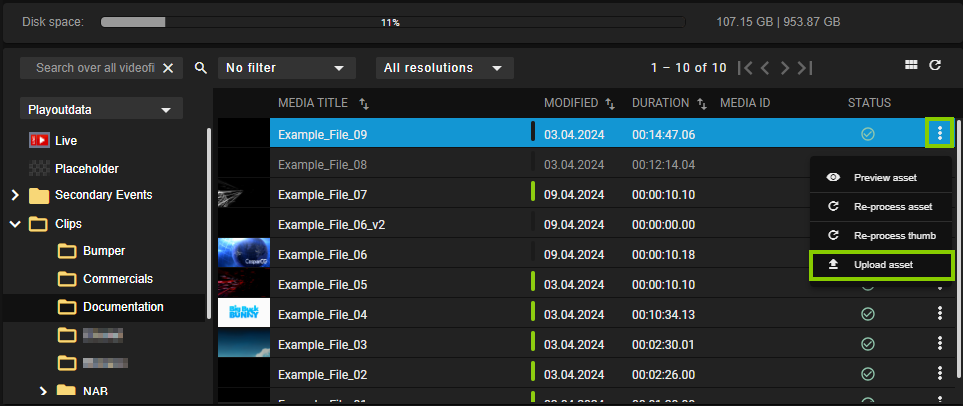
Click the Options icon
 at the right side of the corresponding list item and select Upload asset.
 -
Confirm the dialog by clicking Yes.
The transfer of the selected file starts.
-
Select the Transfer tab to view the file transfer progress.
The file transfer to the playout nodes is completed. This is also indicated by a green bar to the left of the file modified date.
Deleting transferred files manually
Notice
You can only delete files from a playout node, that are not currently used in the rundown.
To manually delete files from a playout node, proceed as follows:
-
Select the Media tab or the Transfer tab.
-
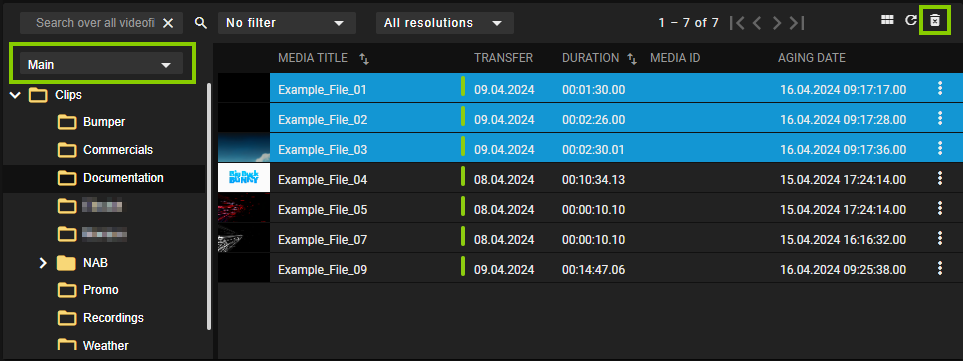
In the Source dropdown menu select the playout node (usually named Main or Backup).
-
Select the folder that contains the files to be deleted.
-
Select one or more files to be deleted.
-
In the toolbar at the top right of the media asset list click the Delete assets icon
 .
. -
Confirm the dialog by clicking Yes.
The selected files are deleted from the playout node storage. This is also indicated by a black bar to the left of the file transfer date.
Searching for and requesting missing media
Via the Missing assets menu, you can search the rundown for missing assets. In addition, you can export and download the missing file list as a CSV file. If Makalu is connected to an external MAM system, you can also request the transfer of missing media files from the MAM storage to the ingest storage.
Makalu distinguishes between the following types of missing assets:
| Type of missing asset | Highlight color in rundown | Description |
|---|---|---|
| Placeholder asset | Yellow | It is expected that the corresponding file is not present yet on the local playout storage |
| File-based asset | Red | The corresponding file is unexpectedly not present on the local playout storage |
To search for missing assets, proceed as follows:
-
Click the Options icon
 above the rundown and select Show missing assets.
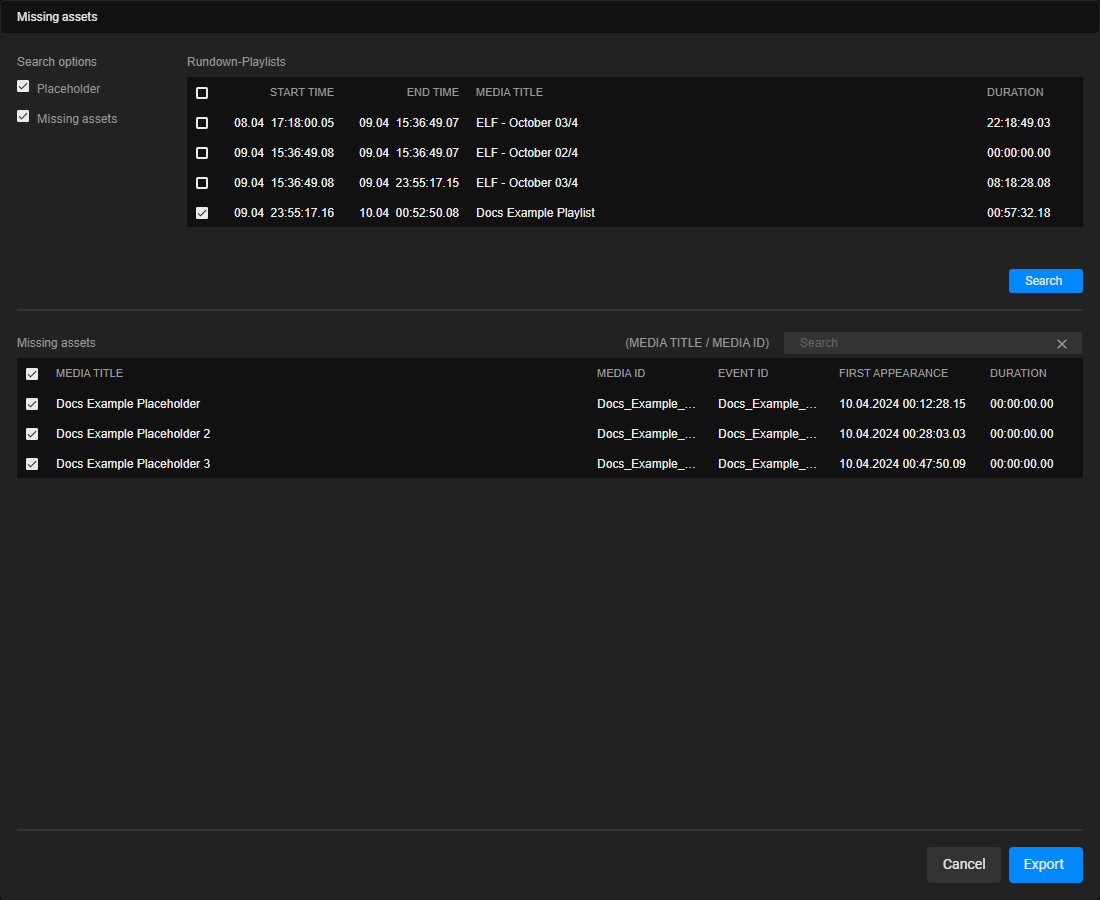
The Missing assets menu opens.
-
Under Search options select if you want to search for Placeholders and/or Missing assets.
-
Under Rundown-Playlists select one or more (if present in the rundown) playlists in which you want to search for missing assets.
-
Click Search.
The search results are listed under Missing assets.
-
(Optional) To search for specific missing assets based on their Media Title or Media ID, use the search field above the result list.
-
(Optional) To export and download the results as a CSV file, select the missing assets to be included and click Export.
-
(Optional) If Makalu is connected to an external MAM system, you can also request the transfer of missing media files from the MAM storage to the ingest storage. To do this, select the assets to be requested in the result list and click Request media.
The selected assets are requested from the connected MAM and are transferred.
File processing
Re-triggering a full file processing
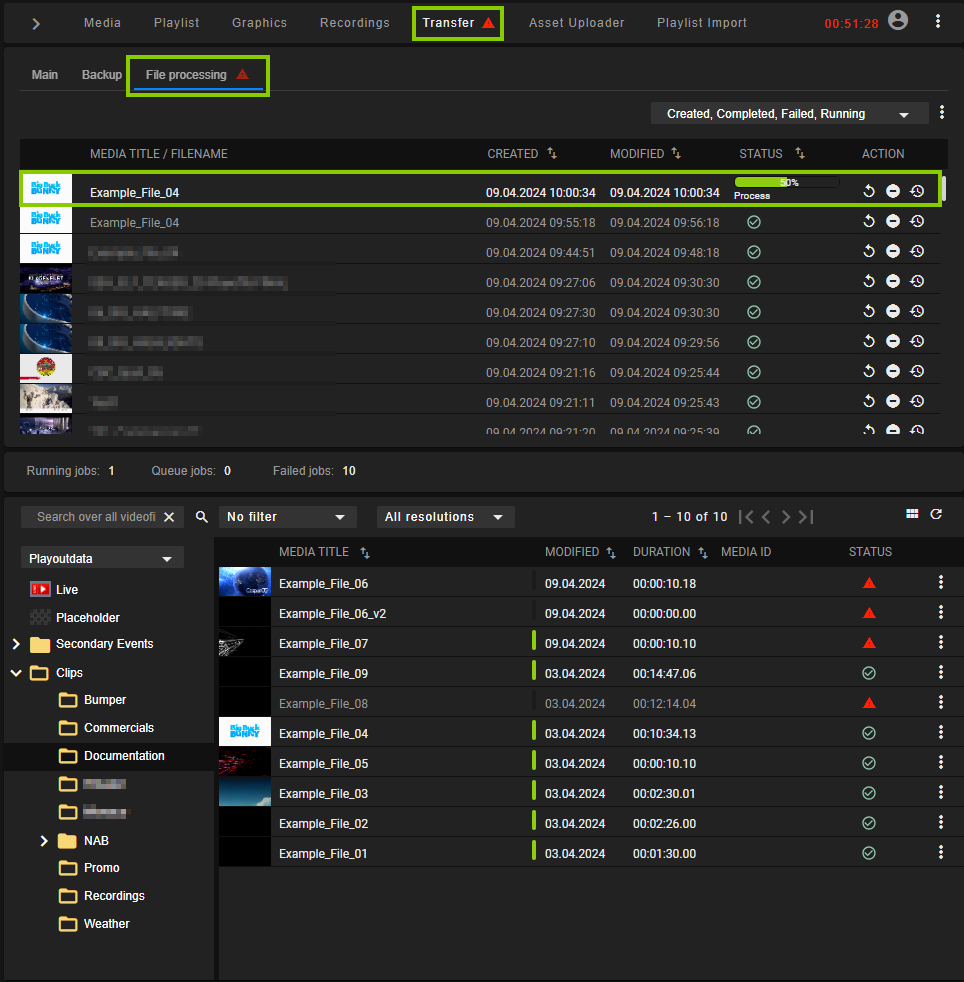
As previously mentioned in section Ingest, the file processing starts automatically when a file is uploaded to the central ingest storage. In some cases, it may be necessary to re-trigger the processing of a file manually. A possible reason could be, for example, if something went wrong during the initial file processing and not all required files (e.g. low-res/proxy video file, checksum, or thumbnail) could be created as expected. In this case, the corresponding media item (in the Media tab) or file processing job (in the Transfer tab under File processing) is marked with an error icon in the Status column. If you hover your mouse over this icon additional error details are displayed.
If you want to re-trigger the full file processing for a specific media asset manually via the Media tab, proceed as follows:
-
On the right side, select the Media tab.
All available media assets are listed in the lower right area.
-
In the media asset list select the media type Clips and the source folder that contains the media asset to be re-processed.
-
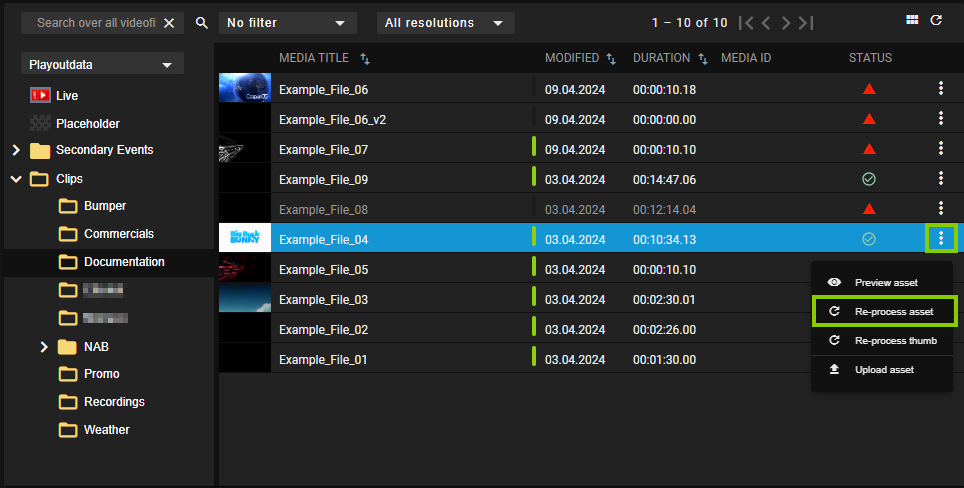
Click the Options icon
 at the right side of the corresponding list item and select Re-process asset.
 -
Confirm the following dialog, by clicking Yes.
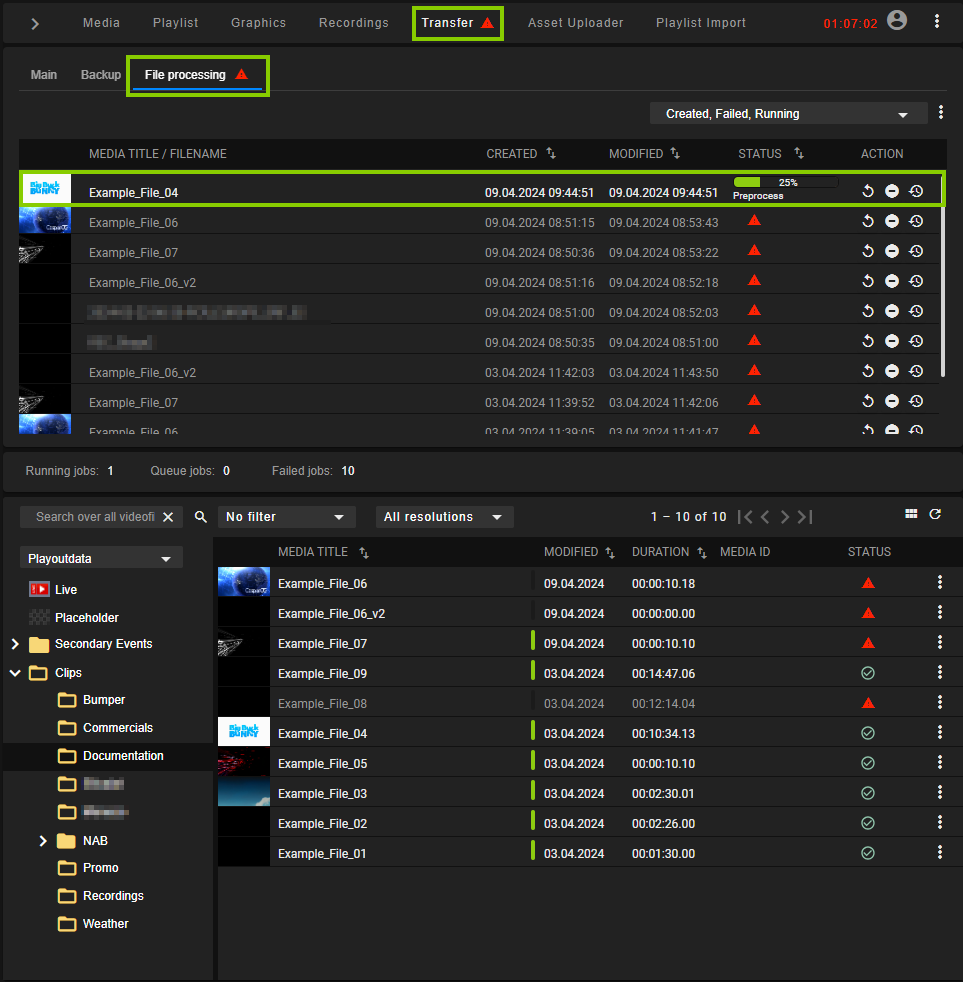
A new file processing job is created for the selected asset. You can view the progress of the processing in the Transfer tab under File processing.
Alternatively, if you want to re-trigger the file processing job manually via the file processing list, proceed as follows:
-
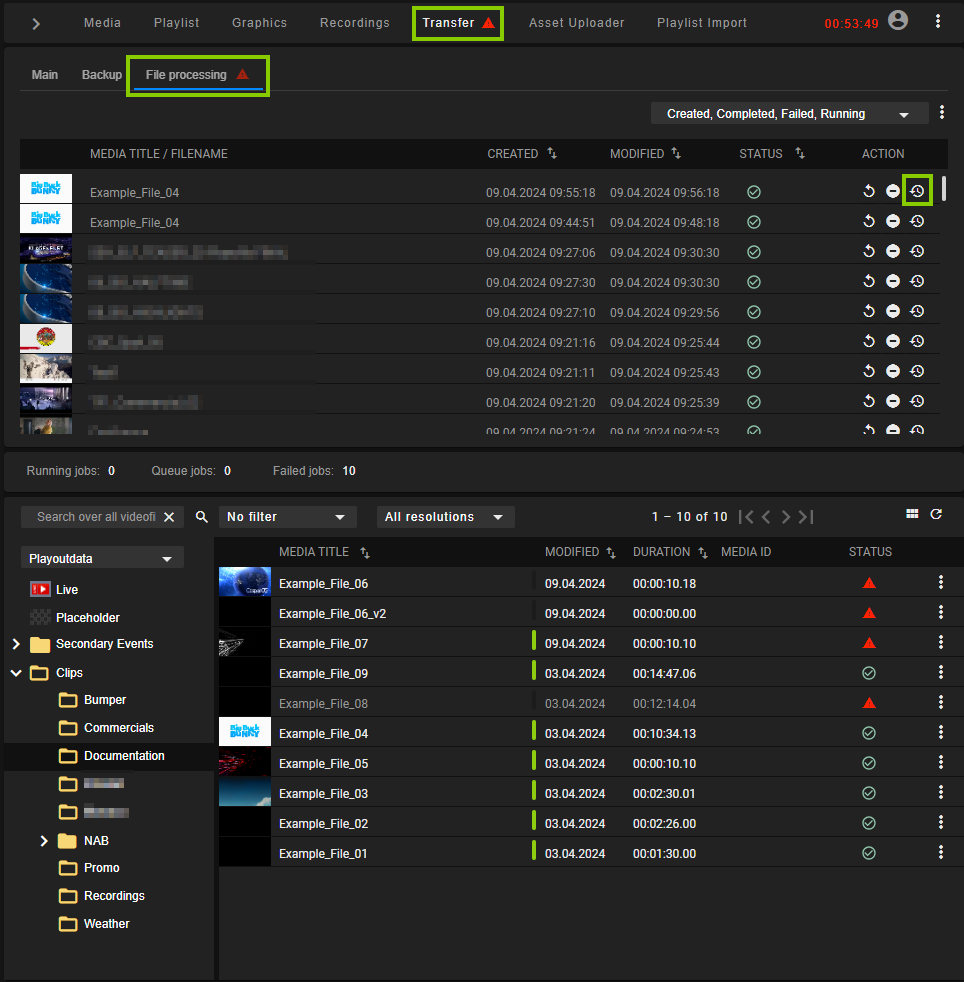
On the right side, select the Transfer tab, and below select File processing.
All file processing jobs that are currently running or were recently finished are displayed below.
-
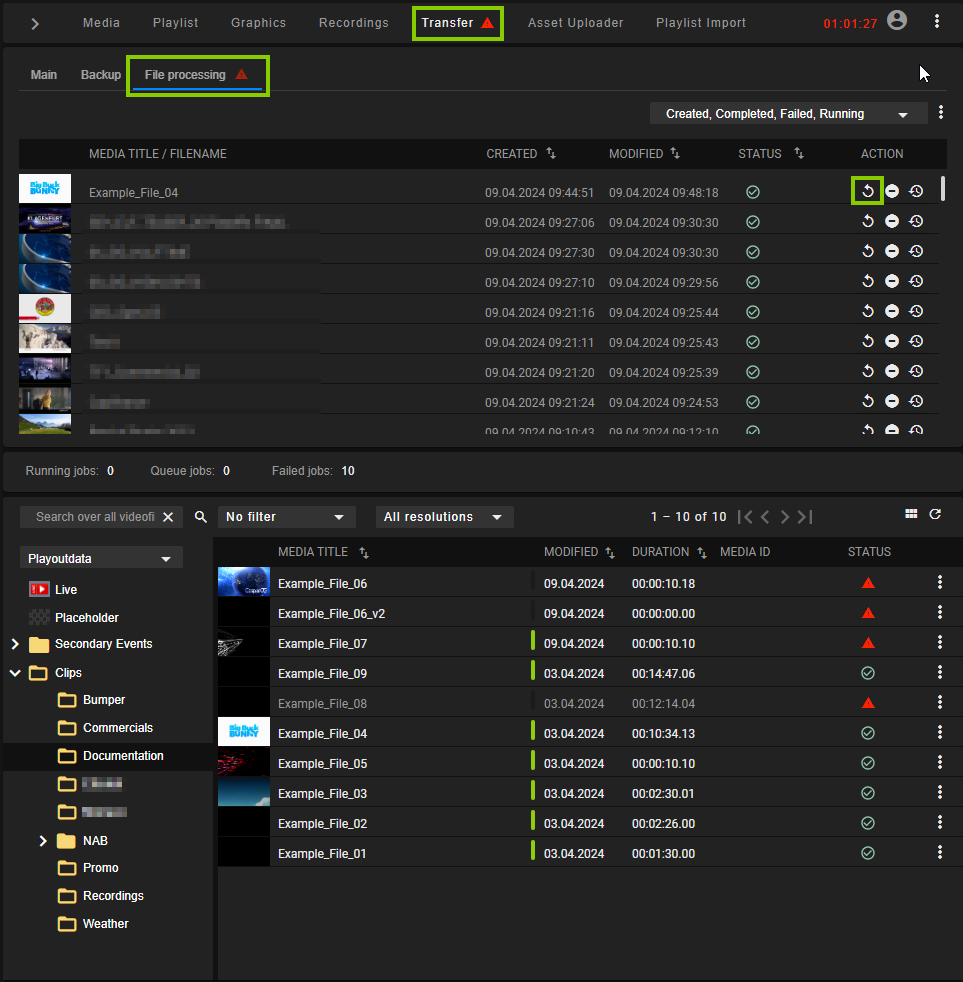
In the file processing list select the job to be re-triggered and in the Action column click the Retry job icon
 .
.
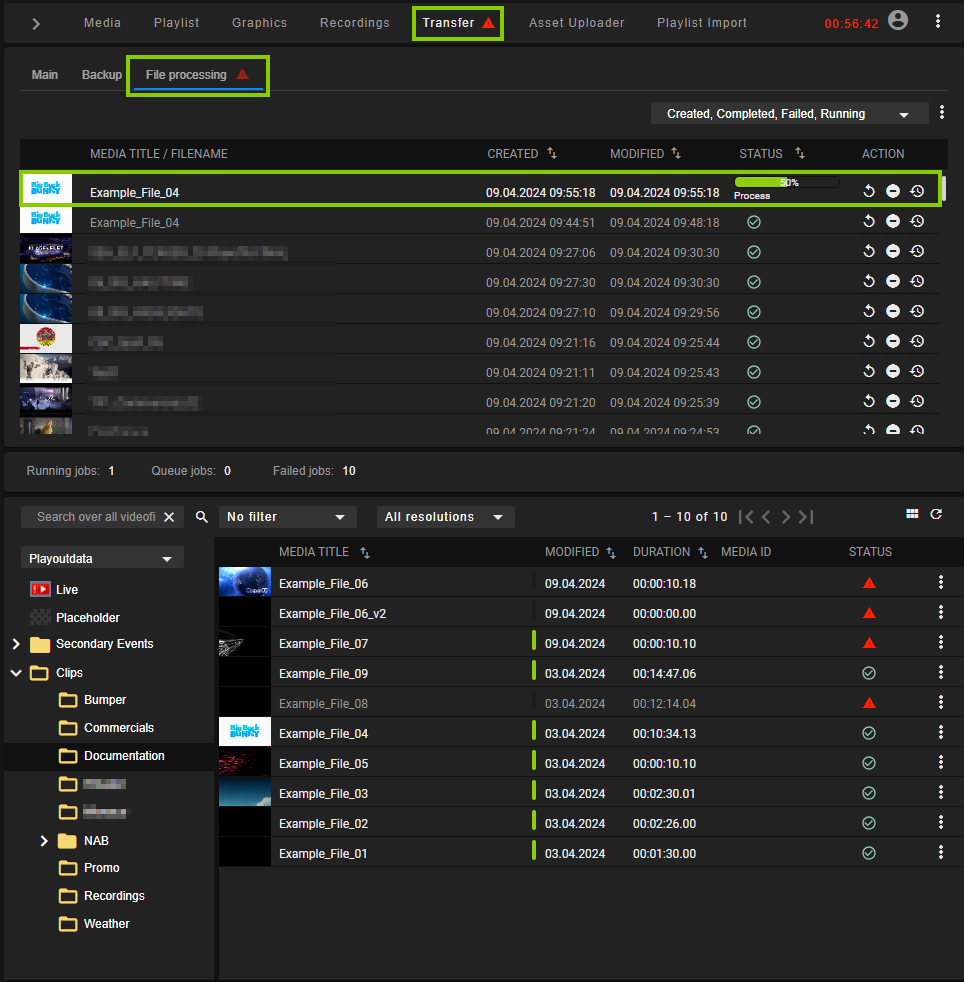
The file processing job is restarted.
Re-triggering a file processing for selected files
Instead of re-triggering the file processing completely, you can also restrict it to selected files.
If you want to re-trigger the file processing for a thumbnail of a specific media asset manually via the Media tab, proceed as follows:
-
On the right side, select the Media tab.
All available media assets are listed in the lower right area.
-
In the media asset list select the media type Clips and the source folder that contains the media asset to be re-processed.
-
Click the Options icon
 at the right side of the corresponding list item and select Re-process thumb.
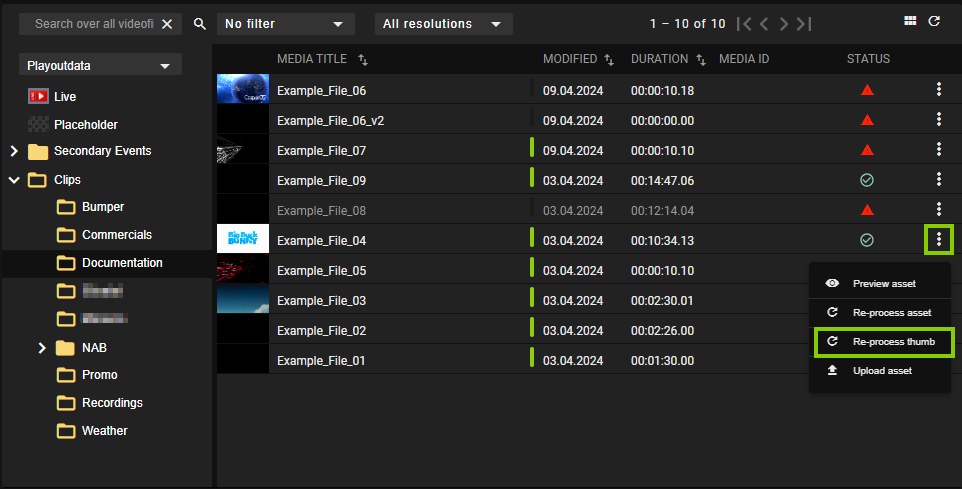
Automation - Re-trigger file processing for thumbnail manually -
Confirm the following dialog, by clicking Yes.
A new file processing job is created for the thumbnail of the selected asset. You can view the progress of the processing in the Transfer tab under File processing.
To re-trigger the file processing for selected file types (checksum, low-res proxy, and/or thumbnail) manually via the file processing list, proceed as follows:
-
On the right side, select the Transfer tab, and below select File processing.
All file processing jobs that are currently running or were recently finished are displayed below.
-
In the file processing list select the job to be re-triggered and in the Action column click the Reprocess job icon
 .
.
Automation - Re-trigger file processing for selected files manually -
In the following dialog select the file types to be re-processed (checksum, low-res proxy, and/or thumbnail).
-
Confirm your selection, by clicking Apply.
The file processing is triggered again for the selected file types.
Importing a playlist
Notice
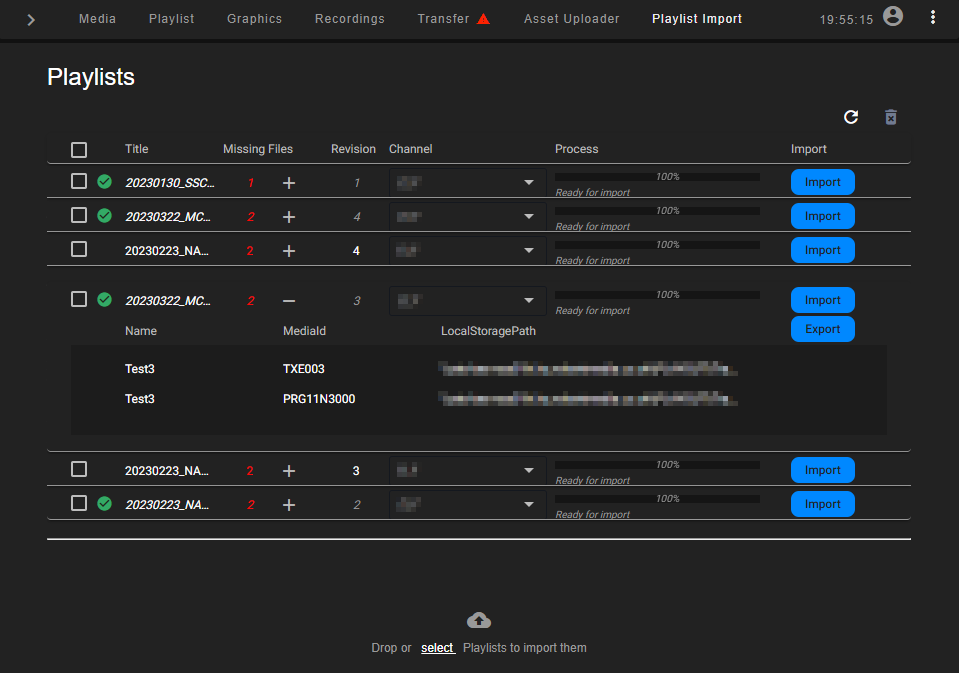
Makalu supports the import of XML-based playlists created by Makalu or by third-party traffic systems. For further information please contact [email protected].
To import a playlist, proceed as follows:
-
Select the Playlist Import tab.
-
To add a playlist, either:
-
drag the playlist file on the drop zone area, or
-
click select and select the playlist file.
-
-
Select the target channel to which the playlist should be assigned.
-
To confirm your selection, click Apply.
-
Click Process.
The content of the playlist file is checked and processed.
-
Click Import.
The playlist is imported.
Creating a placeholder media asset manually
To create a placeholder media asset manually, proceed as follows:
-
Select the Media tab.
The media asset list is displayed at the bottom right.
-
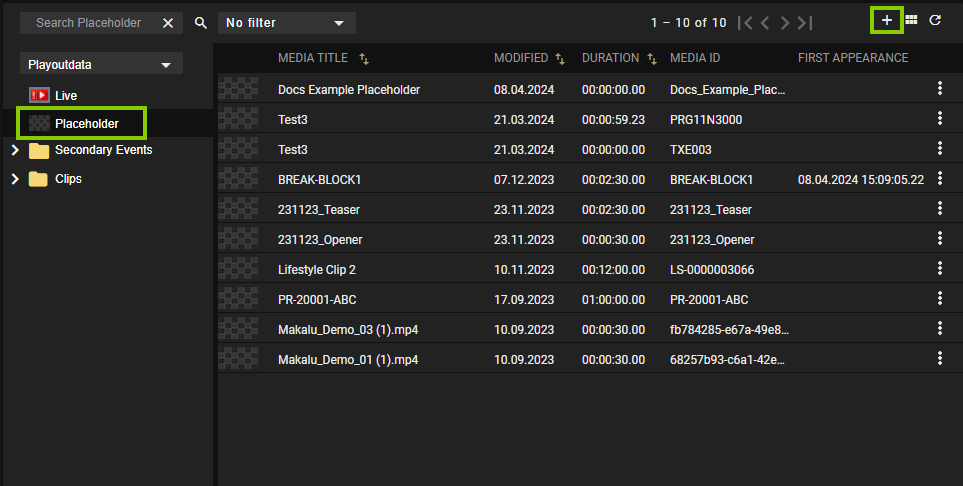
In the media asset list select the asset type Placeholder.
All available placeholder media assets are listed.
-
In the toolbar above the media asset list on the right side click the Create placeholder icon
 .
.
Automation - Create placeholder The Create placeholder dialog opens.
-
Enter the Media Title and Media Id.
-
Select the Folder where the corresponding media file is expected.
-
(Optional) Set the Duration (default: 5 minutes).
-
(Optional) Set the Expiry date (default: one month in the future, based on the current date).
Notice
The Expiry date determines when a media asset/file will be deleted automatically. For more information, see section Housekeeping.
-
Click Apply.
The placeholder media asset is created based on the properties you selected. It is then listed under Placeholder in the media asset list. You can add it to the rundown as described in section Adding elements to the rundown.
Tip
To edit a placeholder media asset, click the Options icon ![]() at the right side of the corresponding list item and select Edit placeholder. Then edit the properties in the Edit placeholder dialog and confirm your changes, by clicking Apply.
at the right side of the corresponding list item and select Edit placeholder. Then edit the properties in the Edit placeholder dialog and confirm your changes, by clicking Apply.
Note that your changes do not automatically affect existing occurrences of the placeholder in the rundown. To apply them, you must add the edited placeholder again to the rundown.
Exporting a missing file list
To export a missing file list, proceed as follows:
-
Select the Playlist Import tab.
-
Click the plus icon of an imported playlist that has missing files.
The missing file list expands, and all missing files are listed.
-
Click Export.
The missing file list is downloaded.
Notice
Missing file lists are exported as CSV files.
Switching the reference player
Notice
This function is only available for redundant channels. Using it only has an effect on the display in the Makalu UI, but not on the output signal of the players.
With redundant channels, the clip status display in the rundown receives its data from the currently selected main or backup playout node. If one of the components involved (for example, Automation API) fails, the clip status data cannot be updated anymore between the player and Makalu UI.
Tip
You can check the current status of all involved components (for example, Automation and VideoServer) via the system health status indicator. In addition, status changes to components (for example, a component goes online/offline) are displayed automatically via corresponding notifications.
In this case, all clips used in the rundown are listed with the status "offline". However, both players (main and backup) can continue to play as long as they still have scheduled program. Rundown and player control commands (for example, Take Next, Cue Next, etc.) are still sent to both players, provided both are accessible.
To get an updated clip status display in this case, you can switch the reference player (either from main to backup or vice versa). To switch the reference player, proceed as follows:
-
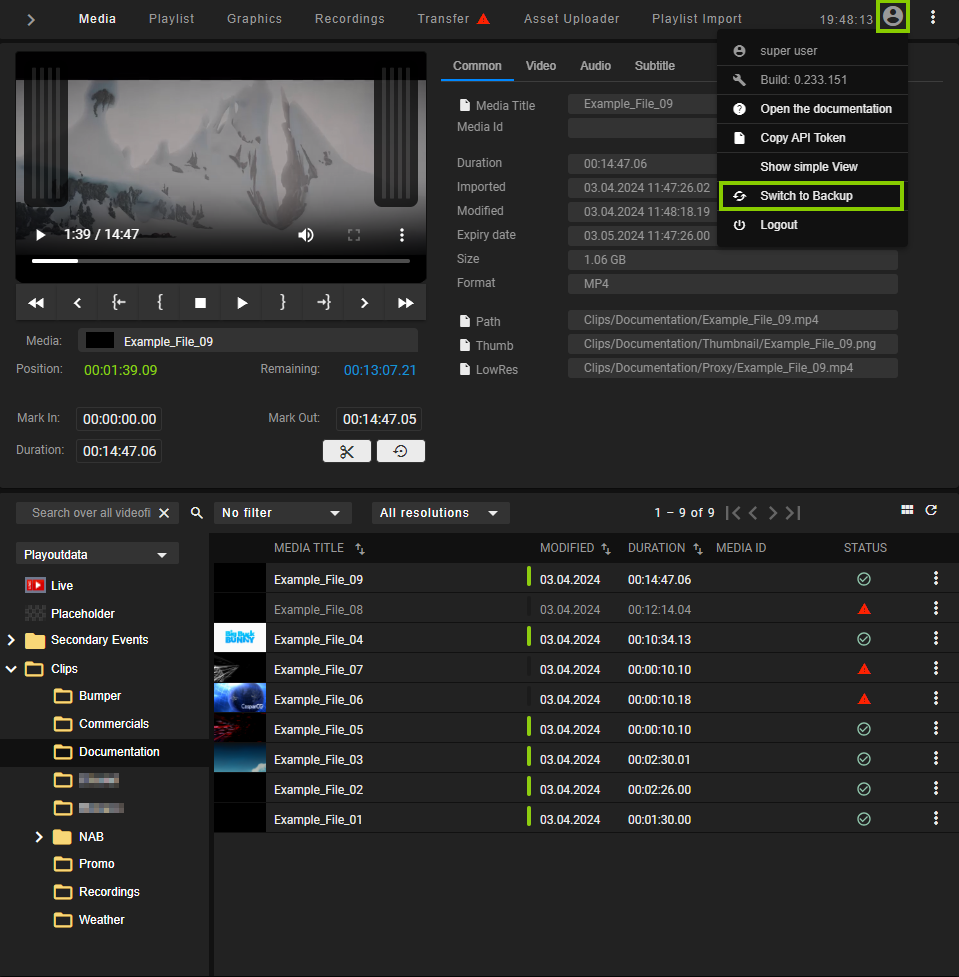
At the top right click the User icon.
-
Depending on the currently selected reference player, either select Switch to Backup or Switch to Main.
-
Confirm your selection, by clicking Yes.
The reference is switched to the selected player and the clip status is updated accordingly.
Restarting the player
Warning
Use the channel restart trigger only in case of an emergency (for example, if a player error occurs).
Restarting the player takes a short amount of time. During this time, no output signal is generated.
To manually restart the player, proceed as follows:
-
Click the menu button to the right of the system health status indicator and select Restart player.
Notice
If the corresponding channel is redundant, the menu provides you with the option to restart the main and backup player separately.
A dialog is displayed that asks you to confirm this action.
-
Confirm the dialog, by clicking Yes.
The player is restarted.
Changing an audio mapping scheme
For information about how to change an audio mapping scheme, see the following sections in chapter Audio mapping:
