Automation
Makalu Automation is the user interface for manually controlling the Makalu playout automation. Depending on the number of playout channels, it includes one or more individually controllable players, running on playout instances.
Each player seamlessly plays the video content of a linear playout channel based on a rundown, that consists of playlists, shows, and clips. The playlists are created via the Makalu Traffic planning component.
Accessing Makalu Automation
To access Makalu Automation, proceed as follows:
-
Open the following URL in your browser:
https://automation.customer-identifier.makalu.live.Notice
Replace
customer-identifierwith your actual customer identifier, e.g.exampletv. -
Log in with your Makalu credentials.
The channel status overview is opened.
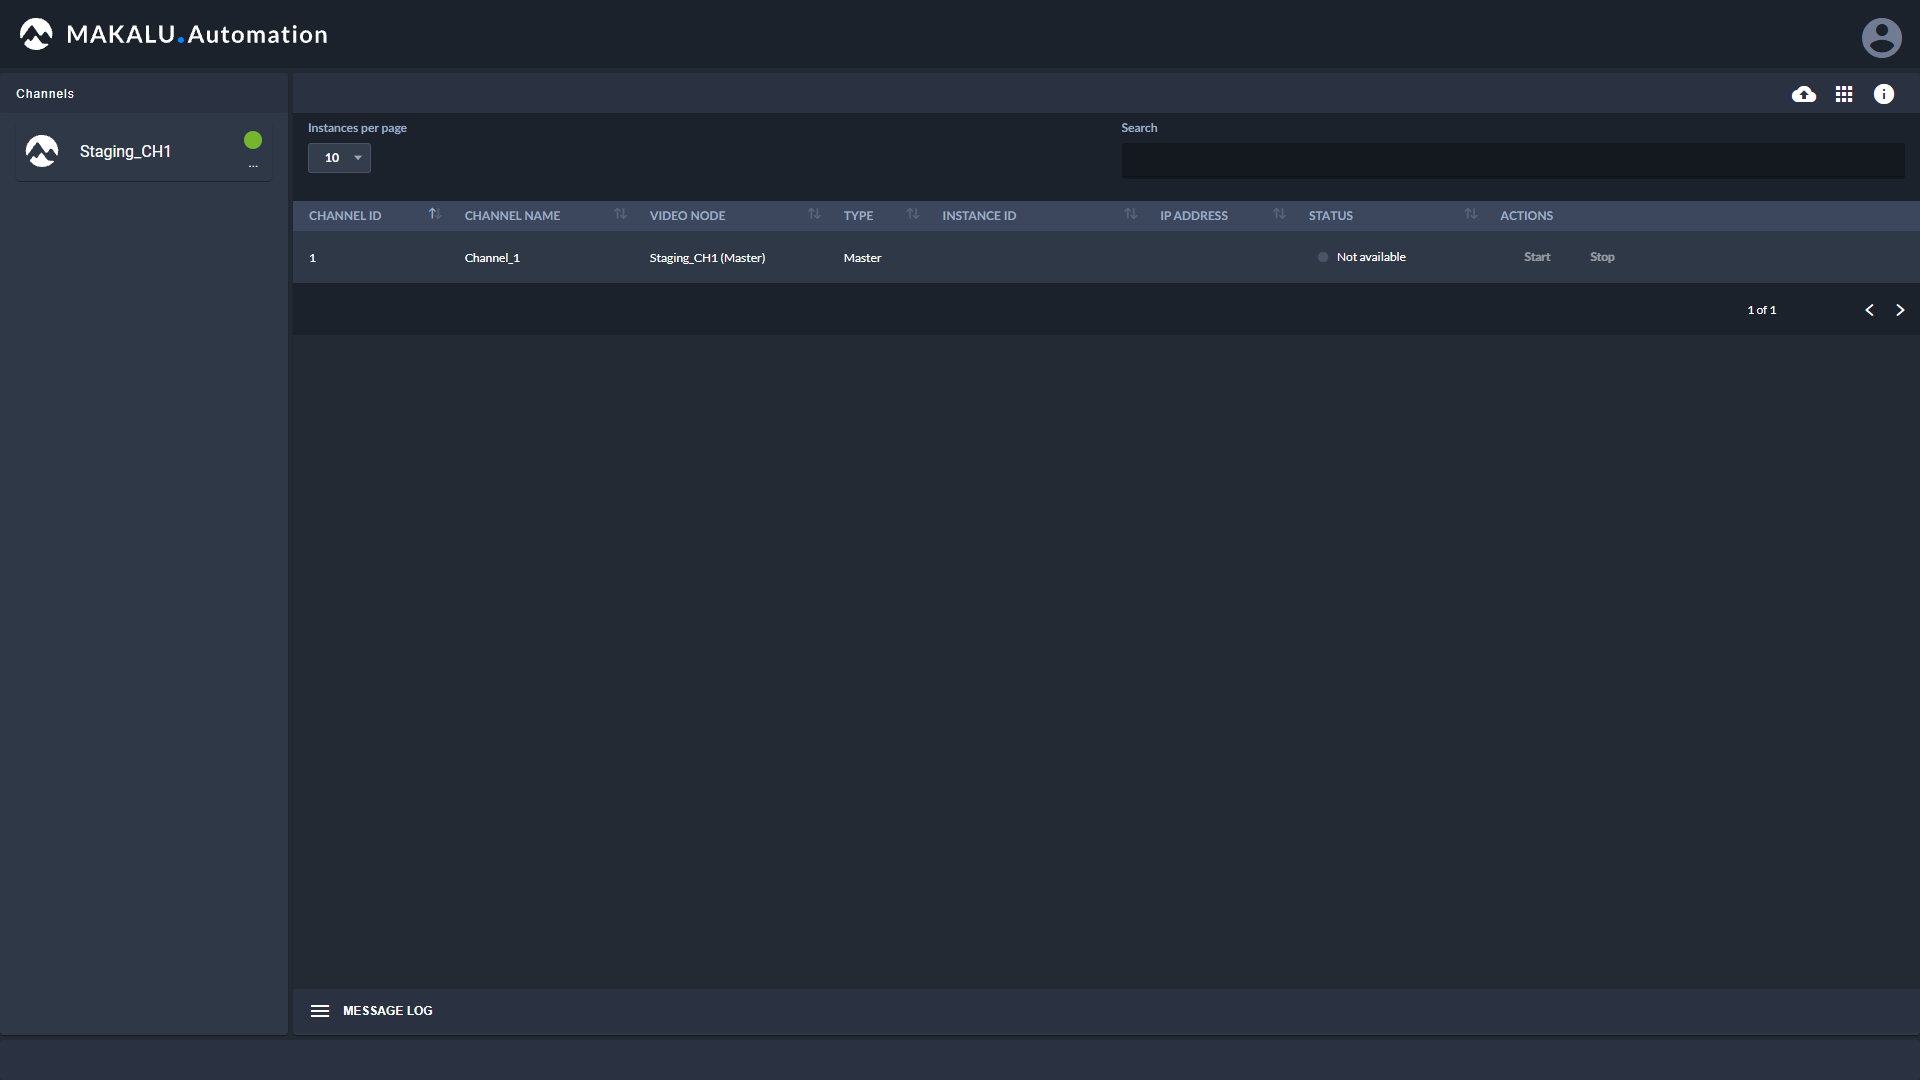
Figure: Makalu Automation - Channel status overview
-
In the Channels sidebar on the left select a channel.
Notice
You can only select channels that are online. Online channels are highlighted with a green circle icon. Offline channels are highlighted with a red circle icon.
The Makalu Automation user interface for the selected channel is opened.
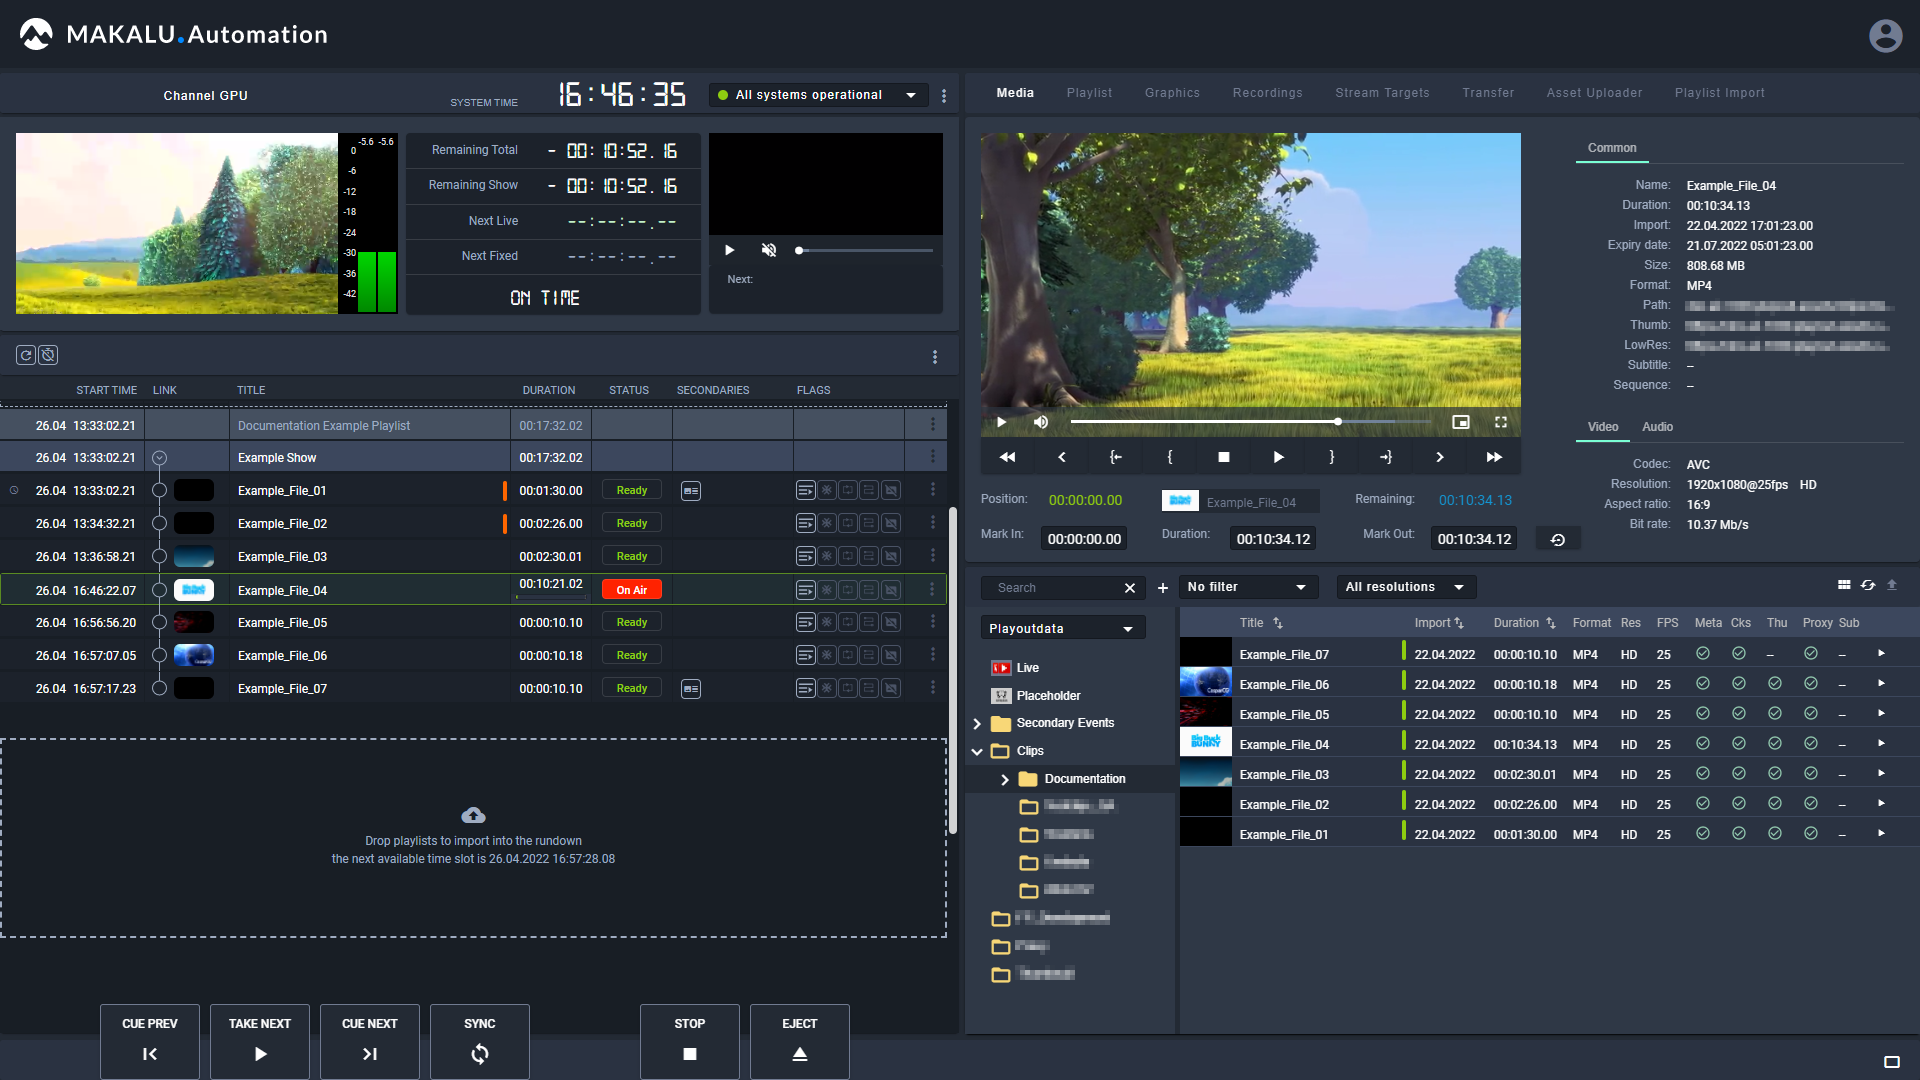
Figure: Makalu Automation user interface
Tip
From the Makalu Automation user interface you can go back to the channel status overview, by clicking the white Makalu logo in the top left corner.
Starting and stopping a channel
Notice
Each playout instance can be started or stopped individually when deployed on AWS.
Warning
If you stop a channel, the corresponding playout instance is shut down and distribution targets configured for this channel will not receive any content.
Depending on the system configuration, in Makalu Automation each playout instance can individually be started or stopped. To do this, open the channel status overview like described in section Accessing Makalu Automation and proceed as follows:
To start a playout instance, in the status list click Start for the channel to be started.
To stop a playout instance, in the status list click Stop for the channel to be stopped.
Makalu Automation user interface overview
The main user interface consists of the following elements:
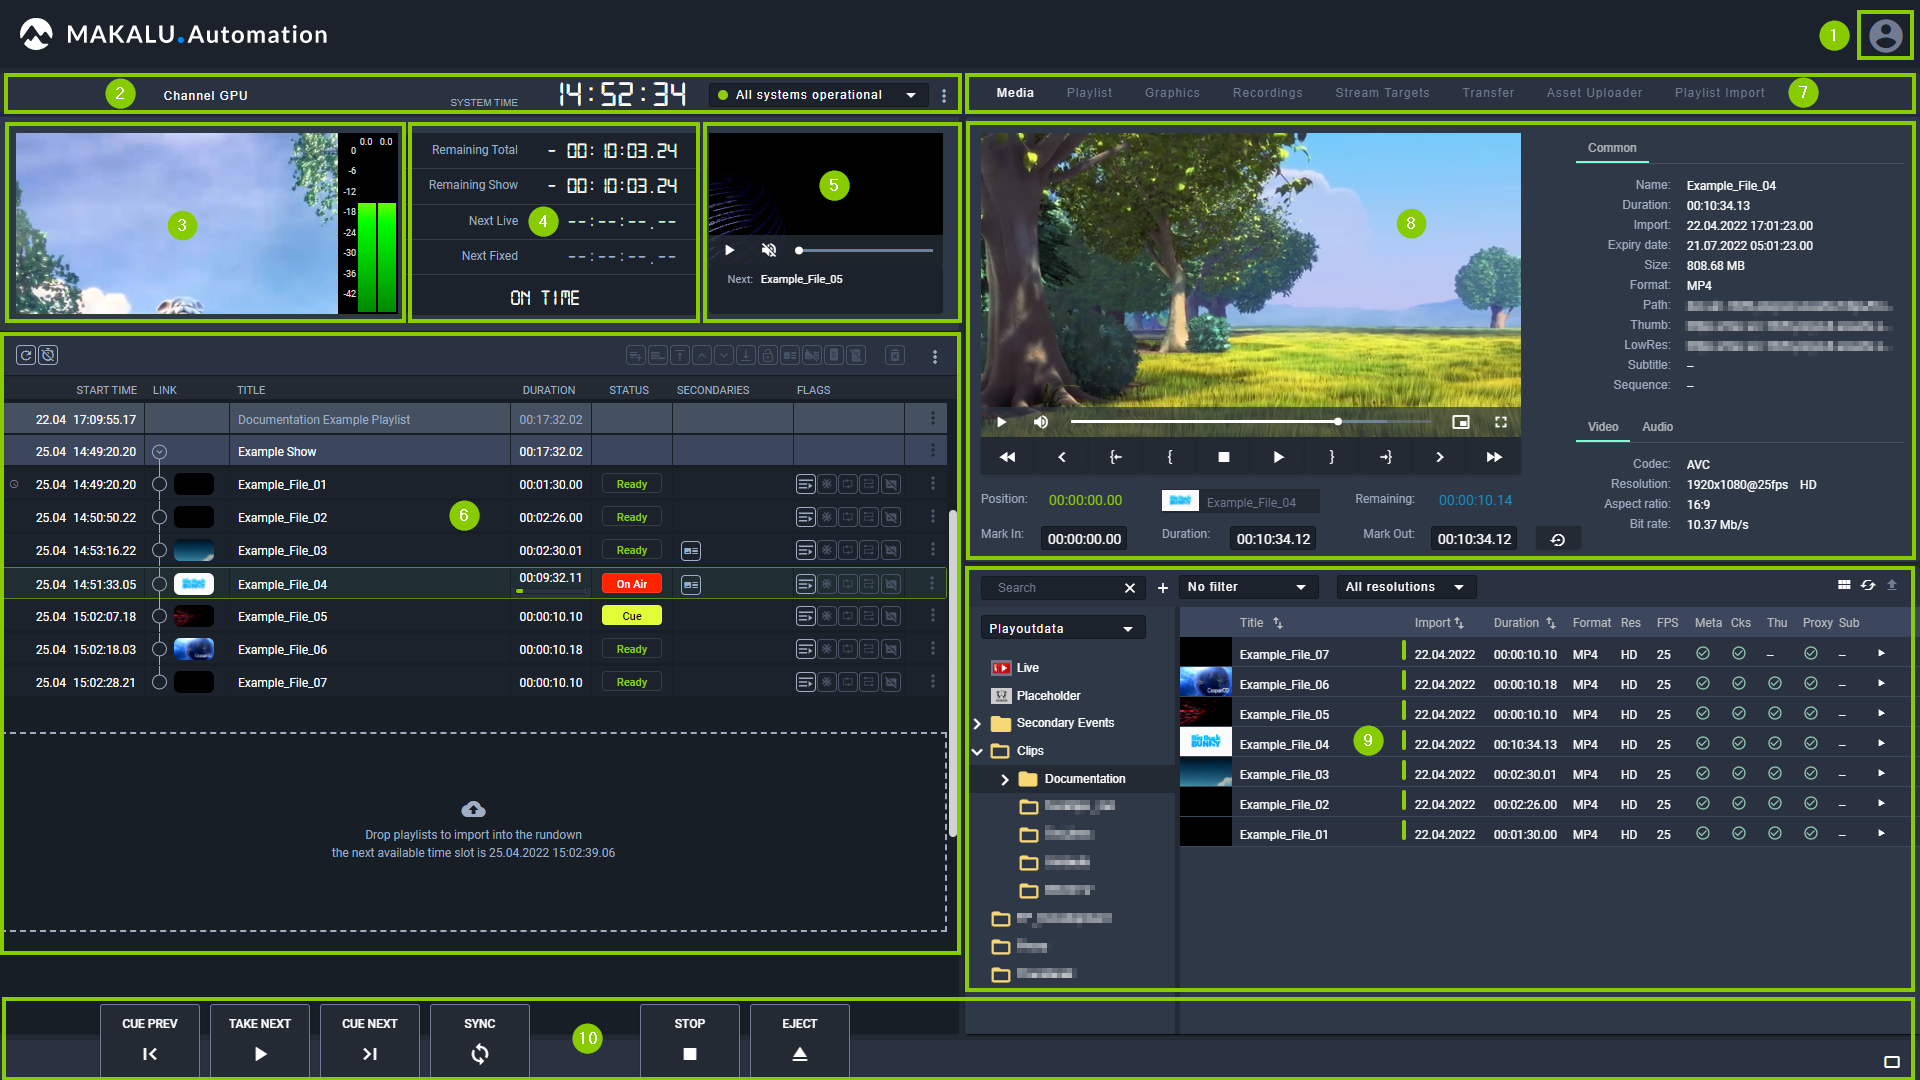
Figure: Makalu Automation - User interface
-
User account settings
-
Channel/system information
-
Channel preview including peak audio meter
-
Time-related rundown information
-
Next clip information and preview
-
Channel rundown
-
Navigation tabs for accessing the areas media, playlist, graphics, recordings, stream targets, transfer, Asset Uploader and playlist import
-
Media asset preview and information (content varies depending on the selected navigation tab)
-
Media asset list (content varies depending on the selected navigation tab)
-
Rundown and player controls
Channel/system information
This area includes the following information:
- Channel name
- System time
- System health status
The system time displays the local time based on the time zone that is configured for the channel.
The system health status indicator displays the current operating status of the most important internal system components (e.g. connection to backend components and player status).

Figure: System status indicator
To display a list of individual components, click the system status indicator.
A green indicator means that the component runs normally, while a red indicator means that it has an error.
The menu button to the right of the system health status ![]() provides access to the following channel actions:
provides access to the following channel actions:
| Action | Purpose |
|---|---|
| Restart player | Restart the player Warning: Restart the player only in case of an emergency (e.g. if a player error occurs). Restarting the player takes a short amount of time. During this time no output signal is generated. |
| Show preview | Enable/disable the preview player |
| Restart preview | Restart the preview component Notice: Manually restarting the preview is only necessary in case of an audio or video error. |
| Delete graphics | Remove all currently displayed graphics secondary events Notice: Manually deleting graphics is only necessary if graphics are not automatically removed as expected. |
Channel preview

Figure: Makalu Automation - Channel preview
The channel preview displays a low-res version of the current player output in real-time.
It also includes a peak audio meter that indicates the current audio signal level of the channel preview.
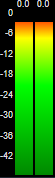
Figure: Makalu Automation - Peak audio meter
Tip
If you want to use a rundown-focused view you can hide this area by selecting User account settings > Show simple view. As a result the rundown list is extended to the full height of the left side.
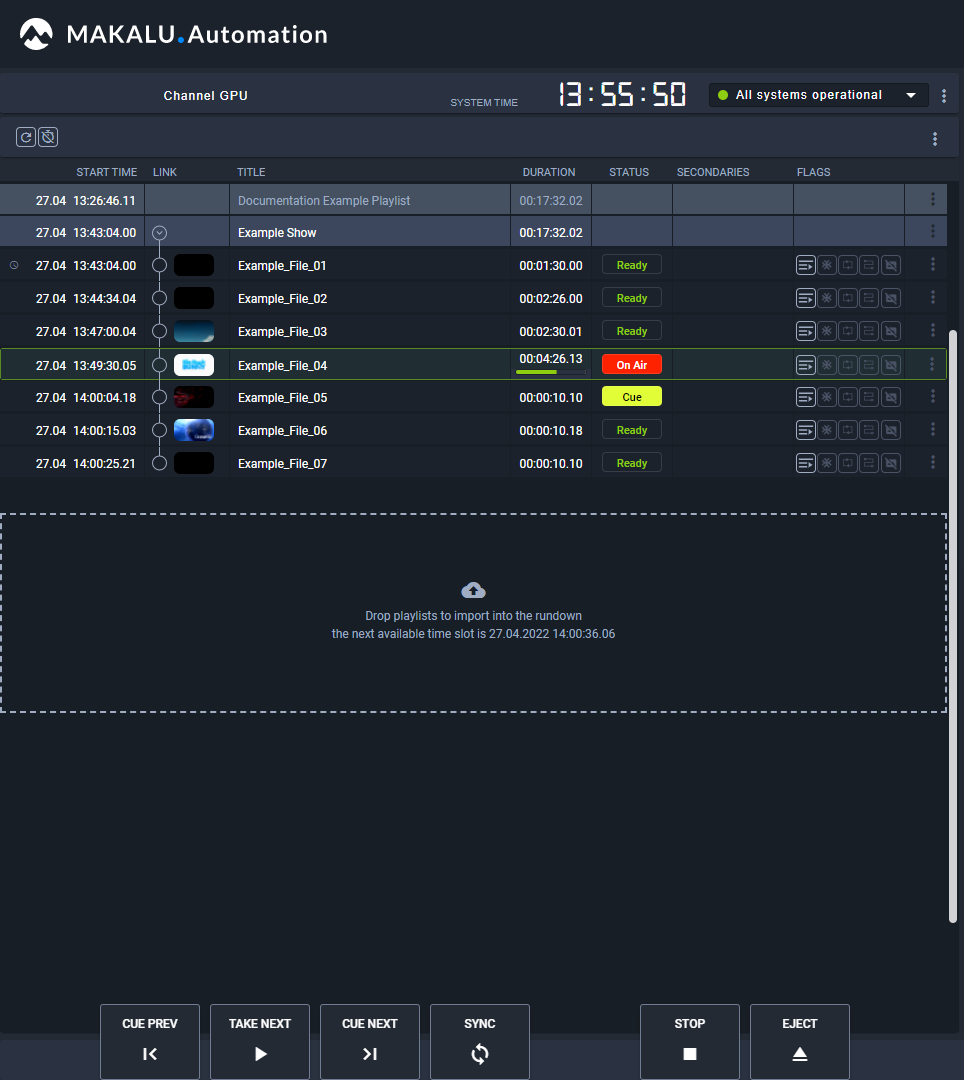
Figure: Makalu Automation - Rundown simple view
Time-related rundown information
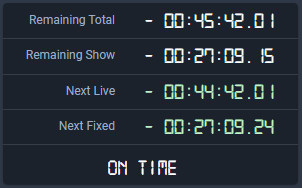
Figure: Makalu Automation - Time-related rundown information
This area provides the following information:
| Element | Description |
|---|---|
| Remaining Total |
|
| Remaining Show |
|
| Next Live |
|
| Next Fixed | Remaining time until the next element in the rundown with a fixed start time |
| Overtime / Undertime |
|
Tip
If you want to use a rundown-focused view you can hide this area by selecting User account settings > Show simple view. As a result the rundown list is extended to the full height of the left side.
Next clip information and preview
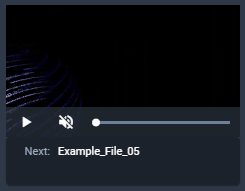
Figure: Makalu Automation - Next clip information and preview
This area provides a preview for the next cued clip. It can be used to preview file-based and live clips.
Tip
If you want to use a rundown-focused view you can hide this area by selecting User account settings > Show simple view. As a result the rundown list is extended to the full height of the left side.
Channel rundown
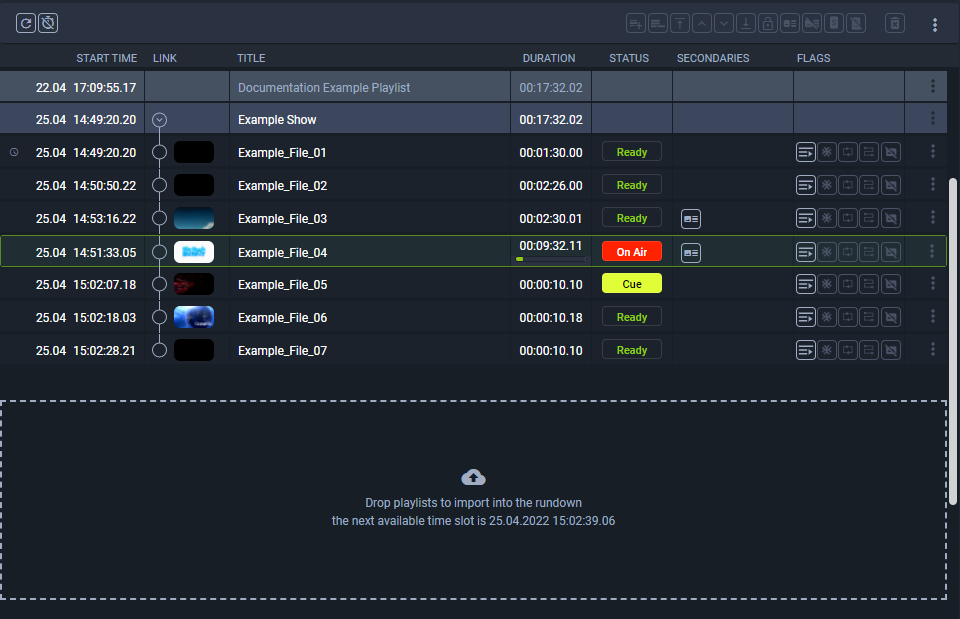
Figure: Makalu Automation - Channel rundown
This area contains the rundown of the current channel. The rundown list contains all playlists, shows, and clips that are scheduled for playout. In this list each playlist and show can be expanded and collapsed. If a clip has assigned secondary events (e.g. graphics), it can also be expanded and closed, and the corresponding secondary events are listed.
Depending on the type of the currently selected element in the rundown, the toolbar at the top contains the following elements:
| Icon/Element | Description |
|---|---|
| Reload rundown | |
| Automatically expand rundown and jump to current on air clip every 15 seconds (click to deactivate) | |
| Group selected clips | |
| Ungroup selected clips | |
| Move selected clip to the top (set it as first clip of the show) | |
| Move selected clip one position up | |
| Move selected clip one position down | |
| Move selected clip to the bottom (set it as last clip of the show) | |
| Remove fixed scheduled start time from selected element | |
| Add default graphic to selected playlist, show or clip | |
| Delete default graphic from selected playlist, show or clip | |
| Add splicing event to selected clip | |
| Delete splicing event from selected clip | |
| Delete selected playlist or clip | |
| Access additional actions Depending on the selected element available actions are:
|
The actual rundown list includes the following information:
| Column | Description |
|---|---|
| Clock icon | Configure a fixed start time of a show/first clip of a show Depending on whether a fixed time is set or not, the clock icon is displayed as follows:
|
| Start Time | Scheduled/actual start date and time of a playlist, show or clip |
| Link | Distinguish playlists, shows and clips, expand/collapse shows, display clip thumbnail The different types of elements are marked as follows:
|
| Title | Name of the playlist, show or clip, indicator for grouped clips Notice: Grouped clips are highlighted with an orange indicator |
| Duration | Total playlist, show, clip duration and remaining time of show/clip currently playing |
| Status | Clip status, possible values:
| Secondaries | Indicates if there are secondary events assigned to the show or clip Tip: To expand/collapse the list of assigned secondary events, click the secondaries icon Notice: If a clip has an assigned splicing event it is marked with an "S" icon |
| Flags | Clip flags that define how each clip should be played |
| Access additional actions Depending on the selected element available actions are:
|
Secondary events assigned to a clip are listed with the following information:
| Column | Description |
|---|---|
| Start-Offset | Offset until the secondary event is triggered (based on the start of the corresponding clip) |
| Type | Type of the secondary event (e.g. Singular.Live graphics, Splicing, Script) |
| Title | Title of the secondary event |
| Duration | Duration of the secondary event |
| Flags | Delete button for removing the secondary event from the clip |
Rundown and player controls

Figure: Makalu Automation - Rundown and player controls
The rundown and player controls provide the following actions:
| Action | Description |
|---|---|
| Cue Prev | Prepare the previous clip for playback |
| Take Next | Start the playback of the currently prepared/cued clip |
| Cue Next | Either prepare the first clip in the rundown for playback (if no clip is currently cued) or prepare the next clip after the currently cued clip for playback |
| Sync | Synchronize rundown and player Notice: This action should only be used in case of an error, if rundown and player are not synchronized as expected. |
| Stop | Stop the playback of the clip currently playing |
| Eject | Stop playback and eject player (set to idle) |
Notice
The control buttons on the left side are always displayed by default. The buttons on the right side can be manually displayed or hidden. If these buttons are not displayed, you can display them by clicking the Show controls icon ![]() at the bottom right of the screen. To hide these buttons, click the Hide controls icon
at the bottom right of the screen. To hide these buttons, click the Hide controls icon ![]() at the bottom right of the screen.
at the bottom right of the screen.
Media
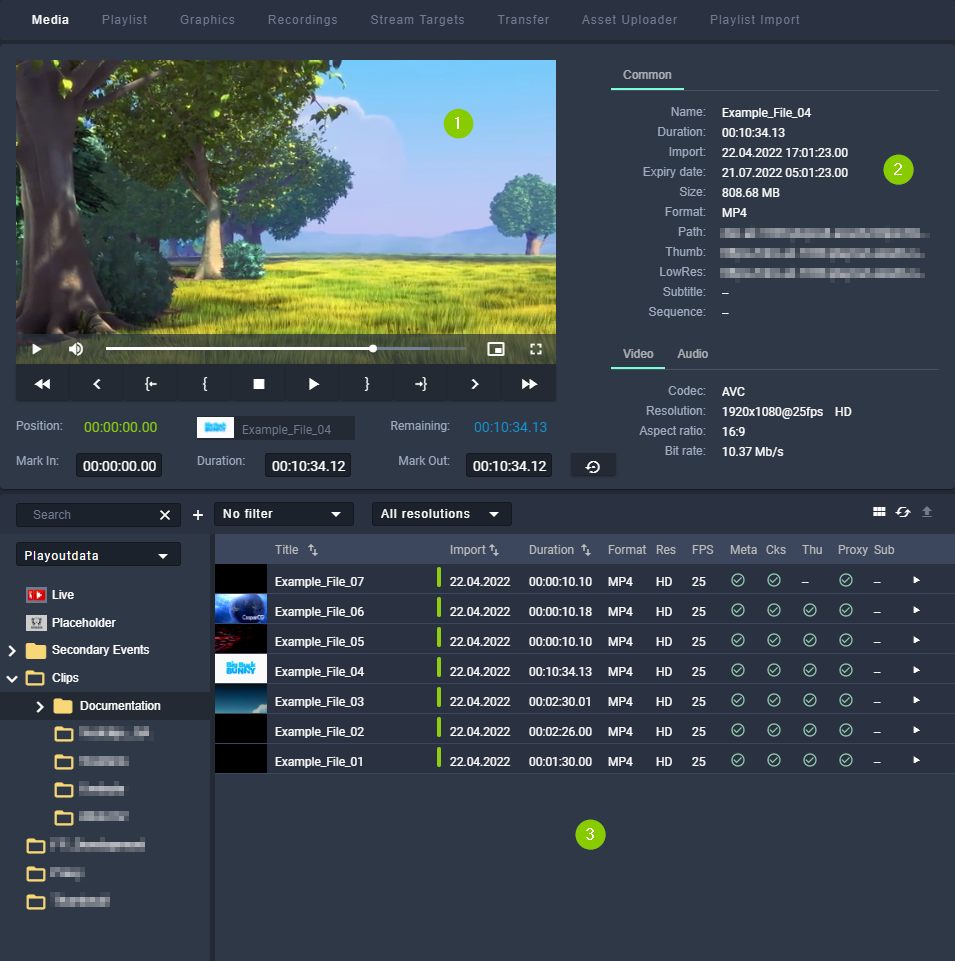
Figure: Makalu Automation - Asset list and preview
The Media tab contains the following elements:
-
Media asset preview
-
Media asset metadata
-
Media asset list
The preview player provides the following controls:
| Icon | Description |
|---|---|
| Fast rewind | |
| Previous frame | |
| Jump to mark in | |
| Set mark in | |
| Stop | |
| Play | |
| Set mark out | |
| Jump to mark out | |
| Next frame | |
| Fast forward |
Below the player controls the following time-related information of the file currently being previewed is displayed:

Figure: Makalu Automation - Preview (time-related information)
- Position - Current playback timecode
- Thumbnail with file name - Draggable element for adding the file (as clip) to a show in the rundown, including the mark in and mark out timecodes
- Remaining - Remaining duration
- Mark In - Mark in timecode
- Duration - Total duration
- Mark Out - Mark out timecode
- Reset - Reset mark in and mark out
To the right of the player window, the metadata of the file currently being previewed is listed. This section is divided into Common, Video and Audio metadata.
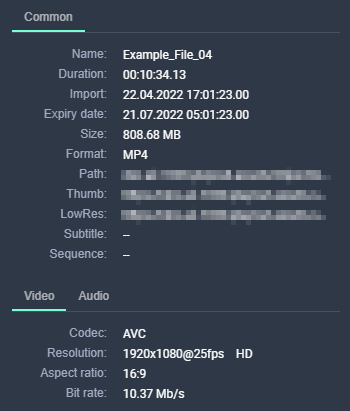
Figure: Makalu Automation - File metadata
Below the preview player and the time-related information the media asset list is displayed. Depending on the selected entry in the Source dropdown menu, this section either lists all files available on the ingest storage or on the playout instances that are assigned to the currently selected channel.
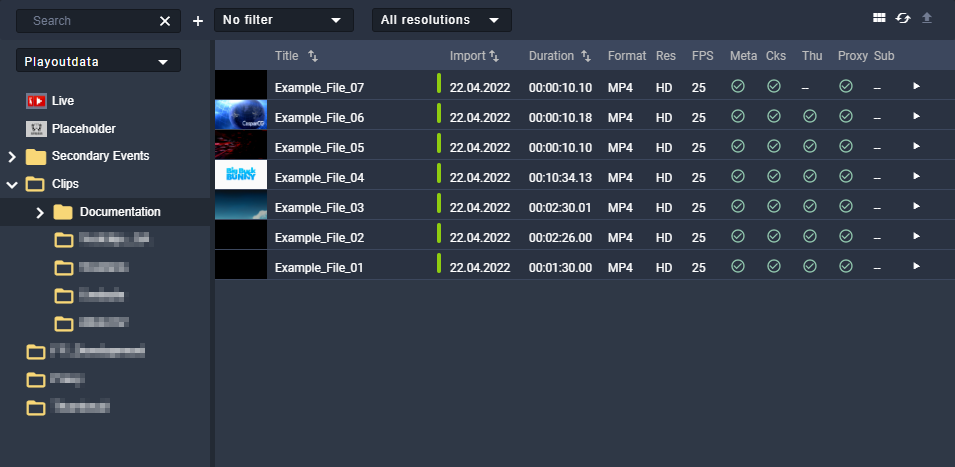
Figure: Makalu Automation - Media asset list
The toolbar of the media asset list contains the following elements:
| Icon/Element | Name | Description |
|---|---|---|
 | Select source | The source of the media assets to be displayed in the media asset list Available options are:
|
 | Title filter | Search media assets based on their title Tip: You can chain multiple search terms. Each time you press [Enter] the current term is added to the current custom search. All currently used terms are listed below the search field:  You can also create multiple reusable custom searches by clicking the plus icon to the right of the search field:  |
 | Live source filter | Filter the available live sources based on their type (only available if asset type Live is selected) Available options are:
|
 | Time filter | Filter the displayed media assets based on the date they were imported into the system Available options are:
|
 | Resolution filter | Filter the displayed media assets based on their resolution Available options are:
|
 | View switch | Switch between table view (default) and grid view |
 | Reload assets | Refresh the media asset list |
 | Upload assets | Trigger a file transfer from the ingest storage to a playout instance storage (only available if the ingest storage is selected as source), see section File transfer for more information |
 | Upload assets again | Re-trigger a file transfer from the ingest storage to a playout instance storage (only available if the playout storage is selected as source), see section File transfer for more information |
 | Delete assets | Delete selected assets (only available if a playout instance storage is selected as source) |
Playlist
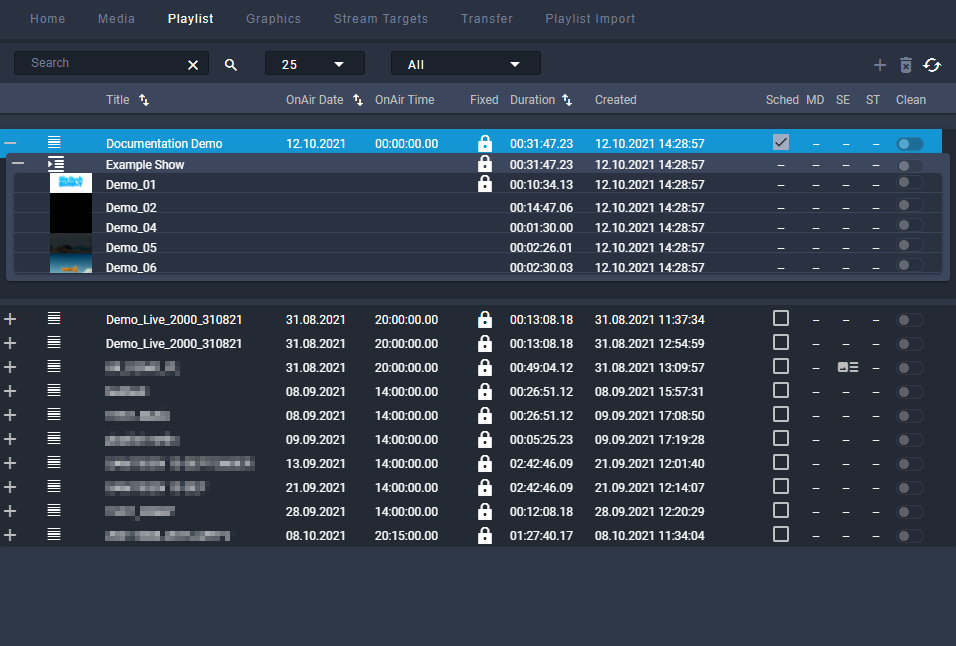
Figure: Makalu Automation - Playlist
The Playlist tab contains all available playlists of the current channel. Each playlist can be expanded to list all included components (shows, clips, secondary events, and metadata). See section Schedule for information about how to create playlists.
The toolbar at the top contains the following elements:
| Element/Icon | Description |
|---|---|
 | Search a playlist by title |
 | Number of playlists to display |
 | Filter the displayed playlists based on their scheduled on air time Available options:
|
| Add the selected playlist to the rundown The position/time where the playlist is added to the rundown depends on the following:
| |
| Delete the selected playlist | |
| Reload the list of available playlists |
Graphics
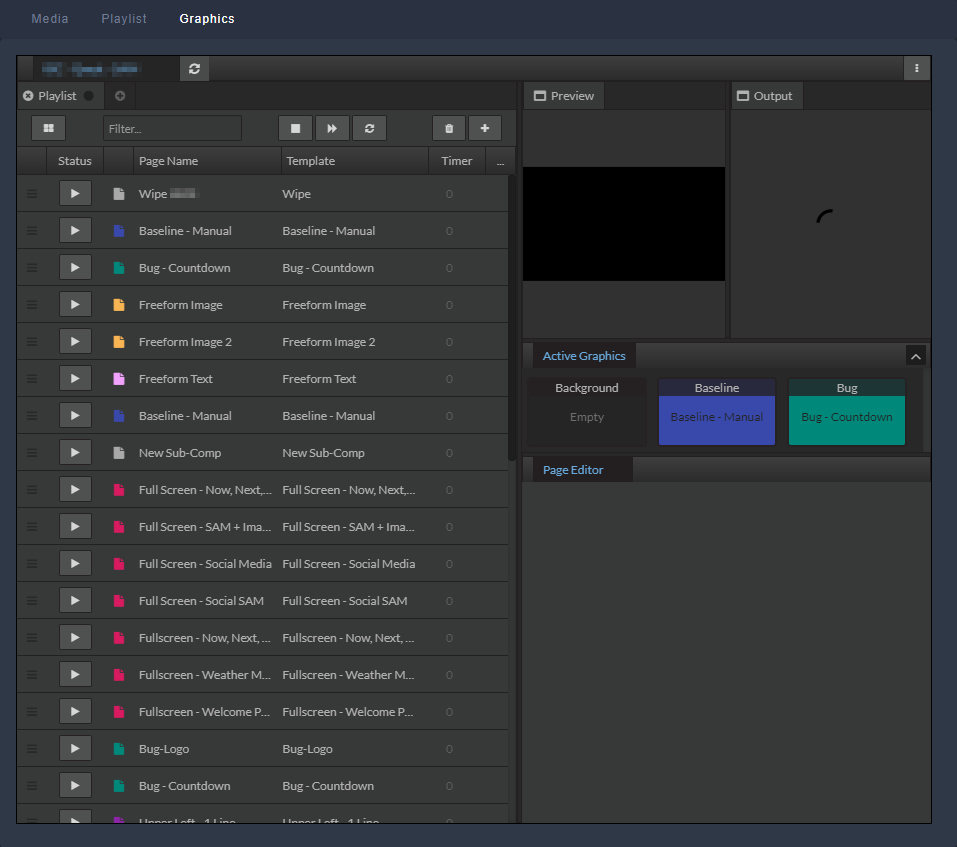
Figure: Makalu Automation - Singular.Live graphics dashboard
The Graphics tab includes an embedded version of the Singular.Live composition dashboard, allowing you to manually trigger Singular.Live graphics for the current channel directly from within Makalu Automation.
For more information about how to use graphics, see the Graphics section.
Recordings
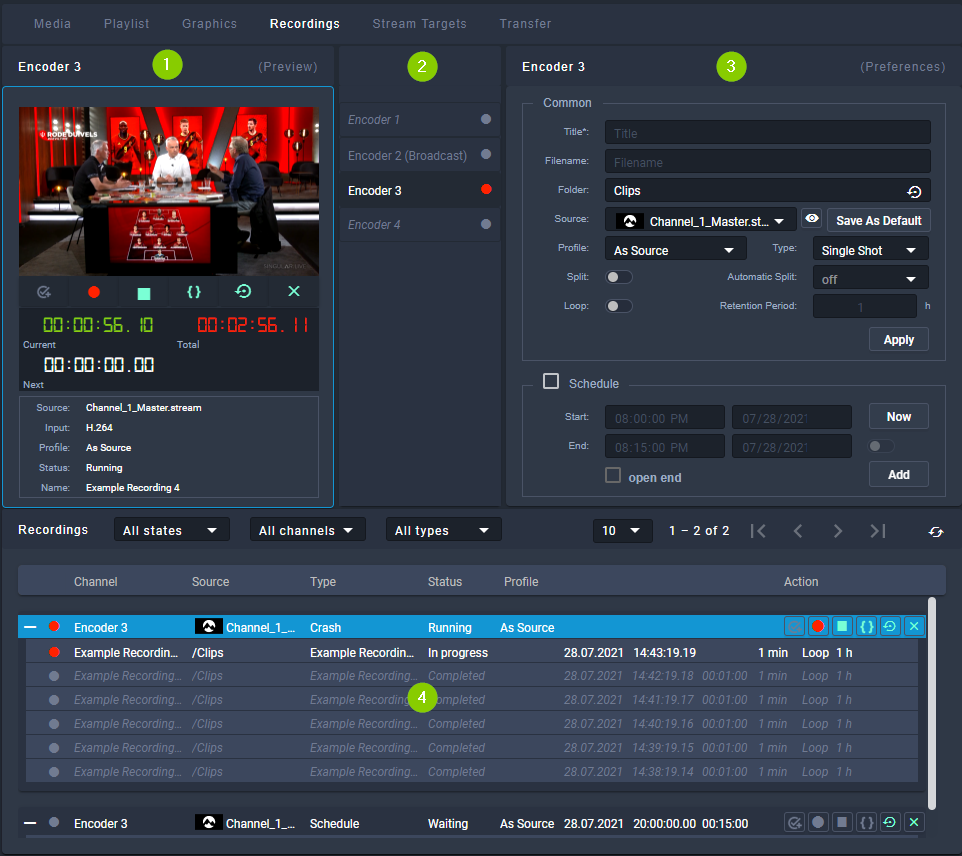 Figure: Makalu Automation - Recordings
In the Recordings tab you can record available (live) sources by using available encoders. For more information about how to create recordings, see section Recording.
The tab contains the following areas:
-
Preview - Preview and controls of the currently selected encoder
-
Encoder list - List of available encoders
-
Preferences - Preferences for creating a new recording job for the currently selected encoder
-
Recordings - List of existing recording jobs
The Preview area provides the following controls and information:
| Element | Description |
|---|---|
 | Prepare a recording |
 | Start a recording |
 | Stop a recording |
 | Split a recording |
 | Cancel a recording |
 | Delete a recording job |
| Current | Current recording duration of the selected recording job |
| Total | Total recording time of the selected recording job |
| Next | Time until the next scheduled recording job starts on the selected encoder |
| Source | Source of the selected recording job |
| Input | Input format of the selected source |
| Profile | Profile of the selected recording job |
| Status | Status of the selected encoder or recording job |
| Name | Title of the selected recording job |
In the Encoder list area all available encoders are listed. Depending on their current status, encoders are highlighted in one of the following colors:
- Gray - Encoder is offline or has no active recording jobs
- Green - A recording job is currently prepared
- Red - A recording job is currently running
The Preferences area provides the following input options:
| Name | Description |
|---|---|
| Title | Title of the recording job |
| Filename | Name of the file to be recorded Notice: If no file name is provided, the title is used as file name. |
| Folder | Destination folder where to store the recorded file |
| Source | Source stream to be recorded |
| Save As Default | Set the currently selected source as default for the currently selected encoder |
| Profile | Format/recording profile of the file to be recorded |
| Type | Recording job type, available options:
|
| Split | If enabled, a recorded file can be split either manually via the corresponding control or automatically based on the "Automatic Split" time setting |
| Automatic Split | Time interval for automatically splitting a recorded file Notice: This option is only available if "Split" is enabled. |
| Loop | Enable to enable the retention period field |
| Retention period | Select a duration (in hours) when a recorded file is automatically deleted |
| Apply | Create a recording job with the current settings |
| Schedule | Activate the checkbox to create a scheduled recording job |
| Start | Start time of the scheduled recording job |
| End | End time of the scheduled recording job |
| Now | Set start time to current time and end time to current time plus one hour |
| Add | Create a scheduled recording job with the current settings |
| Duration | Duration of the scheduled recording job Notice: The duration is only available if "Schedule" and the toggle switch next to "End" are enabled. |
| Open end | Activate the checkbox to create a scheduled recording job without specifying an end time Notice: In this case the recording job must be stopped manually. |
The Recordings list contains all current recording jobs and the following information:
| Column | Description |
|---|---|
| Channel | Recording channel/encoder used for the recording |
| Source | Recorded source |
| Type | Type of the recording job, available options:
|
| Status | Status of the recording job, available states:
|
| Profile | Format/recording profile of the recorded file |
| Action | The action column provides the following controls:
|
Stream targets
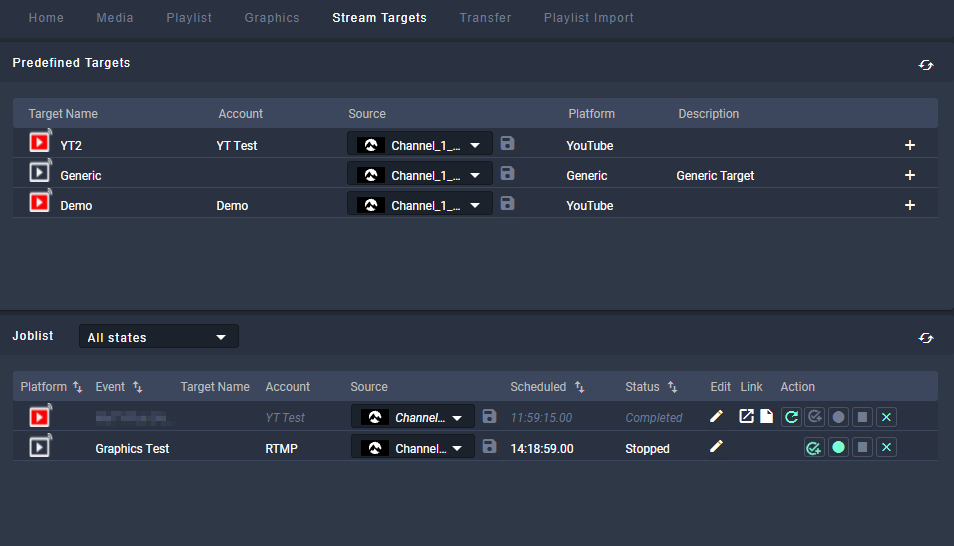
Figure: Makalu Automation - Stream targets
The Stream Targets tab lists existing streaming jobs/events. It also allows you to create new streaming jobs/events and to trigger them manually.
The list of Predefined Targets contains all available stream targets and the following information:
| Column/element | Description |
|---|---|
| Target Name | Icon representing the target platform/type and name of the stream target |
| Account | Internal name of the corresponding target platform-specific account to be used by the stream target (if applicable) |
| Source | Name of the source stream |
 | Set the selected source as default for the stream target |
| Platform | Target platform |
| Description | Short description of the stream target |
| Create a new streaming job for the corresponding stream target |
The Joblist contains all scheduled streaming jobs/events of the current channel and the following information:
| Column | Description |
|---|---|
| Platform | Icon representing the target platform/type of the job |
| Event | Event title or category |
| Target Name | Name of the stream target |
| Account | Internal name of the corresponding target platform-specific account to be used by the stream target (if applicable) |
| Source | Name of the source stream |
| Scheduled | Scheduled start time |
| Status | Streaming event status, available states:
|
| Edit | Edit metadata of the stream job |
| Link | |
| Action | Actions for manually controlling the streaming job, available actions:
|
Notice
You can only trigger actions that are highlighted with a white or green icon. Actions with a gray icon are not available.
For more information about streaming, see the Social media streaming section.
Transfer
In the Transfer tab all file transfers from ingest storage to playout instances are listed, that are currently running or were recently finished.
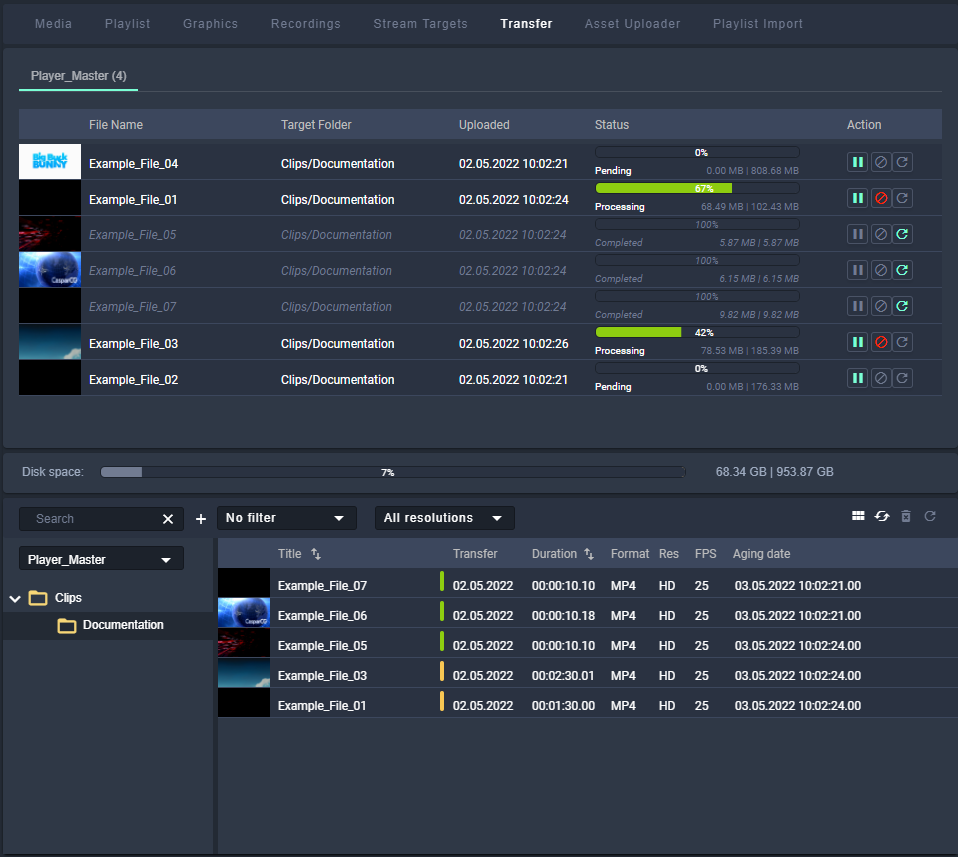
Figure: Makalu Automation - File transfer list
The number in brackets beside the playout instance name indicates how many file transfers are currently running. The columns of the list provide details about each file and the transfer progress.
The action column provides the following elements:
| Icon/Element | Description |
|---|---|
 | Pause file transfer |
 | Cancel file transfer |
 | Retry/re-trigger file transfer |
Below the transfer list in the Disk space area the available storage space of the selected playout instance is displayed.
At the bottom of the Transfer tab the media asset list is displayed. This is the same list and provides the same functionality as in the Media tab. The only difference is that its source is set by default to the storage of the first playout instance instead of the ingest storage. The source can be changed via the corresponding dropdown menu.
For information about how to trigger a file transfer, see section File transfer.
Asset Uploader
The Asset Uploader tab integrates the functionality of the Asset Uploader into the Makalu Automation user interface.
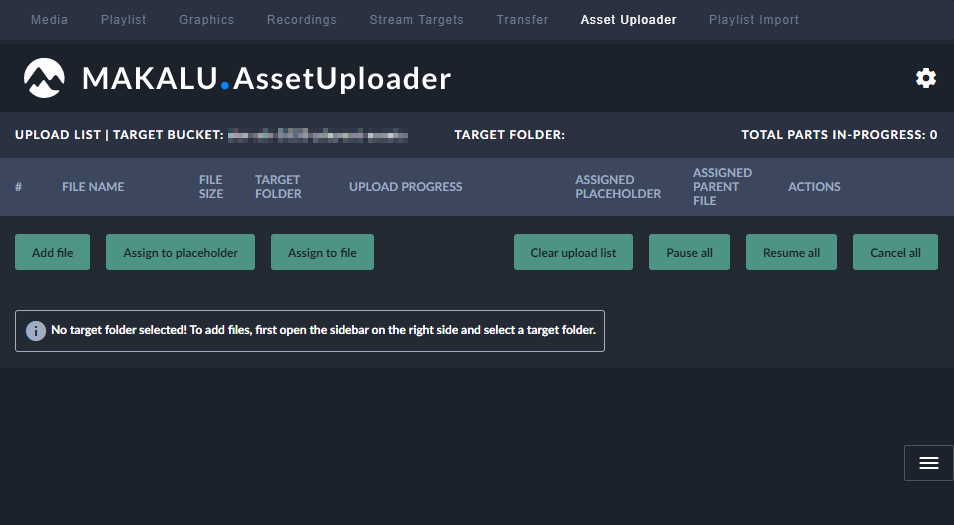
Figure: Makalu Automation - Asset Uploader
For information about how to use the Asset Uploader see section Ingest.
Playlist Import
The Playlist Import tab enables you to import playlists from third-party traffic systems.
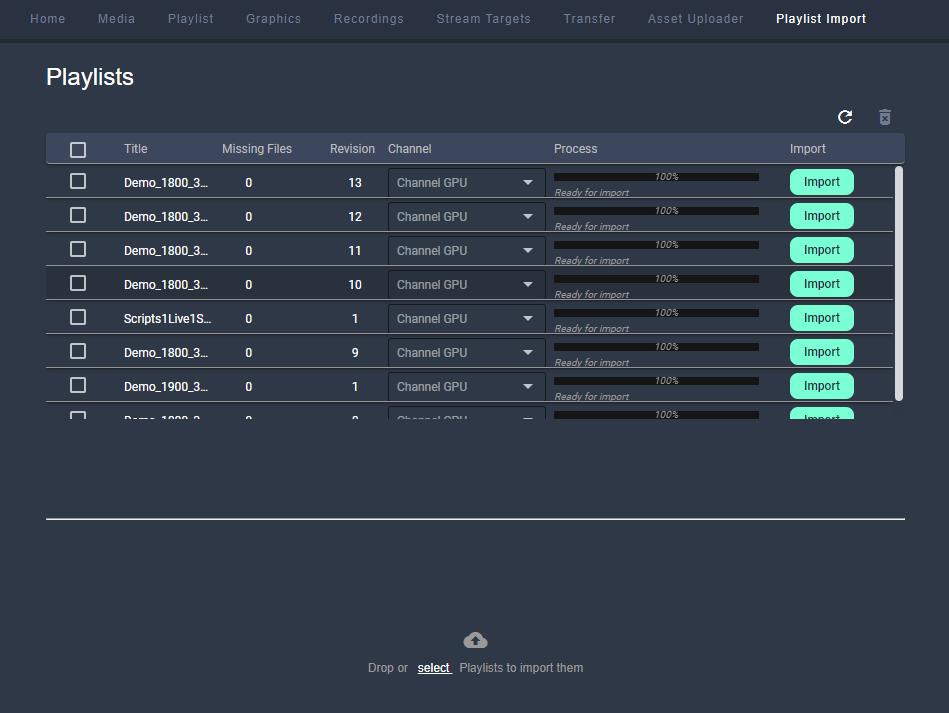
Figure: Makalu Automation - Playlist import
The list of imported playlists provides the following information:
| Column | Description |
|---|---|
| Title | Name/title of the playlist |
| Missing Files | Number of files missing on the ingest storage Notice: For each imported playlist, a missing file list is created. This list includes all files that are used in the imported playlist but are not yet available on the ingest storage. Missing file lists can also be exported. For more information see section Exporting a missing file list. |
| Revision | Playlist revision number (each time a playlist with the same name/title is imported, the revision number is increased) |
| Channel | Target channel |
| Process | Progress/status of the playlist processing/import |
| Import | Start the playlist import |
For more information see section Importing a playlist.
Previewing file-based and live media
To preview media, proceed as follows:
-
On the right side, select the Media tab.
-
In the media list select the media type (live or clips) and the corresponding source folder that contains the media item to be previewed.
-
(Optional) To filter the displayed media items, either use the Search field (to filter by file name) or the dropdown menus (to filter by modification date or by resolution).
The media list is filtered based on your filter settings.
-
To preview a media item, click the Play icon at the right side of the corresponding list item or drag the item on the preview player.
The media item is loaded by the preview player.
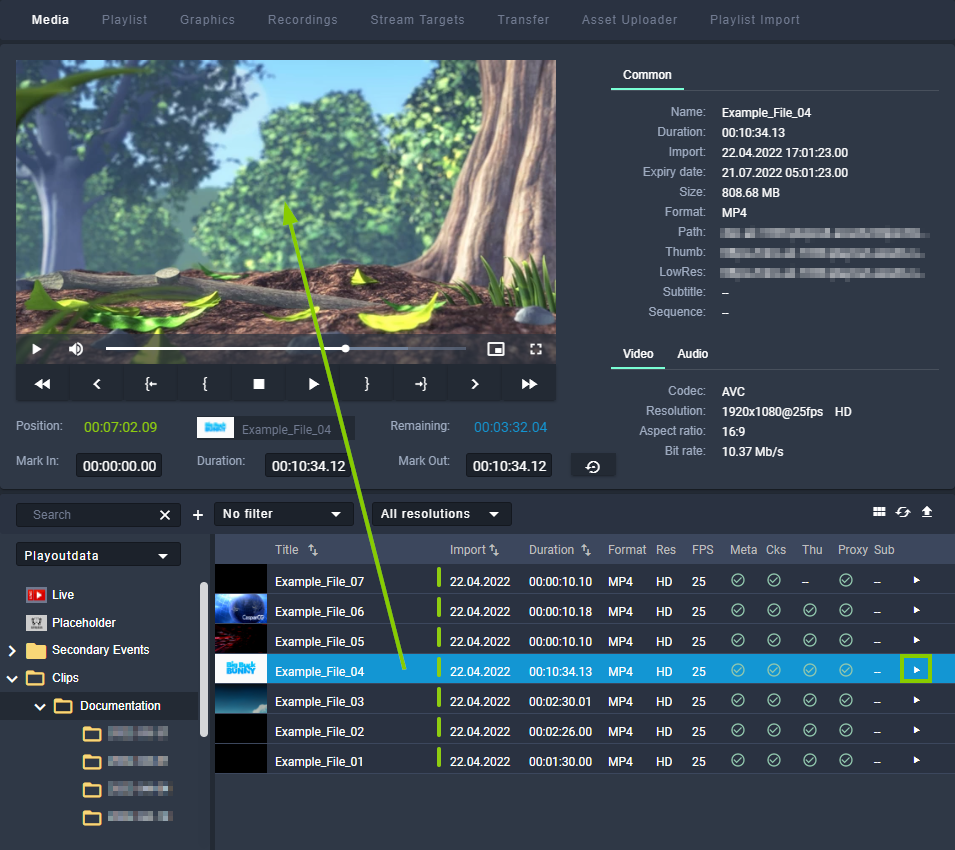
Figure: Makalu Automation - File preview
-
Use the preview player controls to play the media item.
Notice
If you preview a live source:
- the player controls are disabled, except the stop button
- you can copy the stream URL to the clipboard by clicking the corresponding Path icon in the Common metadata section
Adding elements to a rundown
Adding a playlist to a rundown
To add a playlist to a rundown, proceed as follows:
-
On the right side, select the Playlist tab.
All available playlists for the current channel are listed.
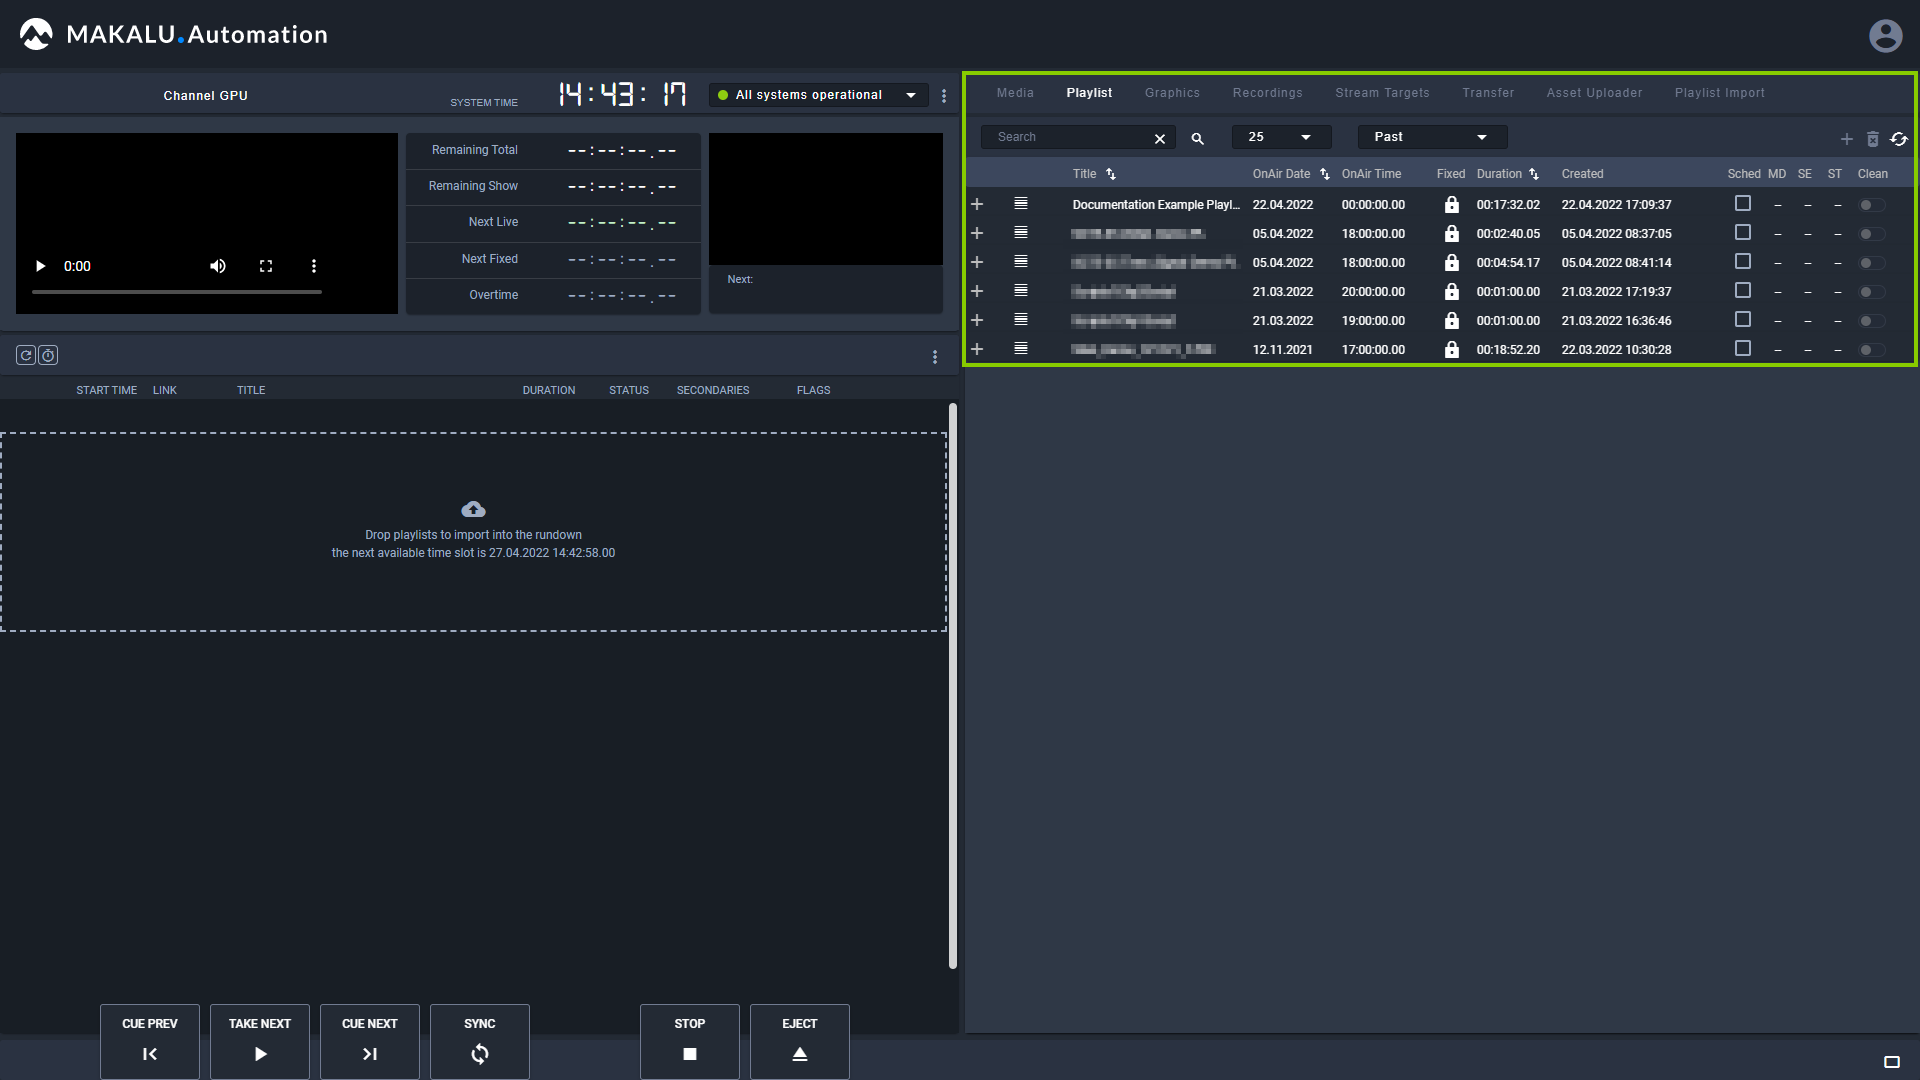
Figure: Makalu Automation - Available playlists
-
To add a playlist to a rundown, you can either:
-
Select a playlist by clicking the corresponding row in the Playlist tab (the row will be highlighted in blue) and click the Plus icon (Add playlist to rundown) at the top right, or
-
drag a playlist and drop it on the dashed area in the rundown.
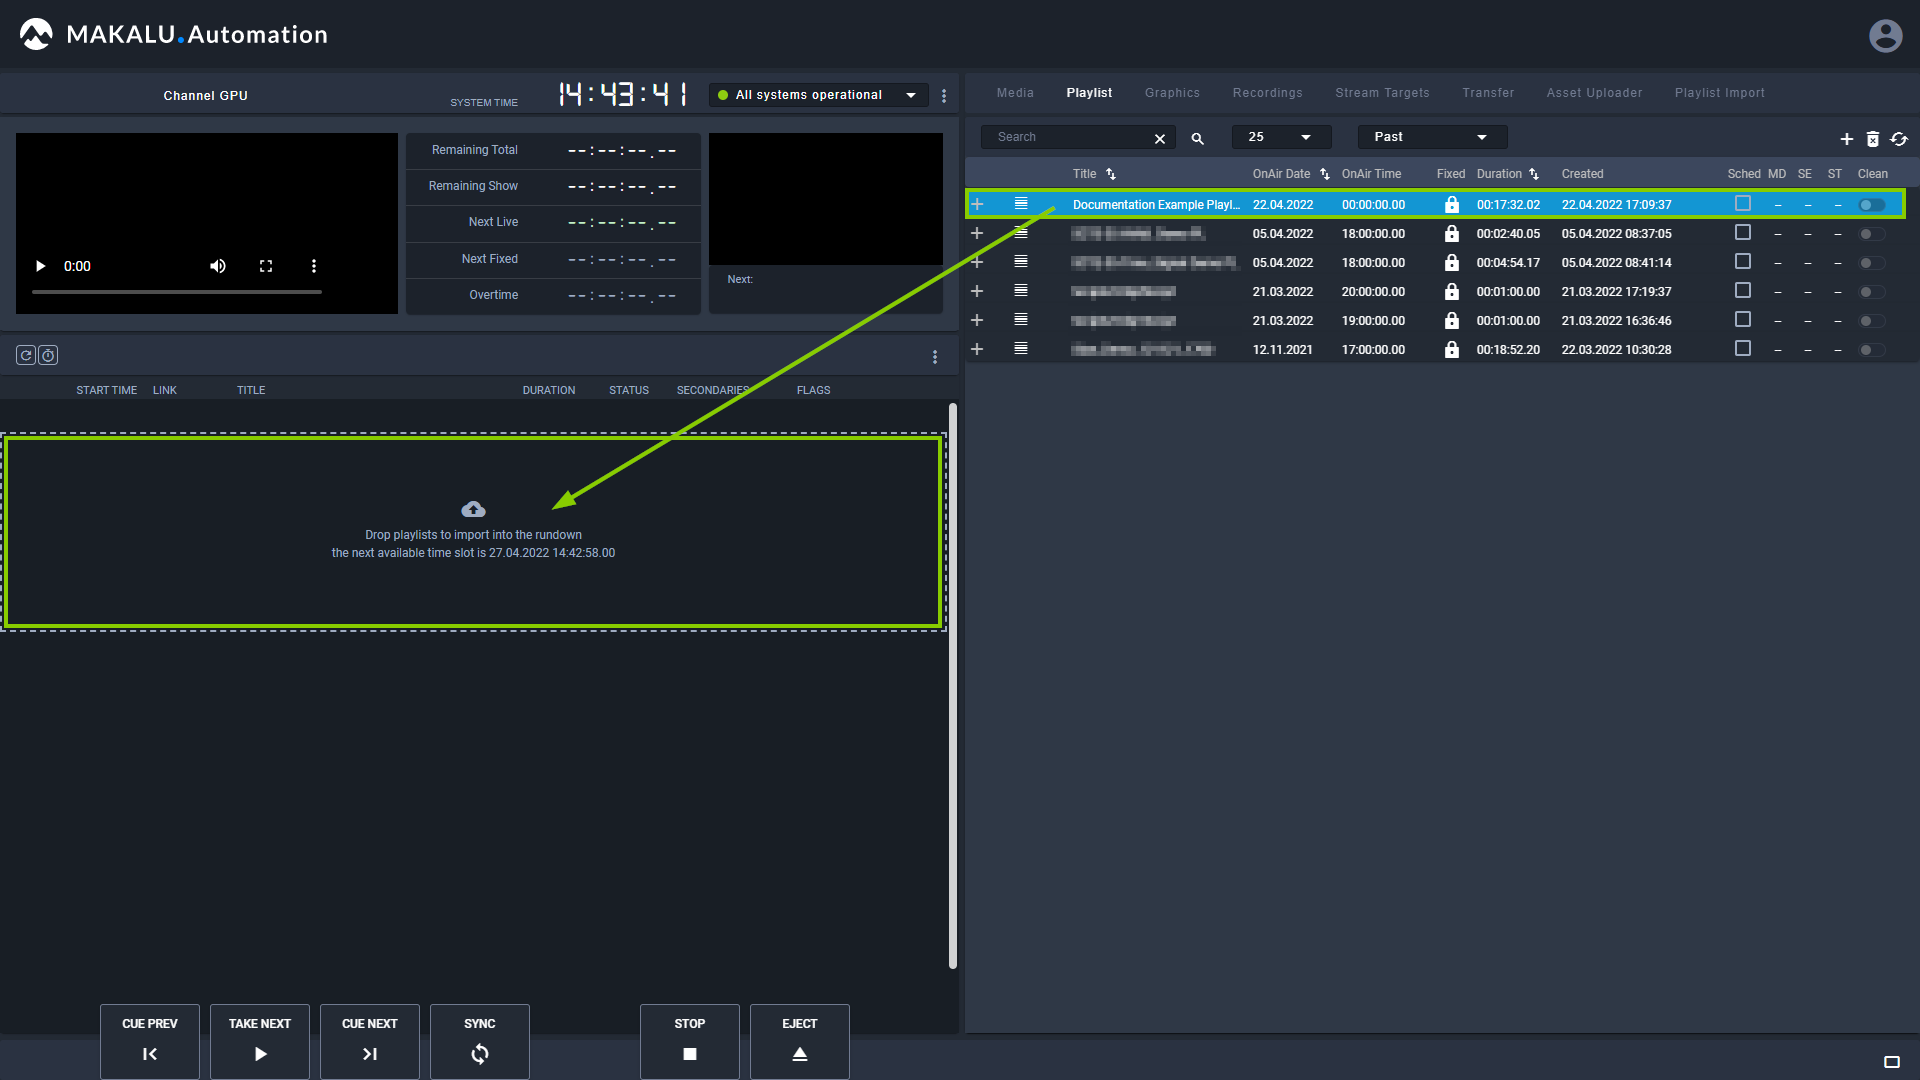
Figure: Makalu Automation - Adding a playlist to the rundown
Notice
If the rundown is currently empty, a dialog is displayed that asks you to select a start time for the playlist. Select the start time and click Apply to confirm.
The playlist is added to the rundown.
Notice
If you selected a start time, the playlist is added based on your selected start time. Otherwise, if the rundown previously already included playlists and you did not select a specific start time, the new playlist is added as last element and the start time is dynamically calculated without creating gaps.
-
-
(Optional) To expand an included show, click the corresponding circle with arrow icon
 in the link column.
The show is expanded, and all included clips are listed.
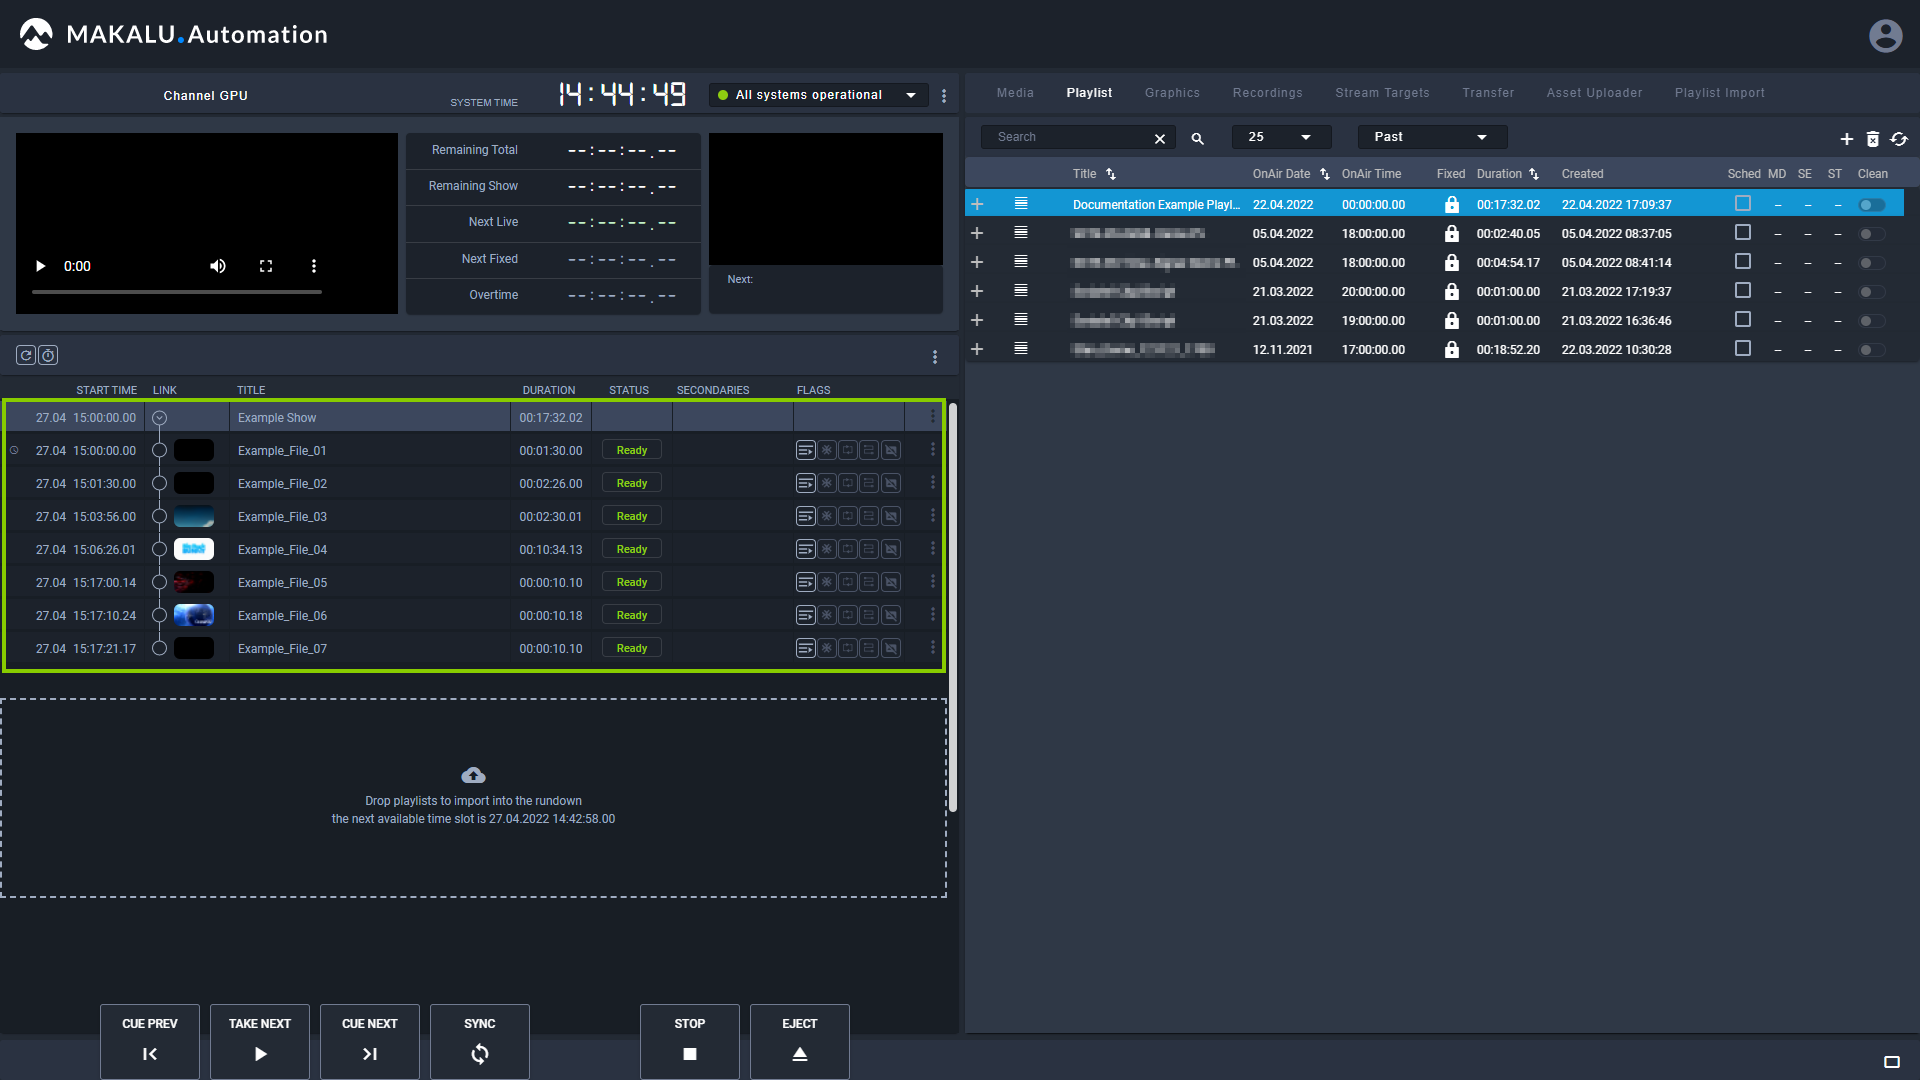
Figure: Makalu Automation - Playlist added to the rundown
Tip
To add a playlist to a rundown at a specified start date/time, activate the checkbox in the Sched (Scheduled) column before you drag the playlist onto the DropZone area or click the Add playlist to rundown button.
If the playlist already has a specified start time, this will be applied. If the playlist has no specified start date/time, a dialog is displayed that asks you to select the start time.
Notice
You cannot add a playlist with a specific scheduled start date/time to a rundown if there is already a playlist in the rundown scheduled for the same date/time.
Notice
Playlists with a fixed start date/time can only be added to a rundown if the start date/time is in the future.
Notice
If the added playlist includes files that are not available on the channel's playout instances, file transfers are automatically started. As a result all corresponding files are copied from the ingest storage to all playout instances that are assigned to the channel. See section File transfer for more information.
Adding media to a rundown
In addition to playlists you can also add media assets (video files, secondary events, live sources, or placeholders) to a rundown, by adding them to a show in a playlist.
To do this, proceed as follows:
-
(Optional) To expand a show, click the corresponding circle with arrow icon
in the link column.The show is expanded, and all included clips are listed.
-
On the right side, select the Media tab.
All available media items are listed in the media list.
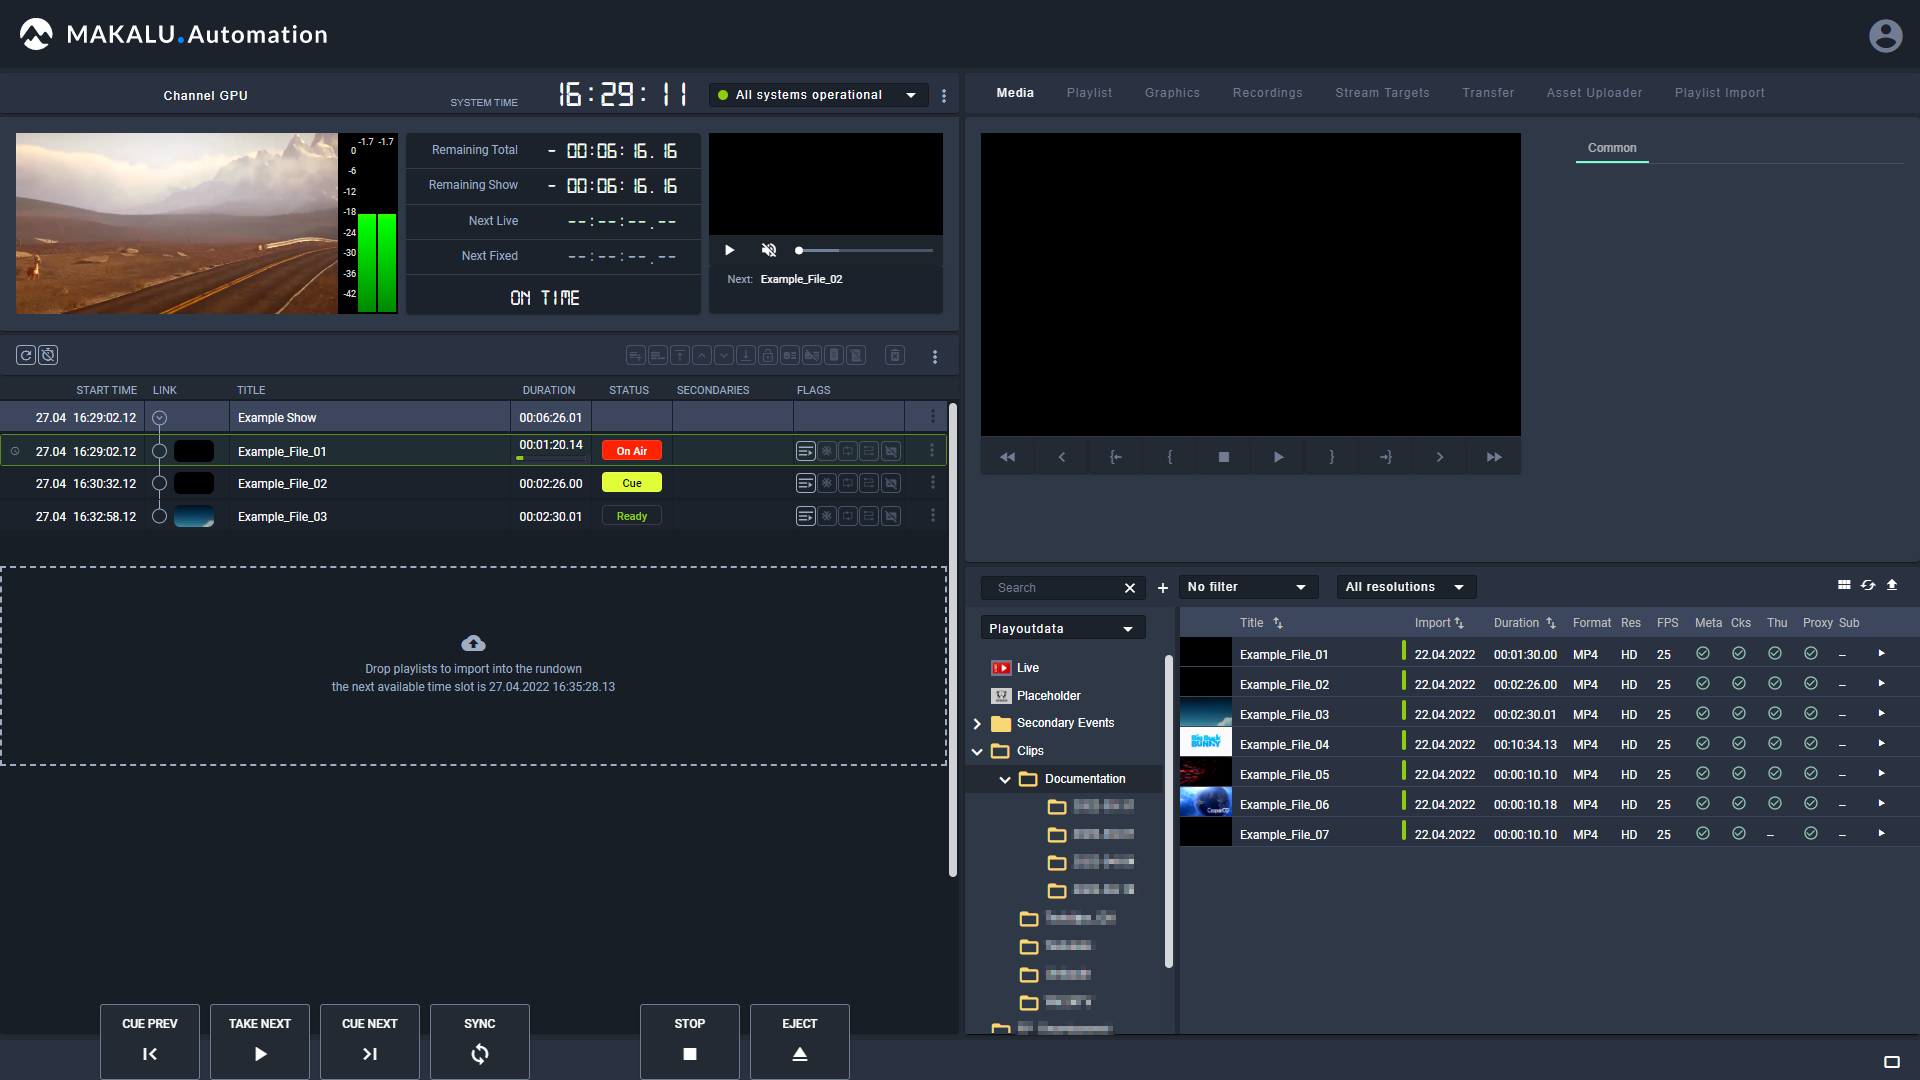
Figure: Makalu Automation - Show expanded and media tab opened
-
Select one or more video files, live sources, or placeholders from the media list on the right side and add them to a show in the rundown on the left side via drag and drop.
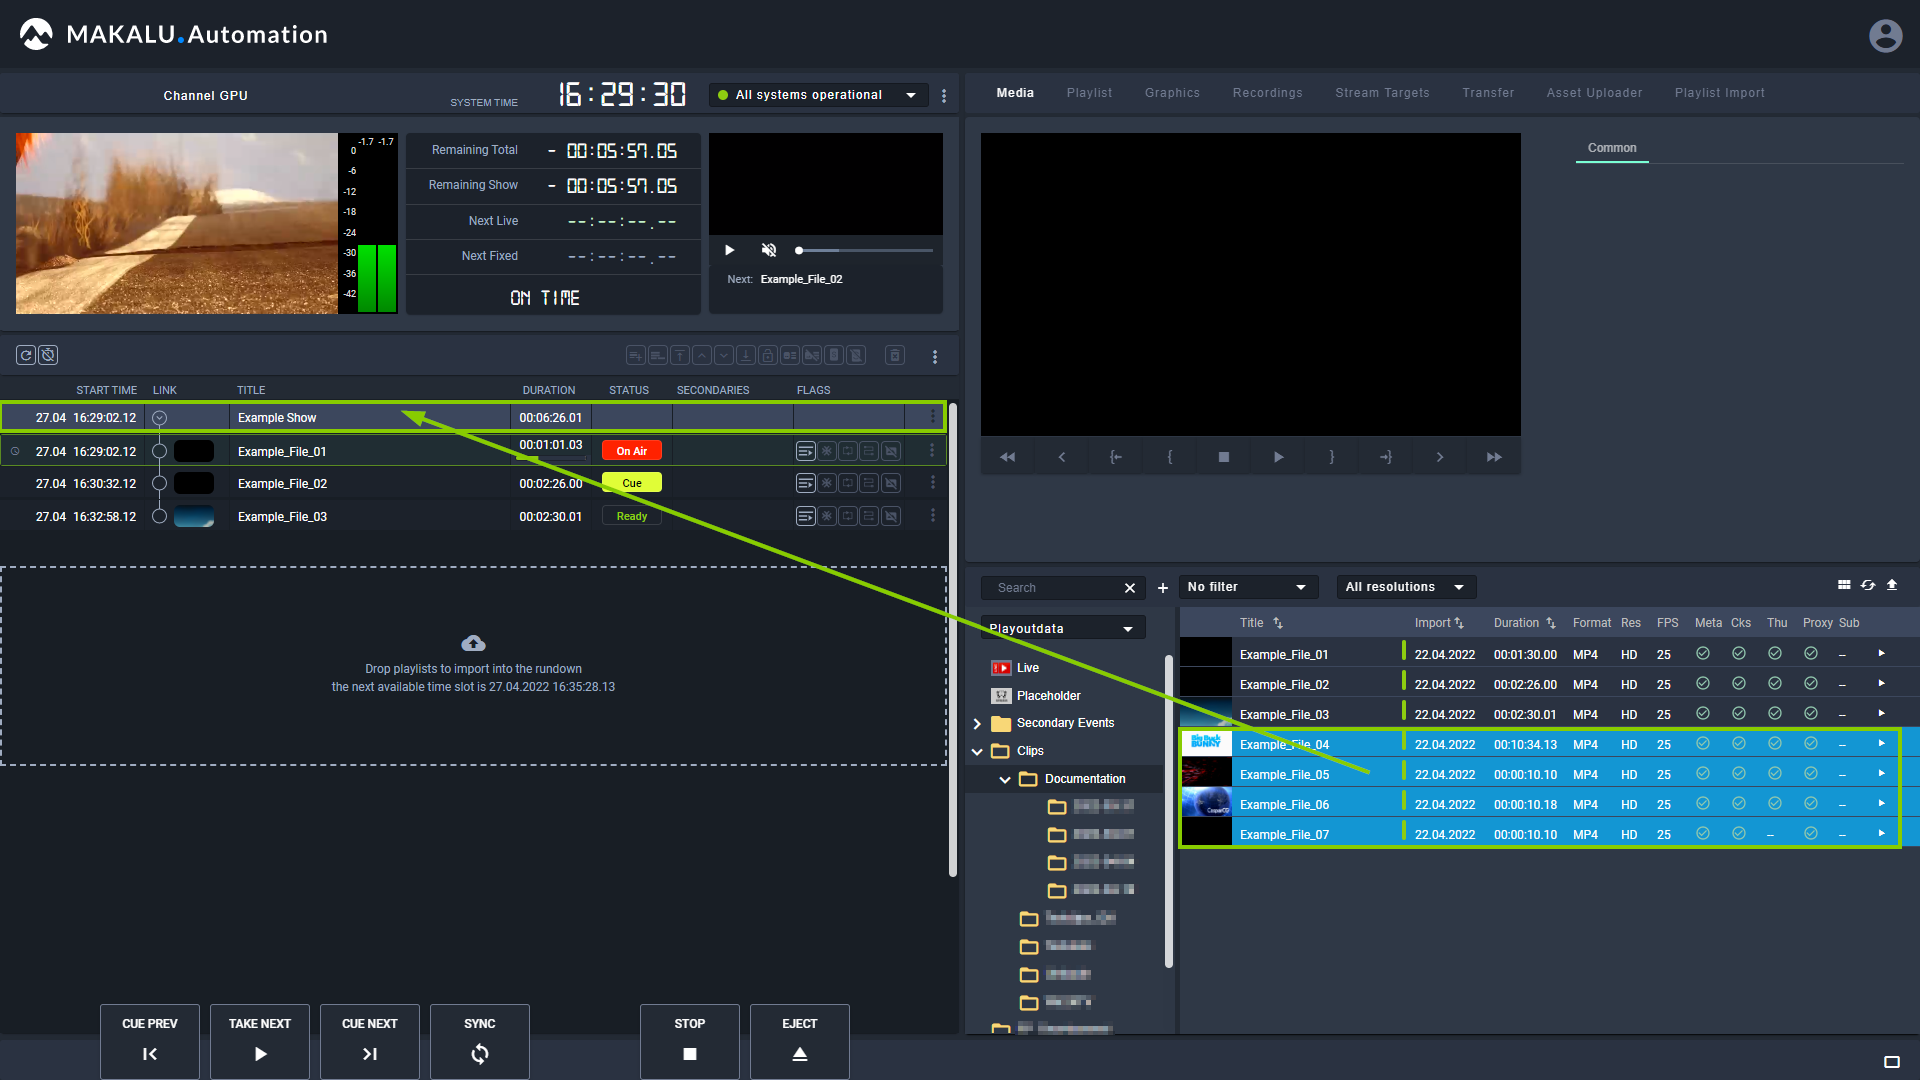
Figure: Makalu Automation - Adding video files to a show
Notice
If you want to add a video file to a rundown, its resolution and framerate should usually match the channel output properties exactly. For example, if you use a channel that is configured for 1080p and 25 fps output, you should use files with a resolution of 1920x1080 px and a framerate of 25 fps.
Video files with properties that differ from the current channel output properties are highlighted in the media list (the resolution and/or the framerate are highlighted in red):
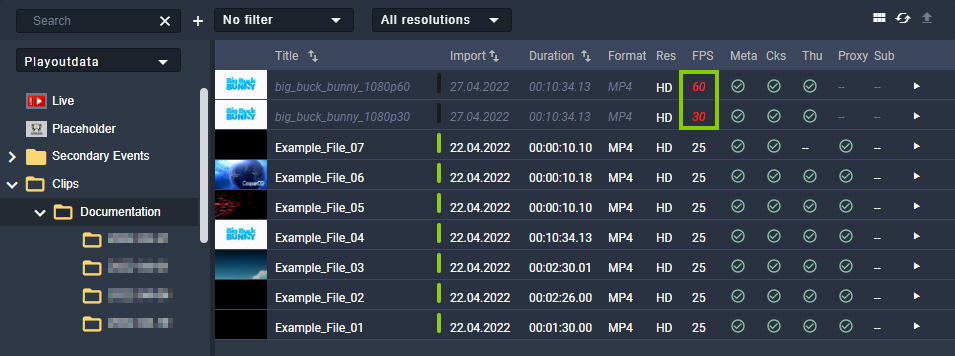
Figure: Makalu Automation - Video files with resolutions and framerates that do not match the channel output properties
By default, you cannot add video files that use other resolutions and/or framerates than the current channel properties. Depending on the channel configuration it may be possible to add files to a rundown, that do not match the channel properties.
The selected video file, live source, or placeholder is added to the rundown as last clip of the selected show.
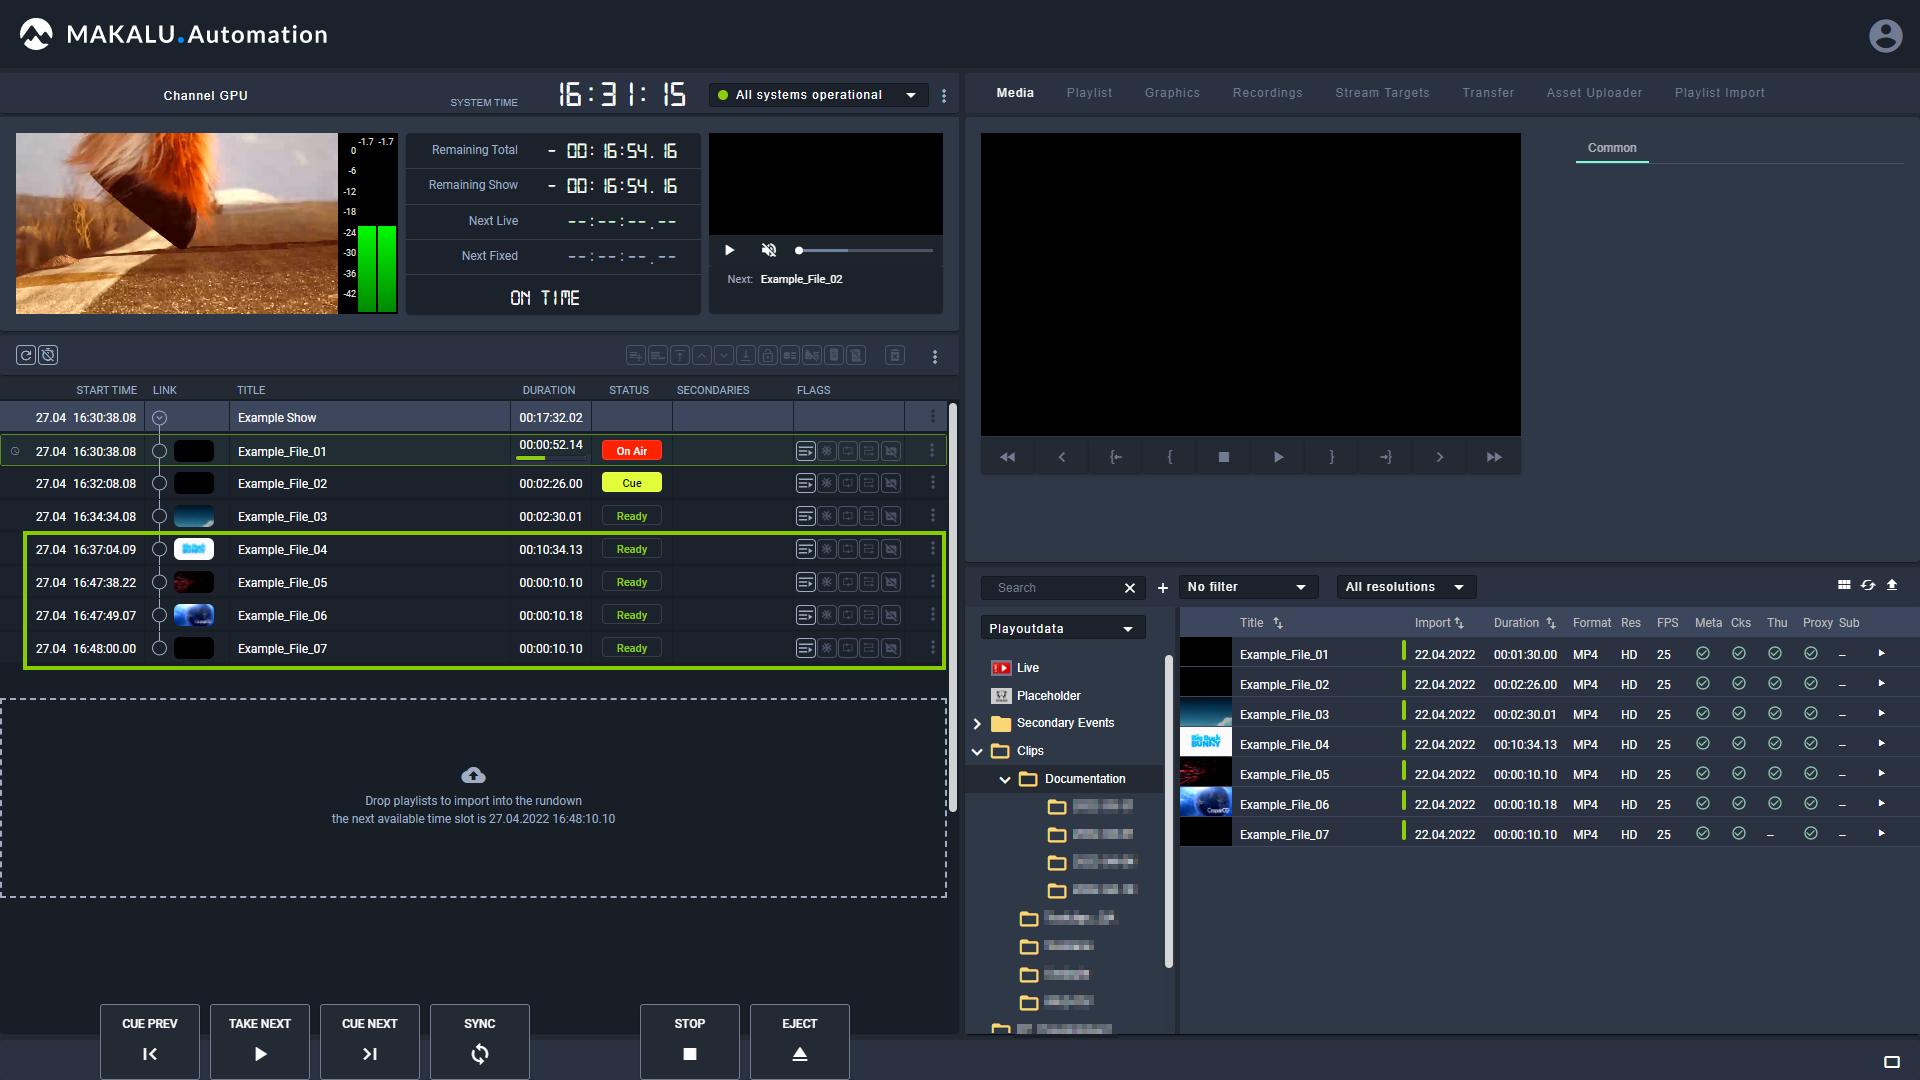
Figure: Makalu Automation - Video files added to a show
Tip
Instead of adding a clip at the end of a show you can also replace an individual clip in a show by dragging and dropping one or more new media items directly on the clip to be replaced while holding [Shift]. For more information see section Replacing a clip.
To add a new clip before an existing clip in a show, drag and drop the new clip on an existing clip (without holding [Shift]).
Notice
If the added file is not available on the channel's playout instances, file transfers are automatically started. As a result the corresponding file is copied from the ingest storage to all playout instances that are assigned to the channel. See section File transfer for more information.
-
(Optional) Change the show’s clip list order to move the added clip to a specific position within the selected show.
Adding trimmed media to a rundown
To add only a specific subsection of a video file to a rundown, proceed as follows:
Notice
Trimming is only possible for media assets that represent actual video files. In the media list these files are usually listed under Clips in the folder tree. Live and placeholder media assets cannot be trimmed.
-
In the rundown select and expand the show to which you want to add trimmed media.
The show is expanded, and all included clips are listed.
-
On the right side, select the Media tab.
All available media items are listed in the media list.
-
In the media list select the media asset to be trimmed and click the Play icon on the right side.
Tip
You can also open a media asset in the preview player by dragging it from the media list and dropping it on the preview player.
The media asset is opened by the preview player.
-
Use the preview player controls to select the timecode for the mark in.
-
To set the selected timecode as mark in, click the Set Mark In
 icon.
icon.The Mark In timecode is updated accordingly.
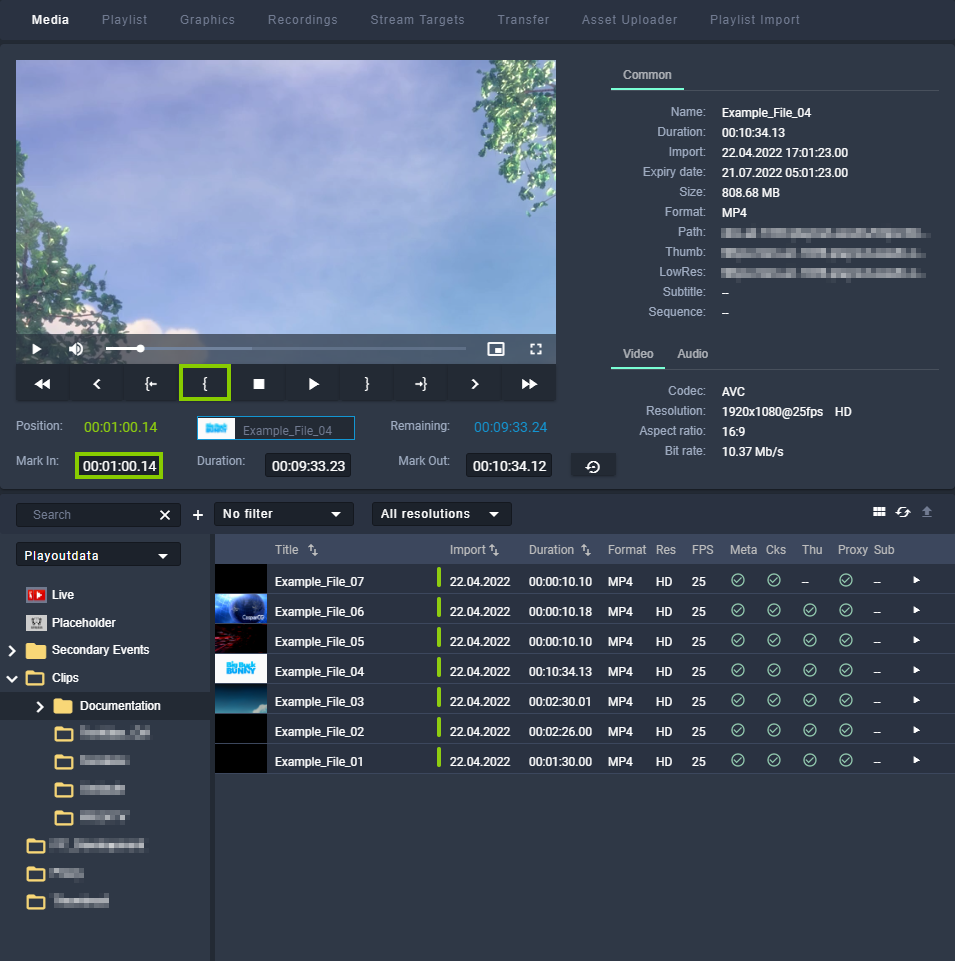
Figure: Makalu Automation - Trimmed media - Mark in set
-
Use the preview player controls to select the timecode for the mark out.
-
To set the selected timecode as mark out, click the Set Mark Out
 icon.
icon.The Mark Out timecode is updated accordingly.
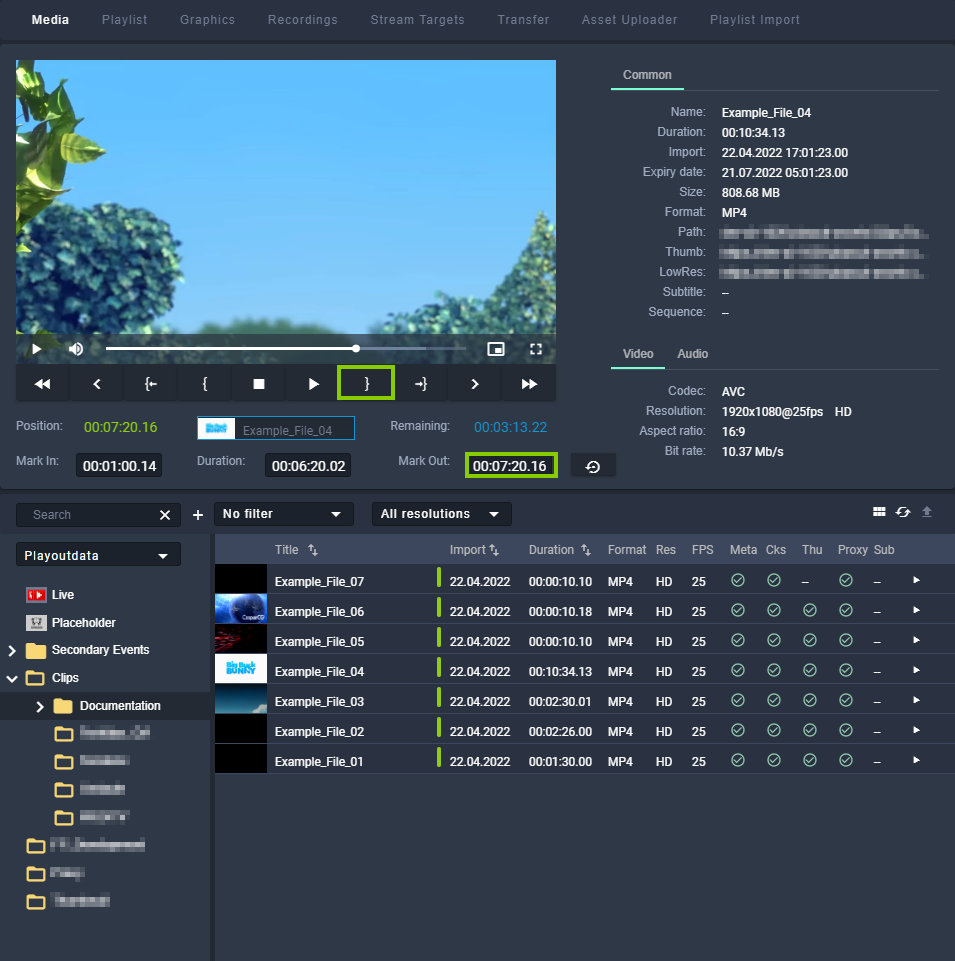
Figure: Makalu Automation - Trimmed media - Mark out set
-
Use the draggable element below the preview player (consisting of thumbnail and file name, located between "Position", and "Remaining") and drag it on the show to which you want to add it.

Figure: Makalu Automation - Adding trimmed media to a show
The selected video file is added to the rundown as last clip of the selected show.
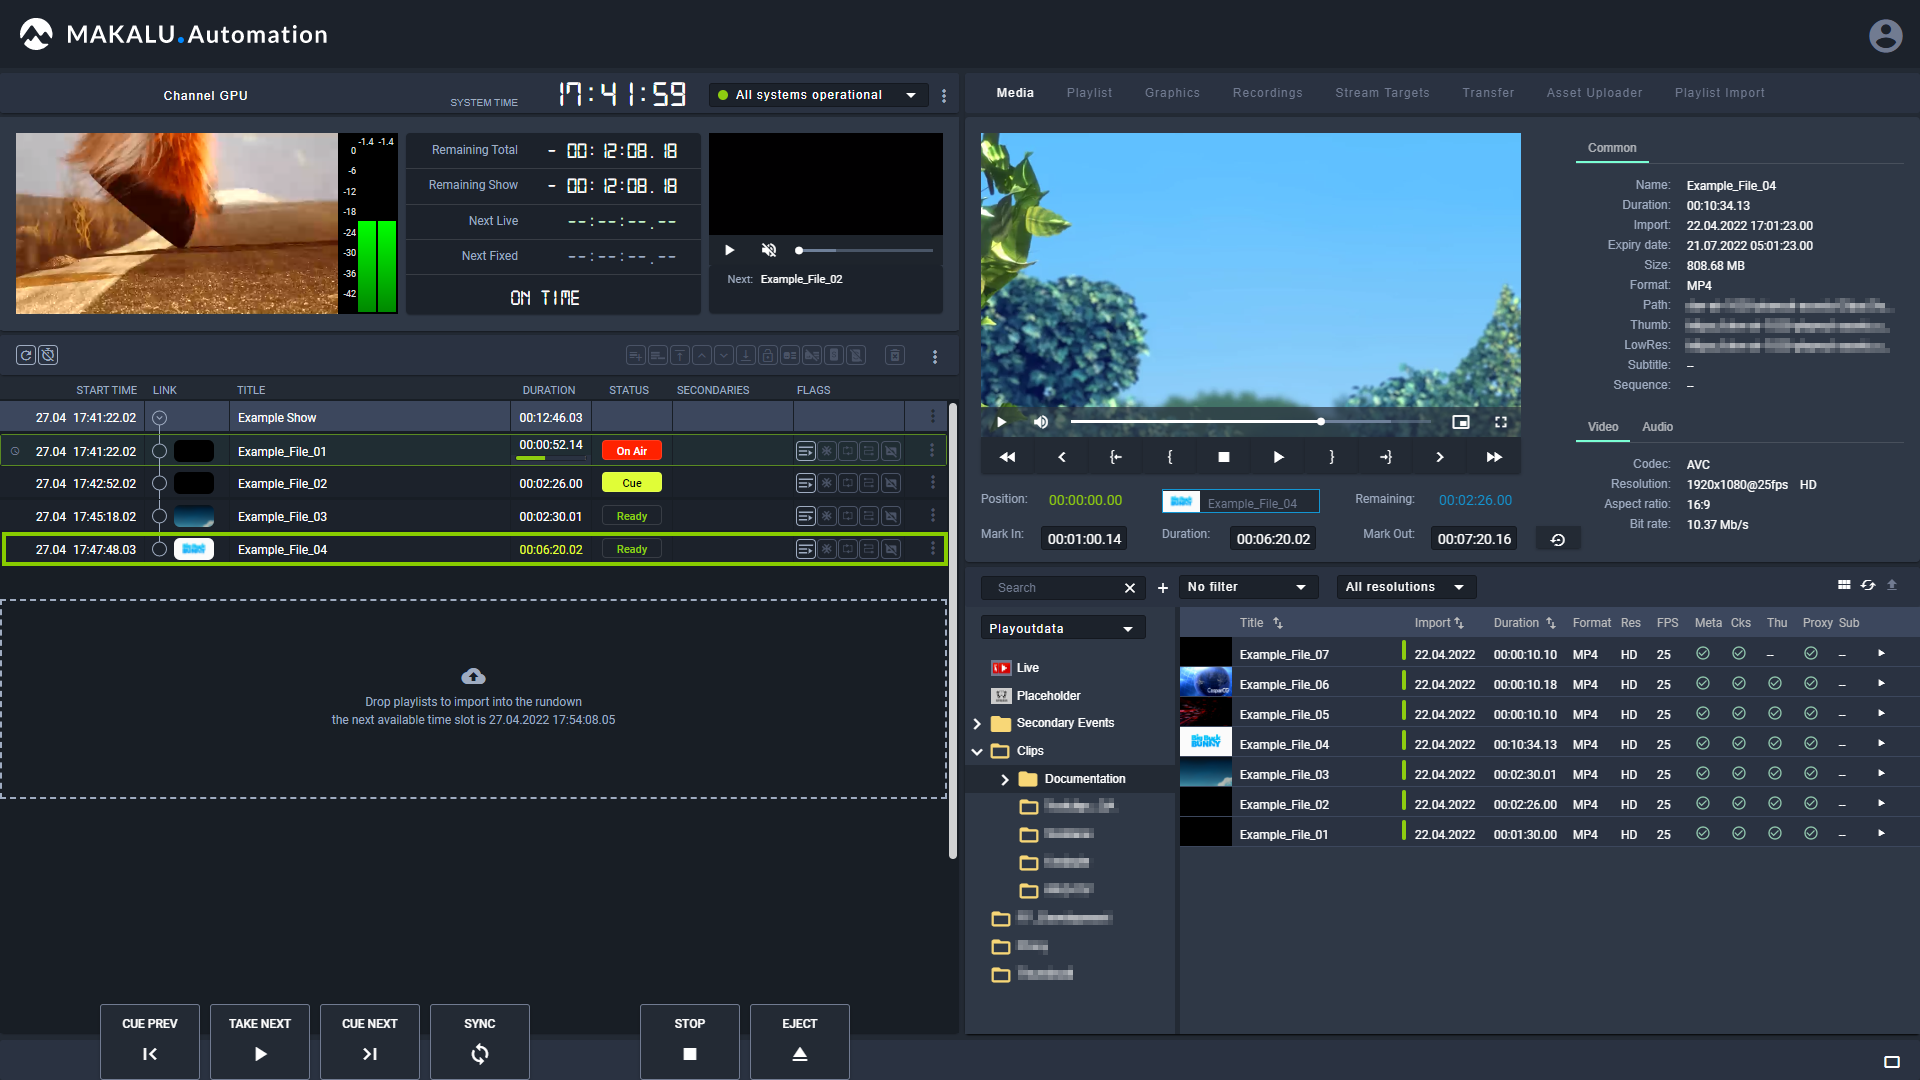
Figure: Makalu Automation - Trimmed media added to a show
Tip
Instead of adding a trimmed clip at the end of a show you can also replace an individual clip in a show by dropping the draggable element directly on the clip to be replaced while holding [Shift]. In this case a confirmation dialog is displayed that also informs you if the rundown duration will be shortened or extended by this replacement. For more information see section Replacing a clip.
To add the trimmed clip before an existing clip in a show, drag and drop the trimmed clip on an existing clip (without holding [Shift]).
Notice
Trimmed files in the rundown are recognizable by their color. Their scheduled duration is highlighted in yellow.
Notice
If the added file is not available on the channel's playout instances, file transfers are automatically started. As a result the corresponding file is copied from the ingest storage to all playout instances that are assigned to the channel.
-
(Optional) Change the show’s clip list order to move the added clip to a specific position within the selected show.
Adding secondary events to a rundown
To add a secondary event to a rundown, proceed as follows:
-
On the right side, select the Media tab.
All available media items are listed in the media list.
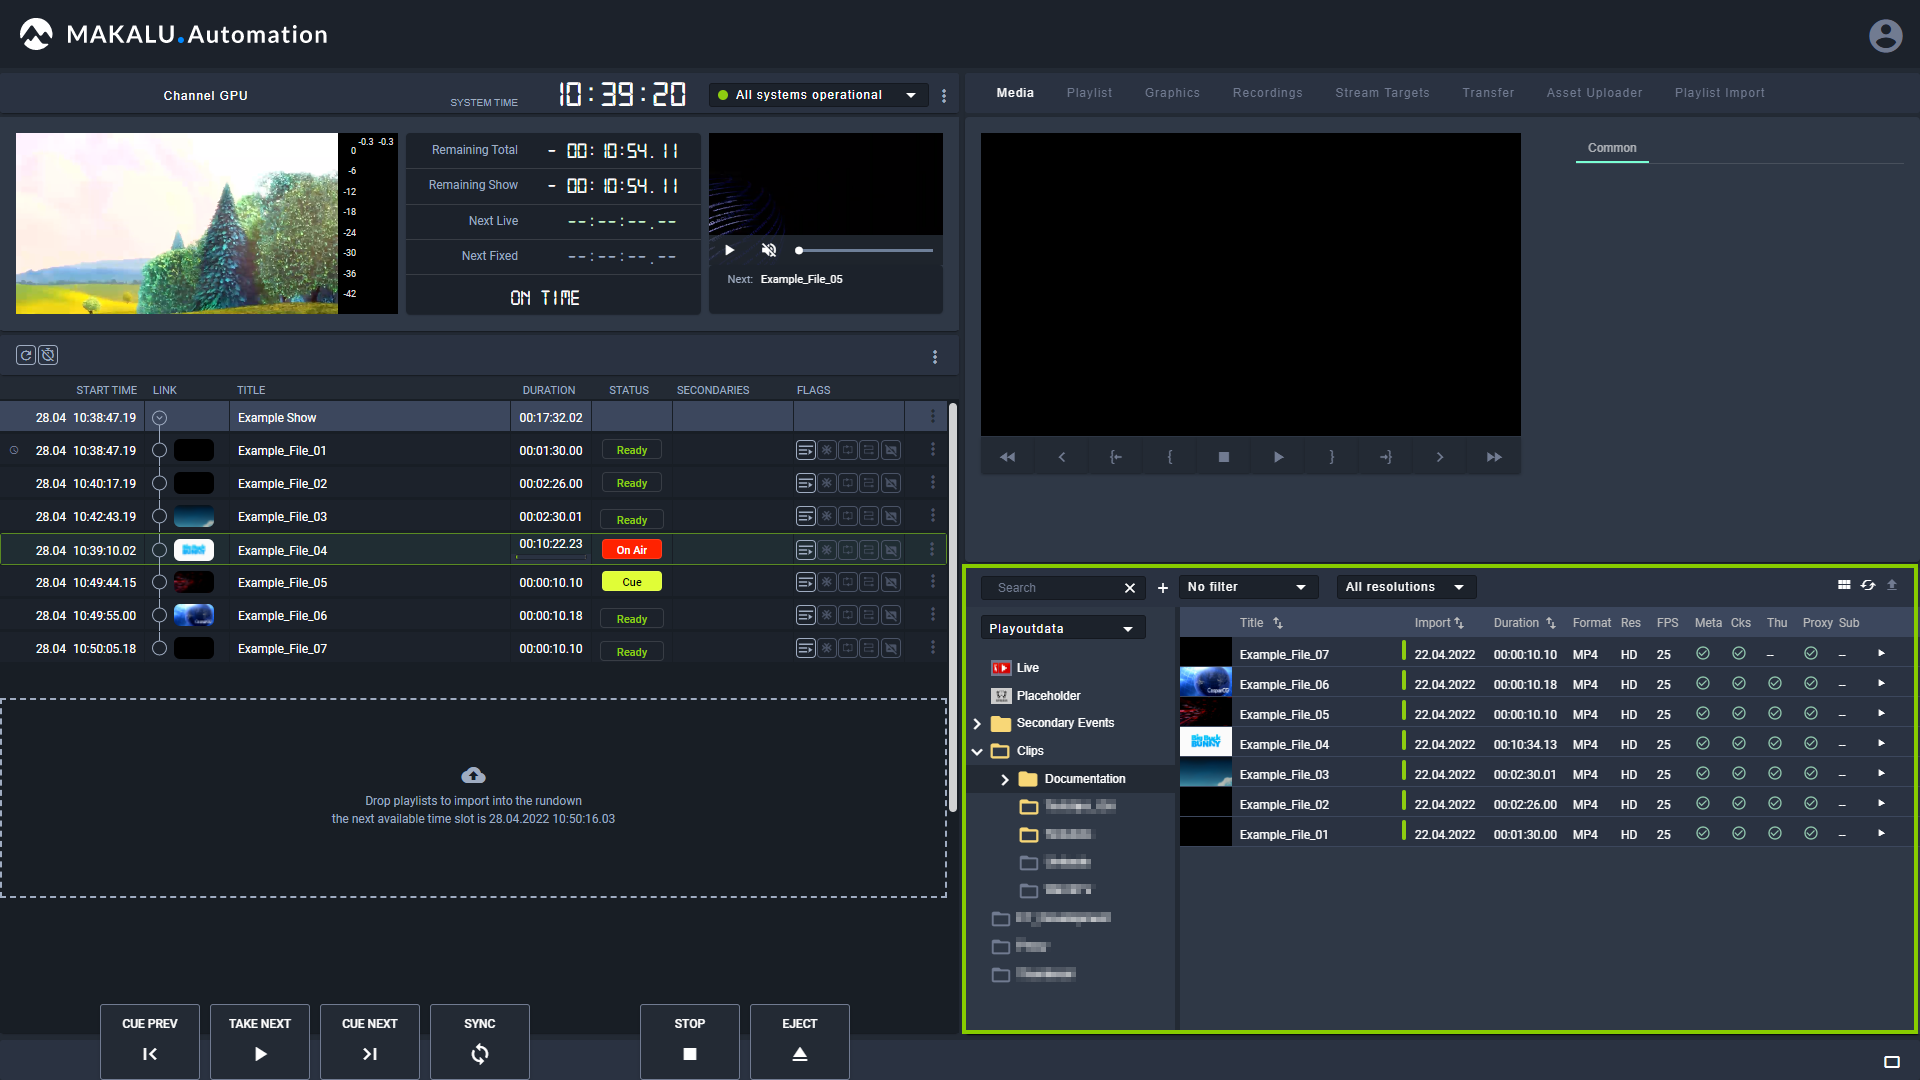
Figure: Makalu Automation - Show expanded and media tab opened
-
In the media list click Secondary Events and select the type of secondary event you want to add.
-
Select one or more secondary events and drag them on a show or clip in the rundown.
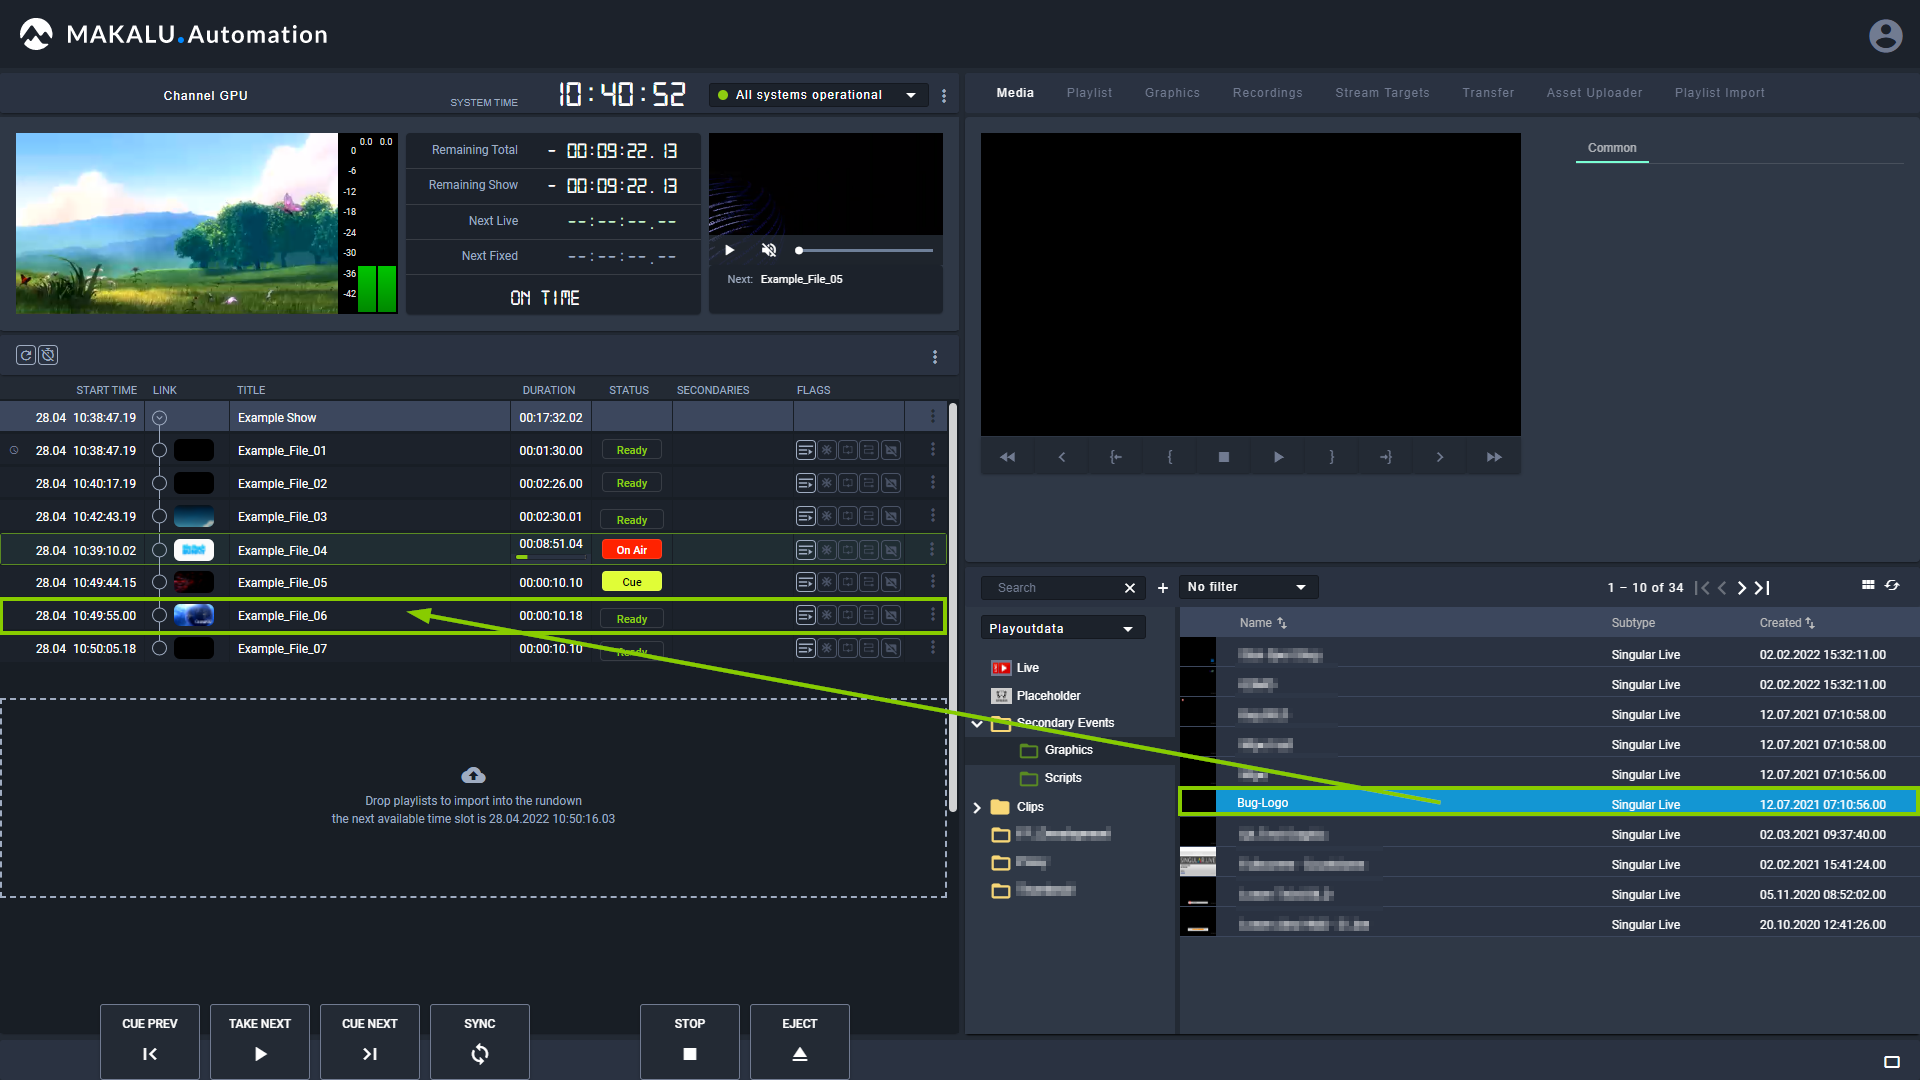
Figure: Makalu Automation - Secondary event selected
The selected secondary events are added to the show or clip, which is indicated by the corresponding icon in the "Secondaries" column.
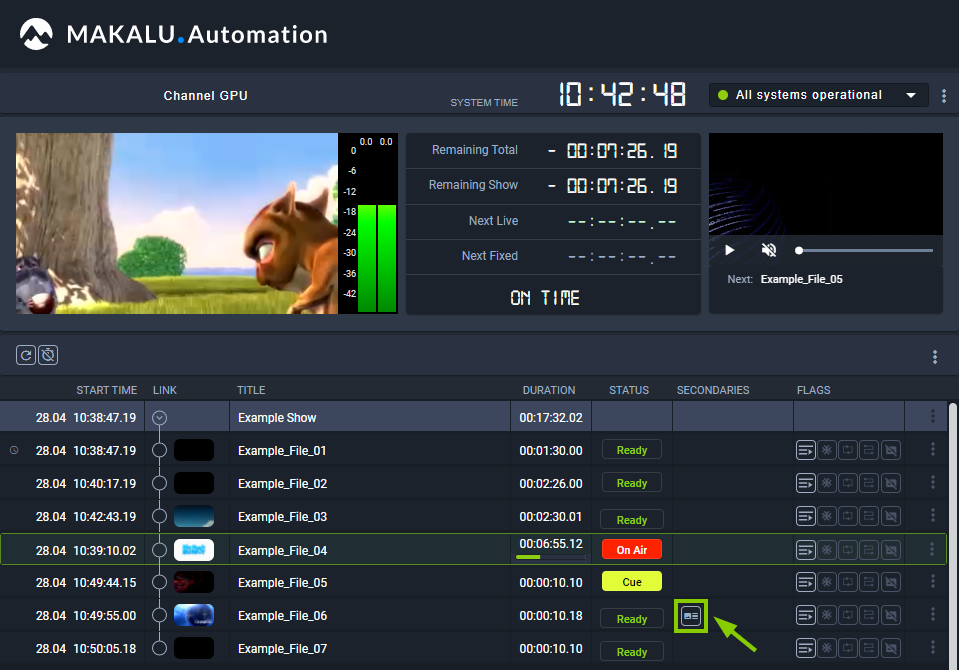
Figure: Makalu Automation - Secondary event added to a clip
Tip
To expand the list of secondary events added to a show or clip, click the secondaries icon
 of the corresponding element.
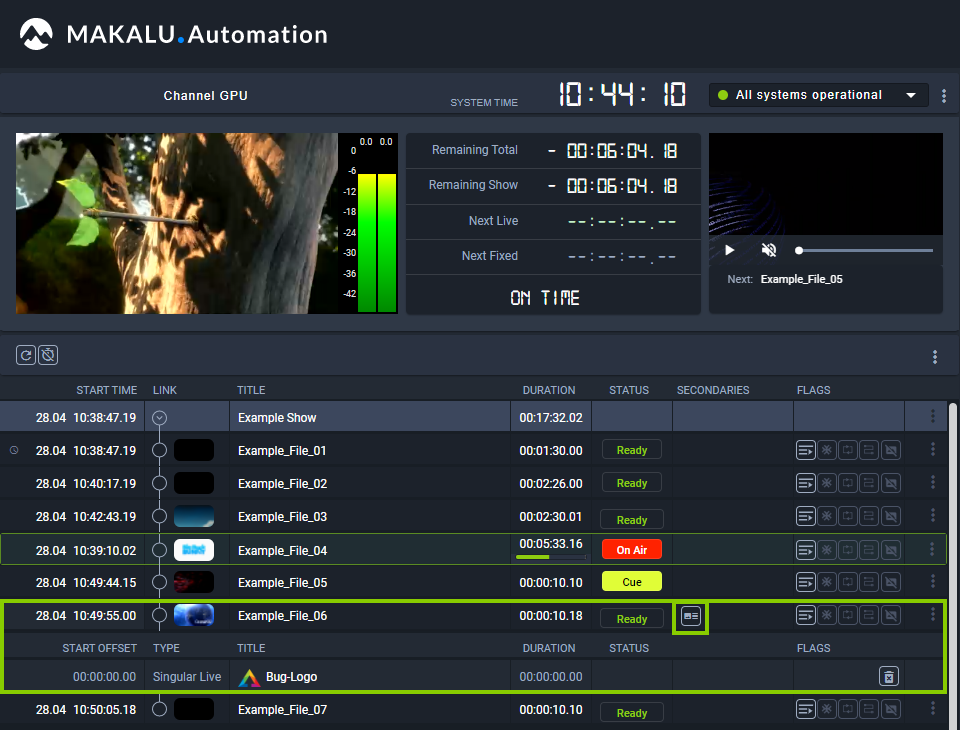
Figure: Makalu Automation - Clip secondary event list expanded
Editing the rundown
Editing the start time of a show
To edit the start time of a show, proceed as follows:
Notice
You can only edit the start time of a show if the show is not currently on air.
-
In the rundown click the clock icon
 of the show to be edited.
Tip
If the show is expanded the clock icon is displayed for the first clip of the show.
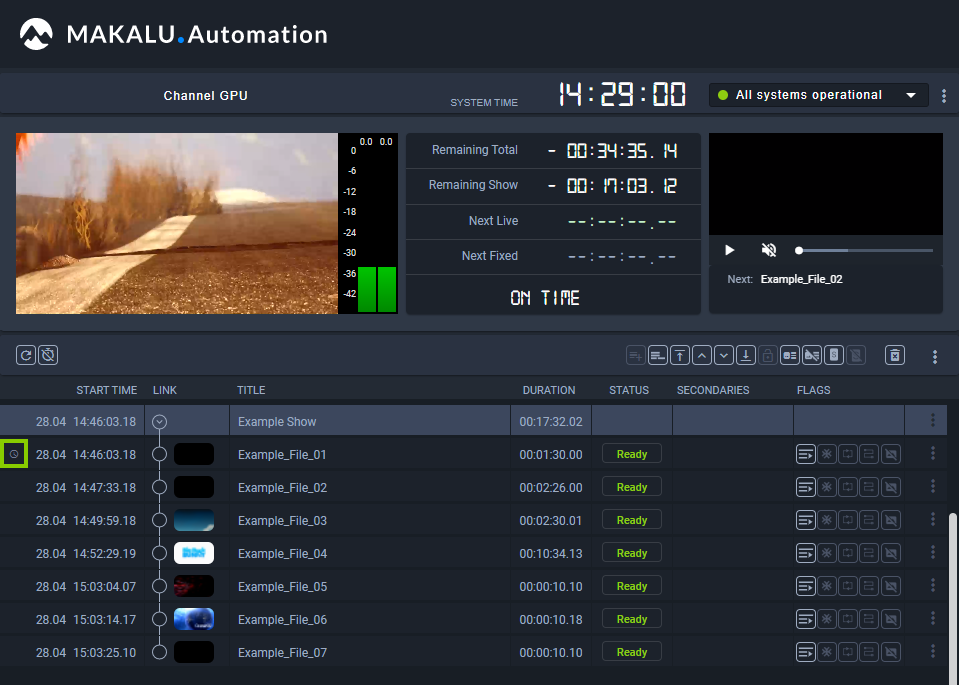
Figure: Makalu Automation - Edit show start time
-
A dialog is displayed that asks you to either use the current time by clicking Now or to enter a specific start time (format
hh:mm:ss:ff).Notice
You can only enter a start time that lies in the future.
-
To confirm the new value, click Apply.
The edited scheduled start time is applied, and the start times of all clips used in the show are updated accordingly.

Figure: Makalu Automation - Show start time edited
Editing the duration of a clip
To edit the duration of a clip, proceed as follows:
-
Expand the show that contains the clip to be edited, by clicking the corresponding circle with arrow icon
in the link column.The show is expanded, and all included clips are listed.
-
To edit the duration of a clip, click the Duration field to be edited.
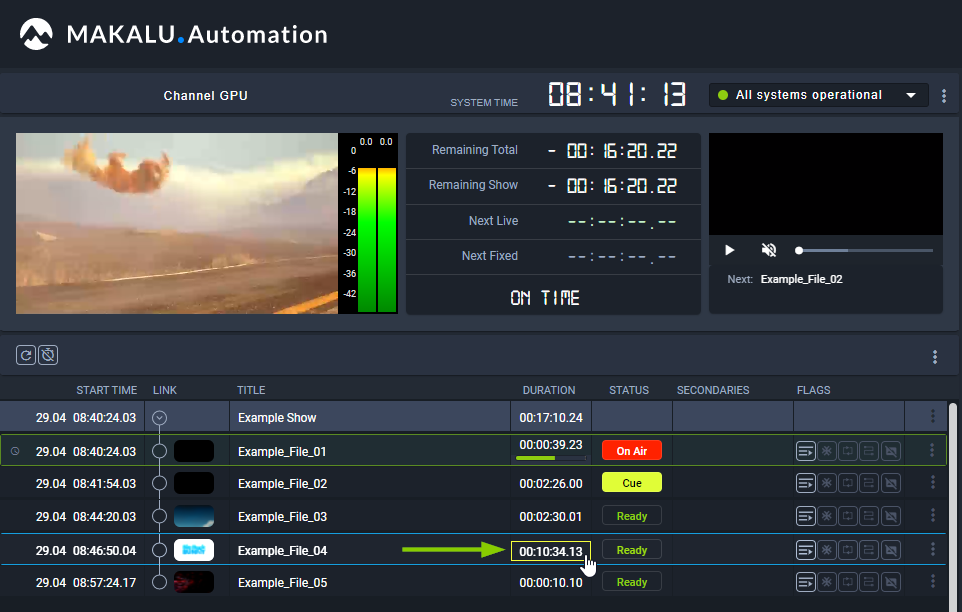
Figure: Makalu Automation - Edit clip duration
A dialog is displayed that asks you to enter the duration.
-
Enter the new duration (format
hh:mm:ss:ff).Notice
If you enter a scheduled duration that is longer than the original duration, the clip playback is looped. When the original duration ends, the clip playback starts from the beginning and plays until the entered scheduled duration is reached.
If you enter a scheduled duration that is shorter than the original duration, the clip playback stops when the entered scheduled duration is reached.
-
To confirm the new value, click Apply.
The edited duration is highlighted in yellow.
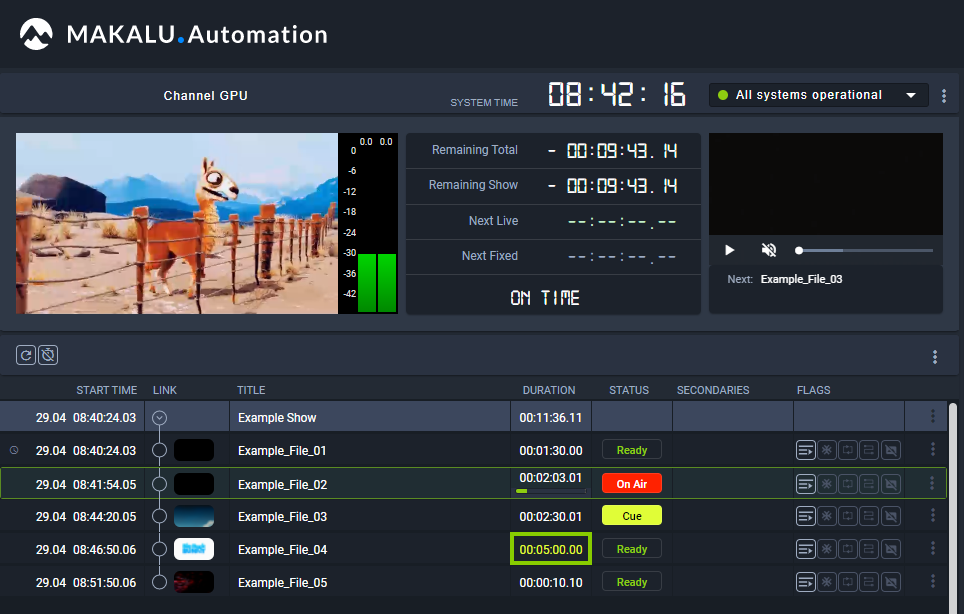
Figure: Makalu Automation - Clip duration edited
Editing the start time or duration of a secondary event
To edit the start time or duration of a secondary event, proceed as follows:
-
In the rundown click the secondaries icon
of the corresponding element (show or clip) to expand its list of secondary events. -
Depending on what property you want to edit, either click the Start Offset or Duration field of the corresponding secondary event.
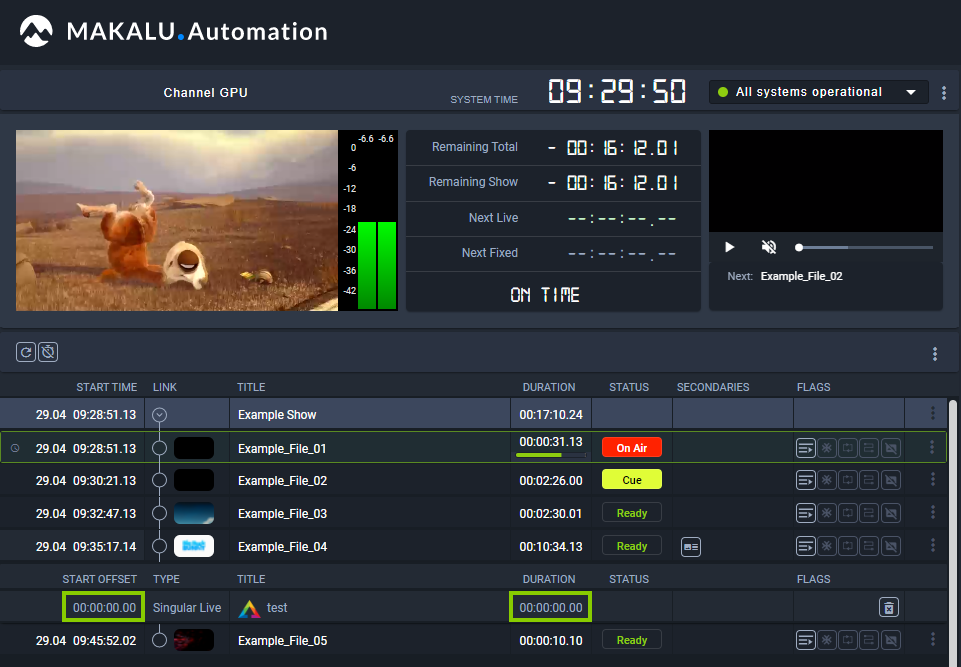
Figure: Edit the start-offset and duration of a secondary event
-
Enter the new value (format
hh:mm:ss:ff). -
Press [Enter].
The entered value is applied.
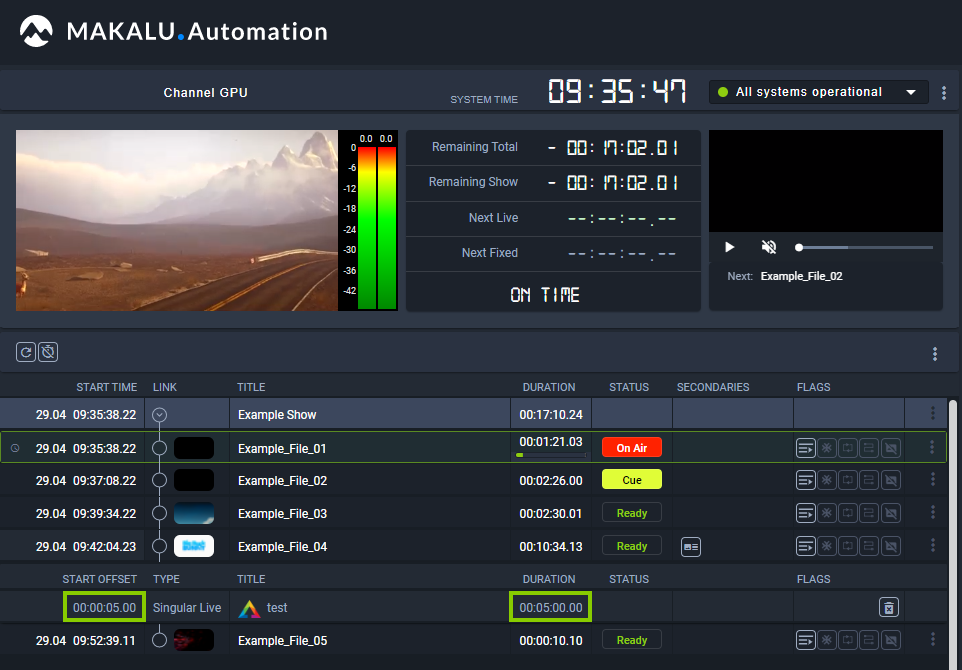
Figure: Start-offset and duration of a secondary event edited
Using groups
The group feature allows you to assign multiple clips within a show to a group. Each group is highlighted in a distinct color to facilitate the differentiation of groups.
Tip
You can play a group of clips in a loop, by activating the loop flag for the last clip in a group. When the playback of the last clip in the group is finished, the playback of the first clip in the group starts again.
To add clips to a group, proceed as follows:
-
In the rundown expand the show that contains the clips to be grouped, by clicking the corresponding circle with arrow icon
in the link column.The show is expanded, and all included clips are listed.
-
In the selected show, select multiple clips to be grouped.
-
In the top right corner of the rundown, click the Create group
 icon.
icon.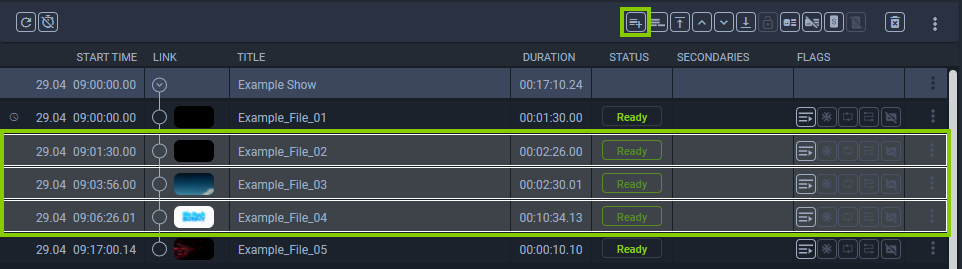
Figure: Makalu Automation - Rundown - Create group
The selected clips are assigned to a new group and are highlighted in the group color (orange in the example below).
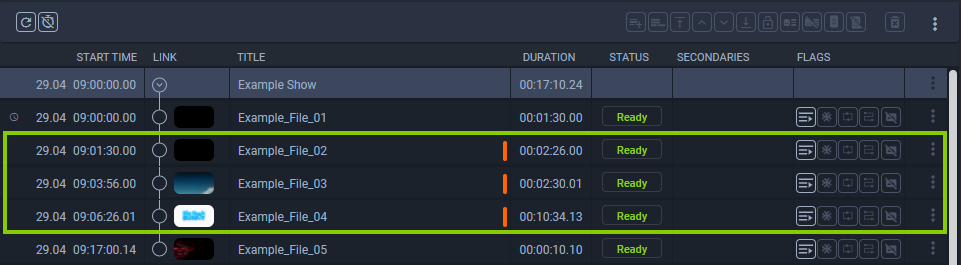
Figure: Makalu Automation - Rundown - Group created
To remove clips from a group, proceed as follows:
-
Expand a show and select the clips to be removed from the group.
-
In the top right corner of the rundown, click the Delete group
 icon.
icon.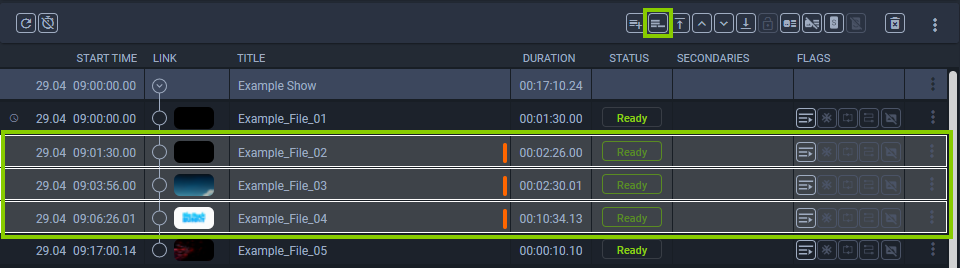
Figure: Makalu Automation - Remove clips from group
The selected clips are removed from the group. If all clips are removed from a group, the group is removed.
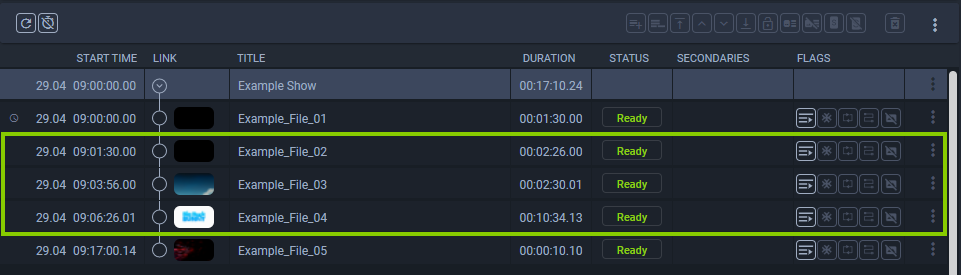
Figure: Makalu Automation - Clips removed from group
Moving clips
To change the clip order of a show, proceed as follows:
-
In the rundown expand the show that contains the clip(s) to be moved, by clicking the corresponding circle with arrow icon
in the link column.The show is expanded, and all included clips are listed.
-
Select one or more clips to be moved.
-
Depending on where you want to move the clips, select the corresponding function:
-
To move the clips one position up in the list, click the File up icon
 .
. -
To move the clips one position down in the list, click the File down icon
 .
. -
To move the clips to the beginning of the selected show’s clip list, click the First file icon
 .
. -
To move the clips to the end of the selected show’s clip list, click the Last file icon
 .
.The clips are moved to the selected position.
-
Replacing a clip
Notice
This function can be used, for example, to replace virtual placeholder assets with other media assets (actual video files). In addition it can be used to replace any clip in the rundown (regardless of the type) with any other available media asset (regardless of the type).
To replace a clip in a rundown, proceed as follows:
-
In the rundown expand the show that contains the clip to be replaced, by clicking the corresponding circle with arrow icon
in the link column.The show is expanded, and all included clips are listed.
-
On the right side select the Media tab.
-
In the media list select the type of the media asset (video file, live source, or placeholder).
-
Select one or more media assets.
-
Hold [Shift] and drag the selected item(s) from the media list on the right side and drop it on the clip to be replaced in the rundown on the left side.
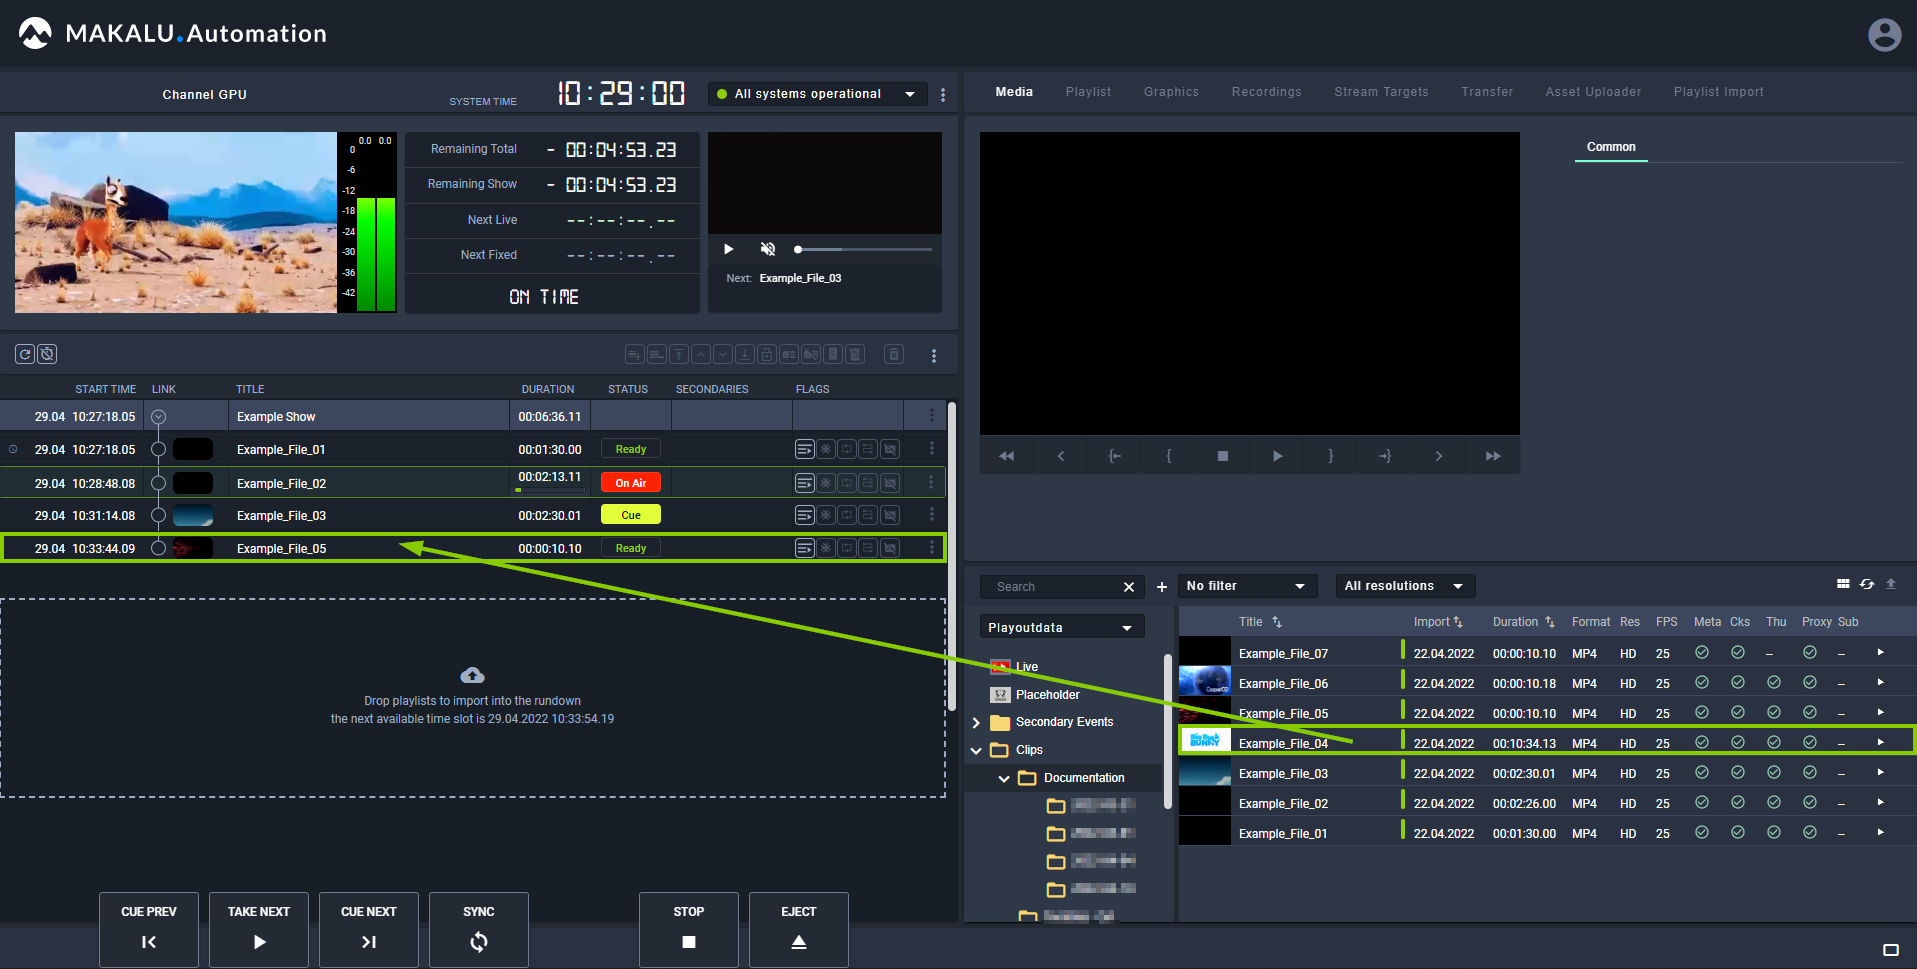
Figure: Makalu Automation - Replace clip
Notice
If the new item is a live source, you additionally must select the duration of the live clip and click Apply.
The original rundown item is replaced by the new item.
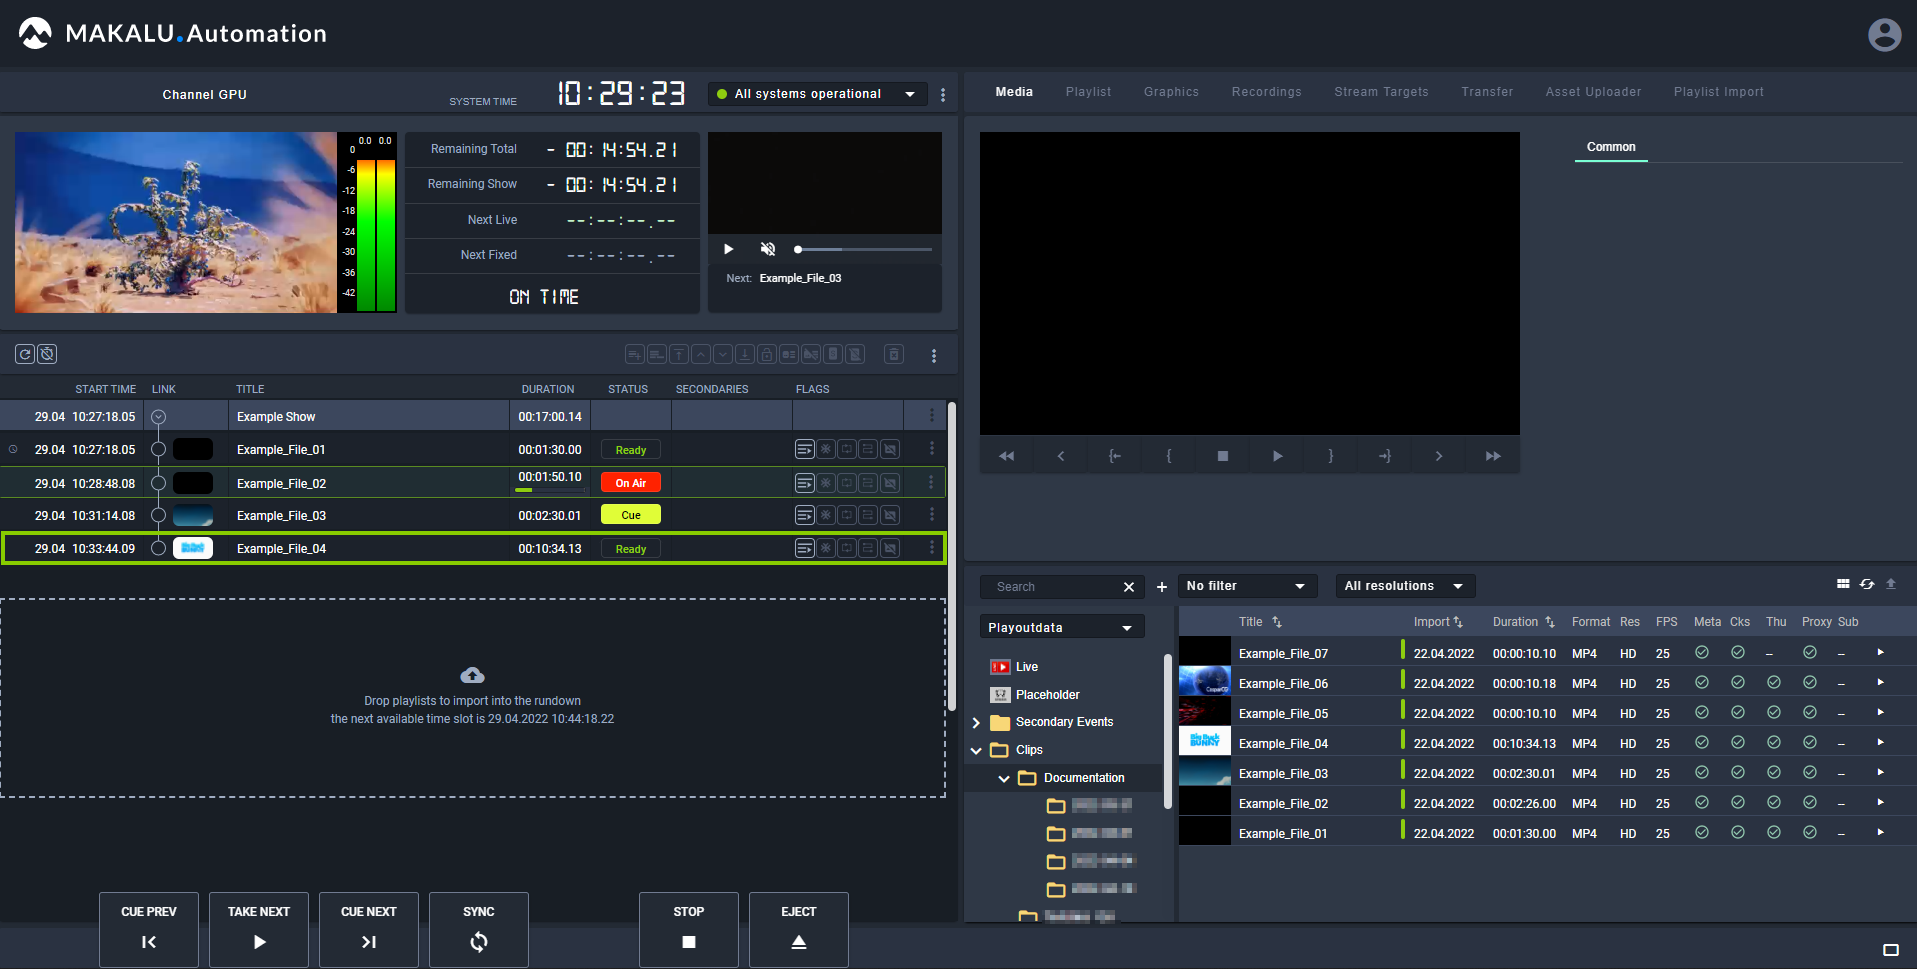
Figure: Makalu Automation - Clip replaced
Notice
If the new file is not available on the channel's playout instances, file transfers are automatically started. As a result the corresponding file is copied from the ingest storage to all playout instances that are assigned to the channel.
Assigning or deleting a default graphic
To assign a default graphic to a playlist, show, or clip, proceed as follows:
-
In the rundown select a playlist, show, or clip.
-
Click the Add default graphic
 icon in the toolbar above the rundown list.
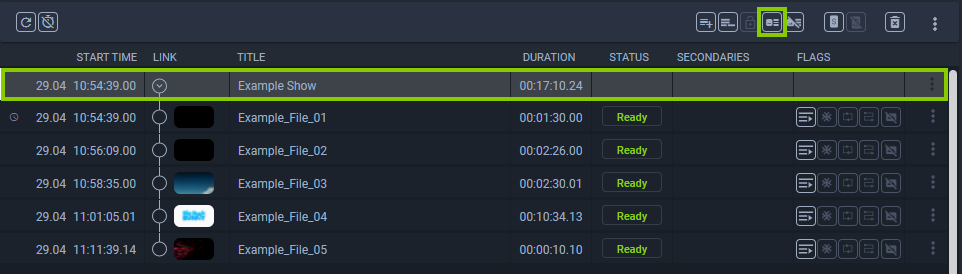
Figure: Makalu Automation - Assign default graphic
The default graphic is assigned to the selected element(s), which is recognizable by the corresponding icon in the "Secondaries" column.
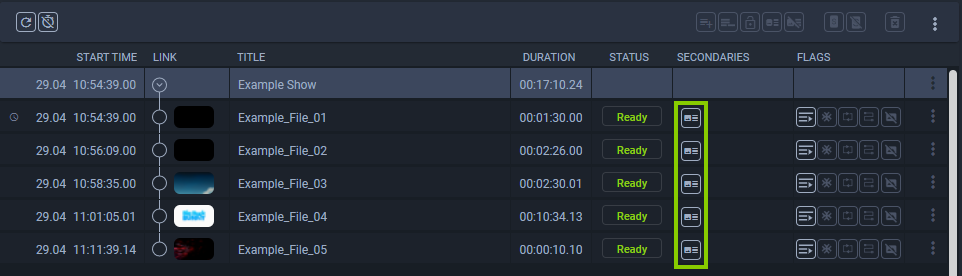
Figure: Makalu Automation - Default graphic assigned
To delete a default graphic from a playlist, show, or clip, proceed as follows:
-
In the rundown select a playlist, show, or clip with an assigned default graphic.
-
Click the Delete default graphic
 icon.
icon.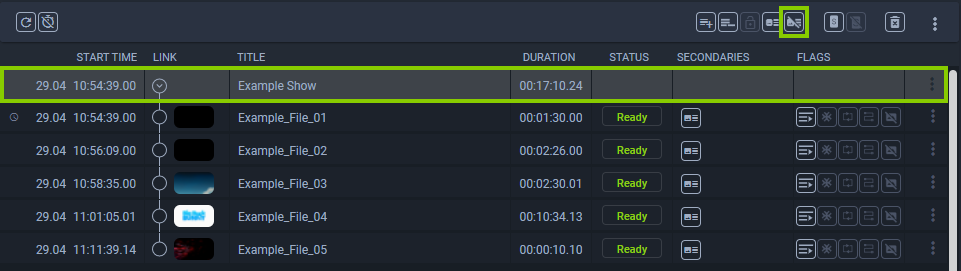
Figure: Makalu Automation - Delete default graphic
The default graphic is deleted from the selected element(s).
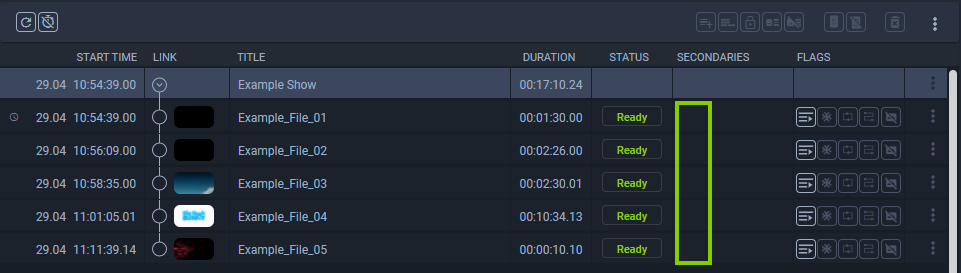
Figure: Makalu Automation - Default graphic deleted
Adding or deleting a splicing event
For information about how to use splicing events, see section Ad triggering:
Deleting a clip or a playlist
Notice
You can only delete a clip if it is in status Ready or if it is a placeholder. You cannot delete a clip if it is cued or on air.
The same applies to playlists and shows. You can only delete a playlist or a show if no clip in the playlist or show is cued or on air.
To delete a clip from the rundown, proceed as follows:
-
Select the clip to be deleted, by clicking the additional actions icon
 and select Delete clip.
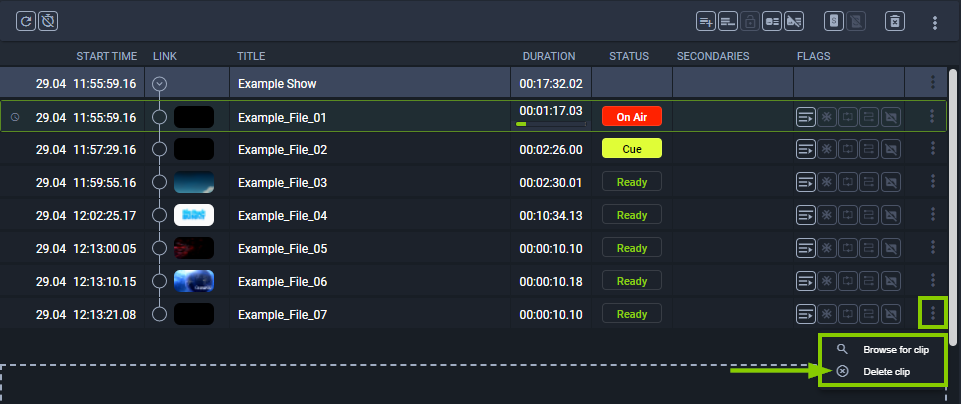
Figure: Makalu Automation - Delete a clip
-
Confirm the displayed dialog by clicking Yes.
The clip is deleted.
To delete a playlist from the rundown, proceed as follows:
Notice
Playlists can only be deleted if they are displayed in the rundown. To display playlists click the additional actions icon ![]() in the toolbar above the rundown list and select Show playlists.
in the toolbar above the rundown list and select Show playlists.
-
Select the playlist to be deleted, by clicking the additional actions icon
and select Delete playlist.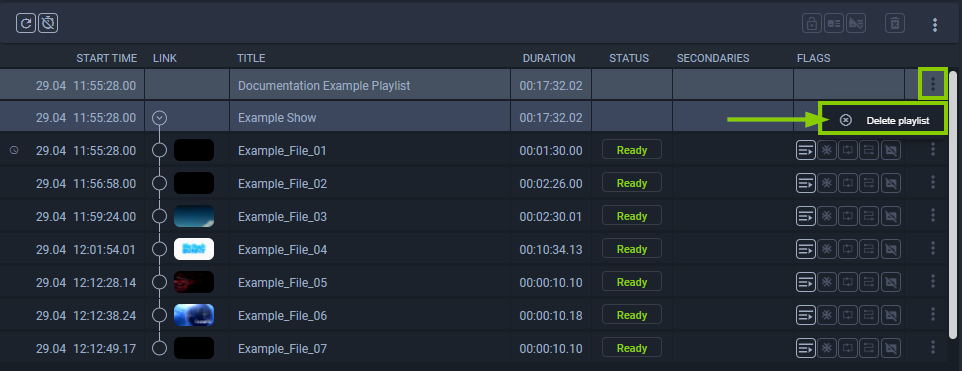
Figure: Makalu Automation - Delete a playlist
-
Confirm the displayed dialog by clicking Yes.
The playlist is deleted.
Tip
You can delete multiple playlists, by selecting the playlists to be deleted. Then click the additional actions icon
in the toolbar above the rundown list and select Delete playlists.
To delete a show from the rundown, proceed as follows:
-
Select the show to be deleted, by clicking the additional actions icon
and select Delete show.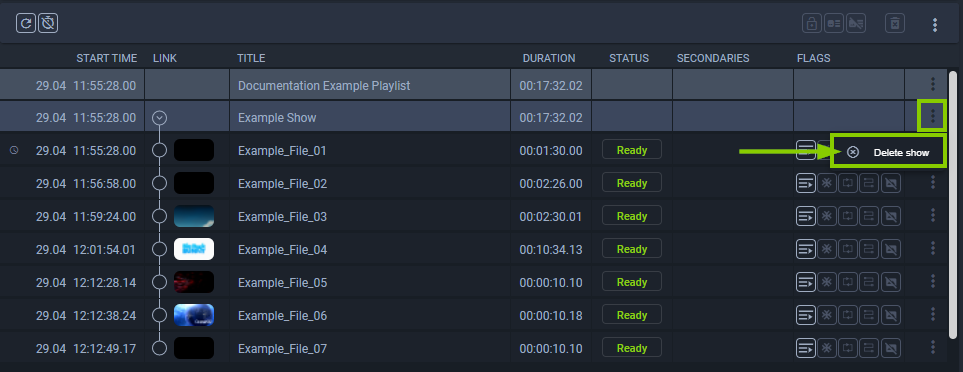
Figure: Makalu Automation - Delete a show
-
Confirm the displayed dialog by clicking Yes.
The show is deleted.
Deleting a fixed start time
To delete a fixed start time of a show in a rundown, proceed as follows:
-
In the rundown expand the show with the fixed start time to be removed, by clicking the corresponding circle with arrow icon
in the link column.The show is expanded, and all included clips are listed.
-
Select the first clip of the show.
-
Click the Delete fix start time icon
 in the toolbar above the rundown list.
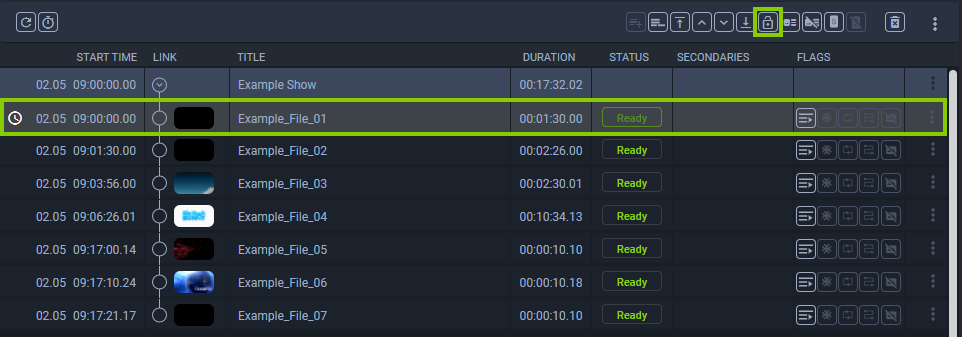
Figure: Makalu Automation - Delete fixed start time
The fixed start time is removed from the selected element. The clock icon in the first column changes from white to gray
 .
.
Reloading the rundown
Notice
Manually reloading the rundown is only necessary in case of an error, e.g. if the clip status is displayed as “Unknown”.
To manually reload the rundown, click the Reload rundown icon ![]() in the toolbar on the left above the rundown list.
in the toolbar on the left above the rundown list.
Controlling the rundown playback
The rundown playback can either be triggered automatically (based on the scheduled playlist start time) or manually by using the rundown control via the buttons at the bottom left of the screen.
To manually start the playback, proceed as follows:
-
In the rundown cue a clip to prepare it for playback, by either:
-
clicking Cue next in the rundown control, or
-
by clicking the clip status of a clip that is in status "Ready".
Notice
If you use the first method, this either cues the first clip in the rundown (if no clip was cued before) or the next clip after the previously cued clip.

Figure: Makalu Automation - Cueing a clip
The clip status changes to "Cue".

Figure: Makalu Automation - Cued clip
-
-
To start playback, click Take next in the rundown control.
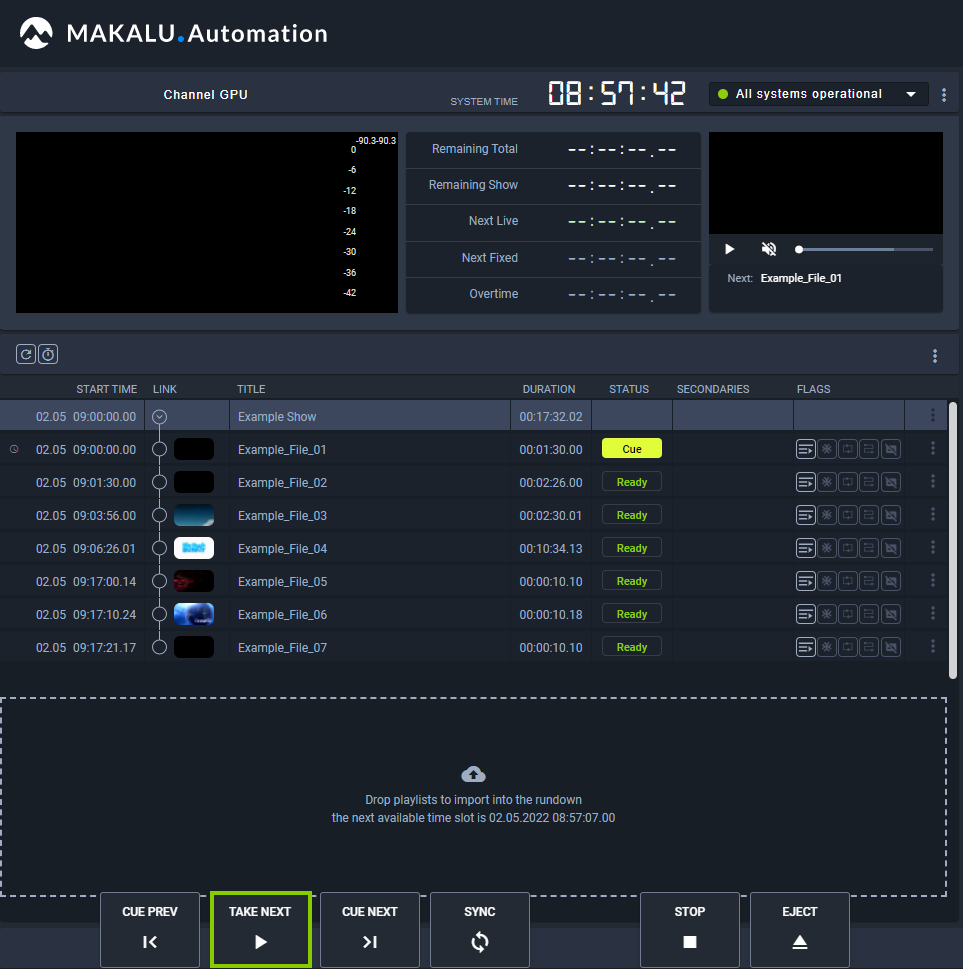
Figure: Makalu Automation - Playing a clip
The clip is played. The clip status changes to "On Air".
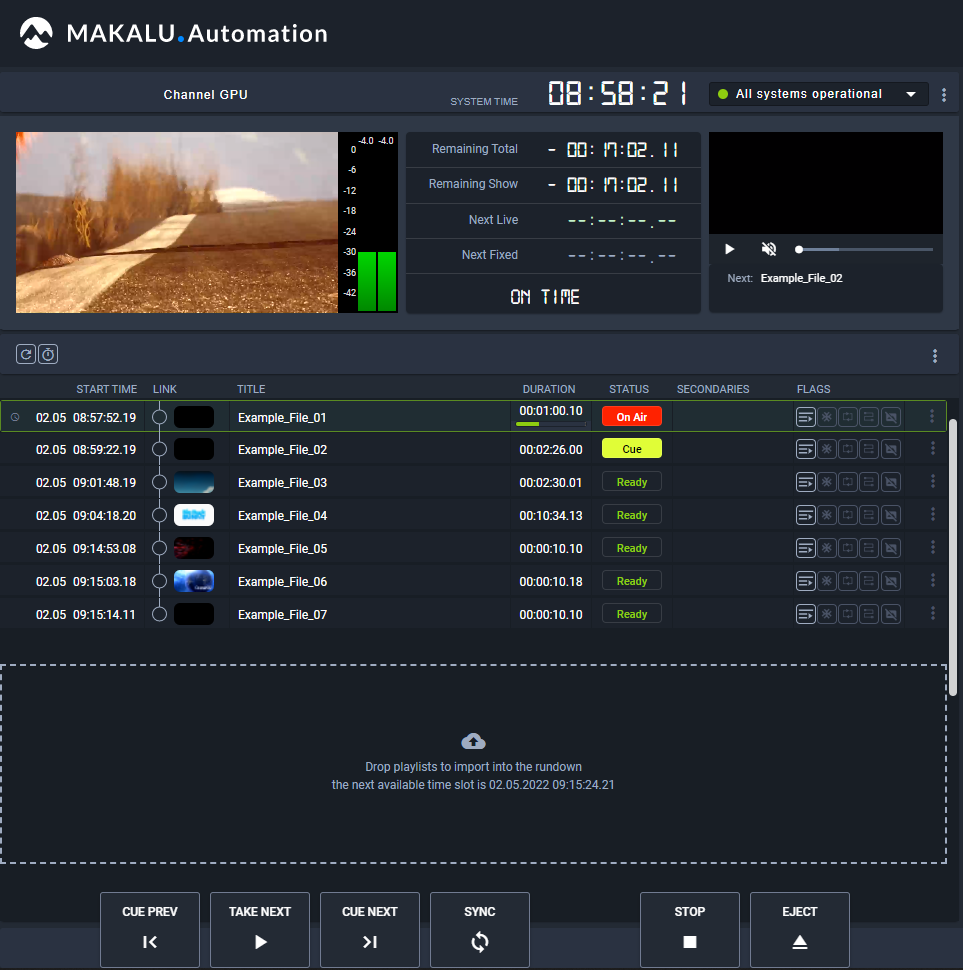
Figure: Makalu Automation - Clip is playing
Tip
If the Auto Follow flag of the following clip is enabled, the following clip is automatically cued. Alternatively you can cue any other clip (that is in status "Ready") by clicking the clip status.
To manually stop the playback of the current clip and start the playback of the next cued clip, click Take next in the rundown control. This is required if e.g. a clip of type "live source" is currently playing with clip flag "Open End" enabled. Because of the flag the clip is playing permanently. The playback stops only when you manually cue the next clip to be played and click Take next.
-
To manually stop playback, click Stop in the rundown control.
-
Confirm the dialog by clicking Yes.
The playback is stopped. The clip status changes to "Ready".
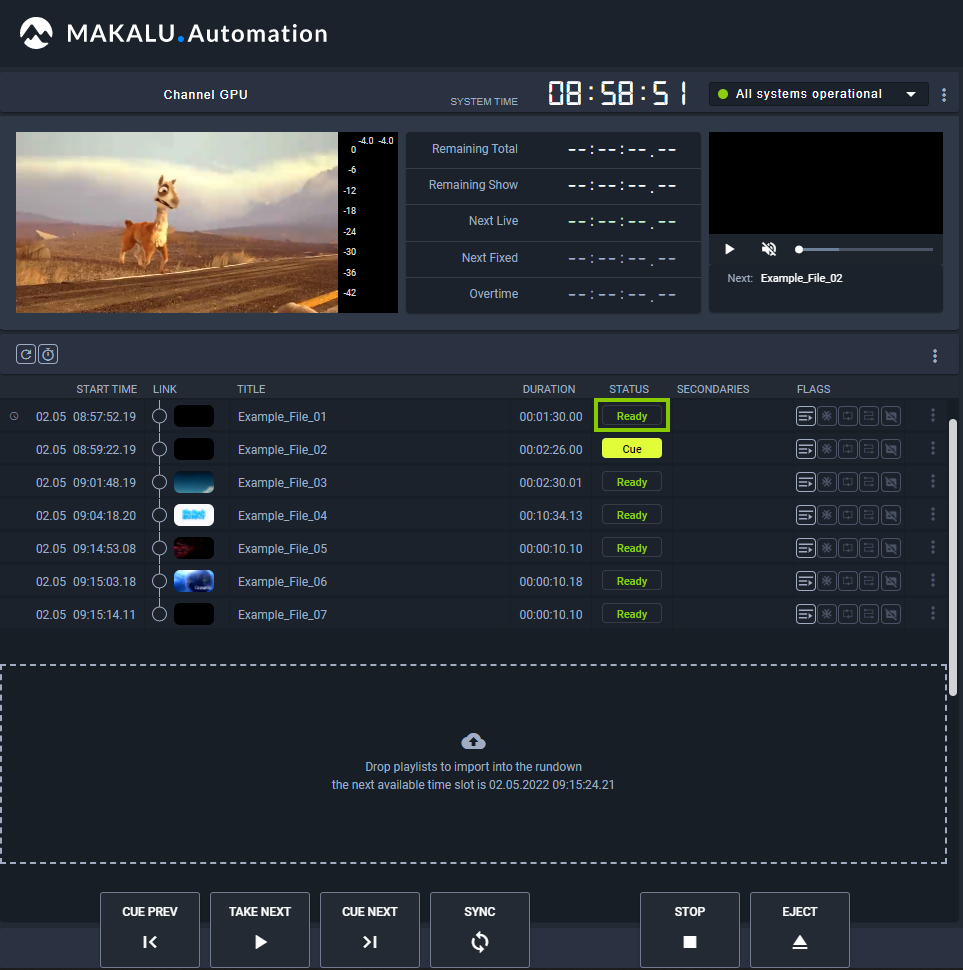
Figure: Makalu Automation - Playback stopped
Notice
If you manually stop playback, the previously cued clip remains cued. To eject the player (setting it to idle) and reset the status of all clips (setting all available clips to status "Ready"), click the Eject player icon
 in the rundown control via the buttons at the bottom left of the screen and confirm the following dialog by clicking Yes.
File transfer
As described in section Ingest, all media files to be played are initially uploaded to the ingest storage. Afterwards each file, that is used in a rundown, must be copied to all playout instances (e.g. main and backup playout instance) that are assigned to the corresponding channel. The file transfer between ingest and playout storage can be triggered in the following ways:
- add a new playlist to the rundown, which automatically triggers transfers for all used files that are not yet available on the playout instances
- add a media file to an existing show in a playlist in the rundown, which automatically triggers transfers for all used files that are not yet available on the playout instances
- trigger a file transfer manually via the media asset list (either via the Media tab or Transfer tab)
The file transfer status (that indicates if a file is already available on all related playout instances) is recognizable by colored bars in the media asset list:
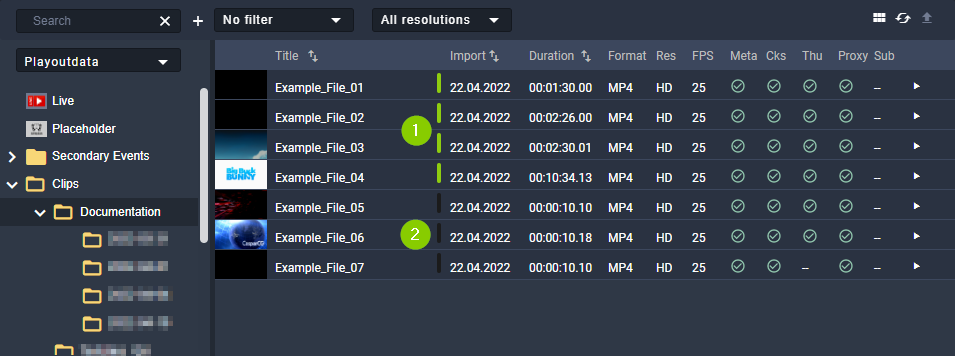
Figure: Makalu Automation - File transfer status
 Green bar - the file transfer is completed, the file is already available on the playout instances
 Black bar - the file is only available on the ingest storage but not available on the playout instances
A list of all currently running and recent file transfers is available in the Transfer tab.
Notice
The number of file transfers running at the same time is configurable and set by default to 5 parallel file transfers.
Triggering a file transfer manually
To trigger a file transfer from ingest storage to playout instances manually, proceed as follows:
-
Select the Media tab or the Transfer tab.
-
In the Source dropdown menu select the ingest storage (e.g. "Playoutdata").
-
Select a folder that contains files that are not available on playout instances (indicated by a black bar to the left of the file import date).
-
Select one or more files to be transferred.
-
In the toolbar at the top right of the media asset list click the Upload assets icon
 .
.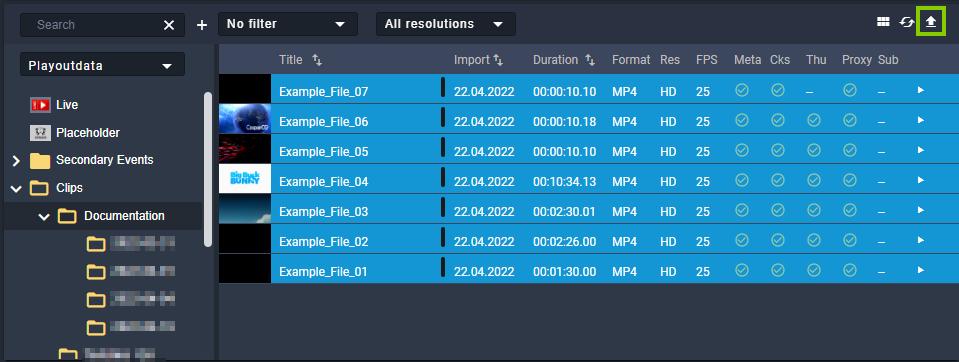
Figure: Makalu Automation - Start file transfer
-
Confirm the dialog by clicking Yes.
The transfer of the selected file(s) starts.
-
Select the Transfer tab to view the file transfer progress.
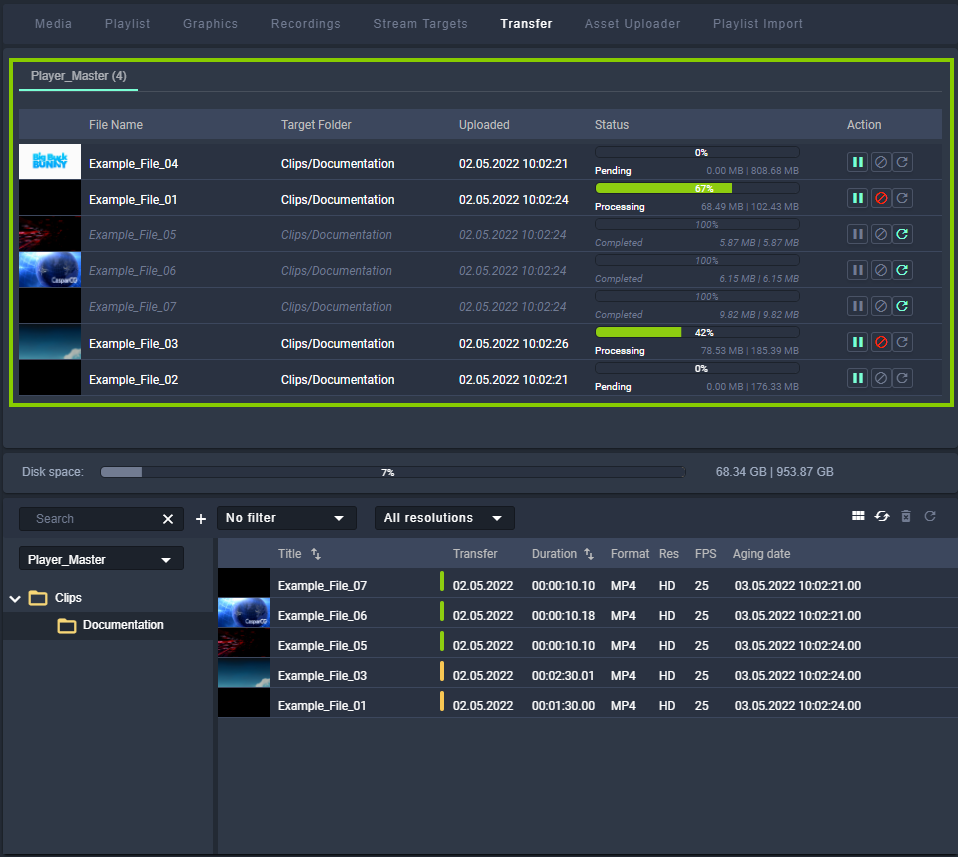
Figure: Makalu Automation - File transfer started
The file transfer to the playout instances is completed. This is also indicated by a green bar to the left of the file import date.
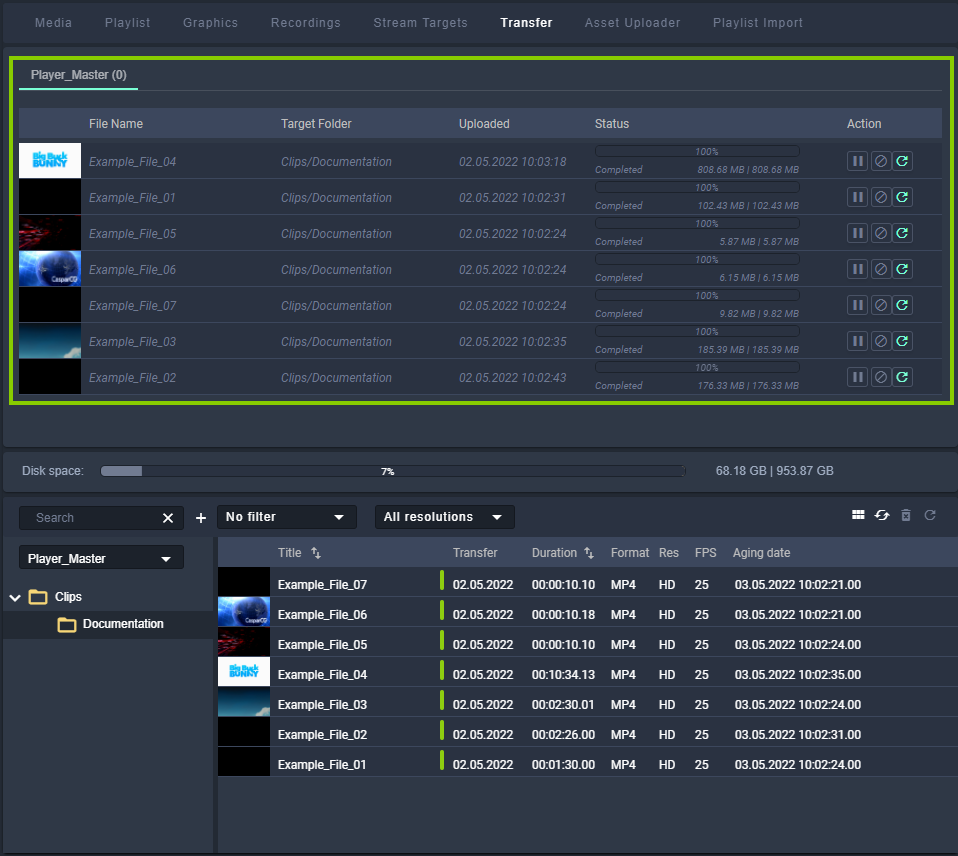
Figure: Makalu Automation - File transfer completed
Deleting transferred files manually
Notice
You can only delete files from a playout instance, that are not currently used in the rundown.
To manually delete files from a playout instance, proceed as follows:
-
Select the Media tab or the Transfer tab.
-
In the Source dropdown menu select the playout instance (e.g. "Player_Master").
-
Select the folder that contains the files to be deleted.
-
Select one or more files to be deleted.
-
In the toolbar at the top right of the media asset list click the Delete assets icon
 .
.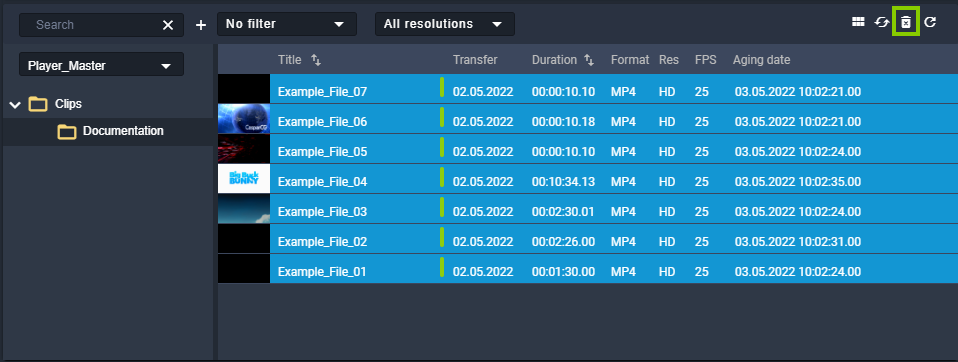
Figure: Makalu Automation - Delete files
-
Confirm the dialog by clicking Yes.
The selected files are deleted from the playout instance storage. This is also indicated by a black bar to the left of the file import date.
Importing a playlist
Notice
Makalu supports the import of XML-based playlists. For further information please contact [email protected].
To import a playlist, proceed as follows:
-
Select the Playlist Import tab.
-
To add a playlist, either:
-
drag the playlist file on the drop zone area, or
-
click select and select the playlist file.
-
-
Select the target channel to which the playlist should be assigned.
-
To confirm your selection, click Apply.
-
Click Process.
The content of the playlist file is checked and processed.
-
Click Import.
The playlist is imported.
Exporting a missing file list
To export a missing file list, proceed as follows:
-
Select the Playlist Import tab.
-
Click the plus icon of an imported playlist that has missing files.
The missing file list expands, and all missing files are listed.
-
Click Export.
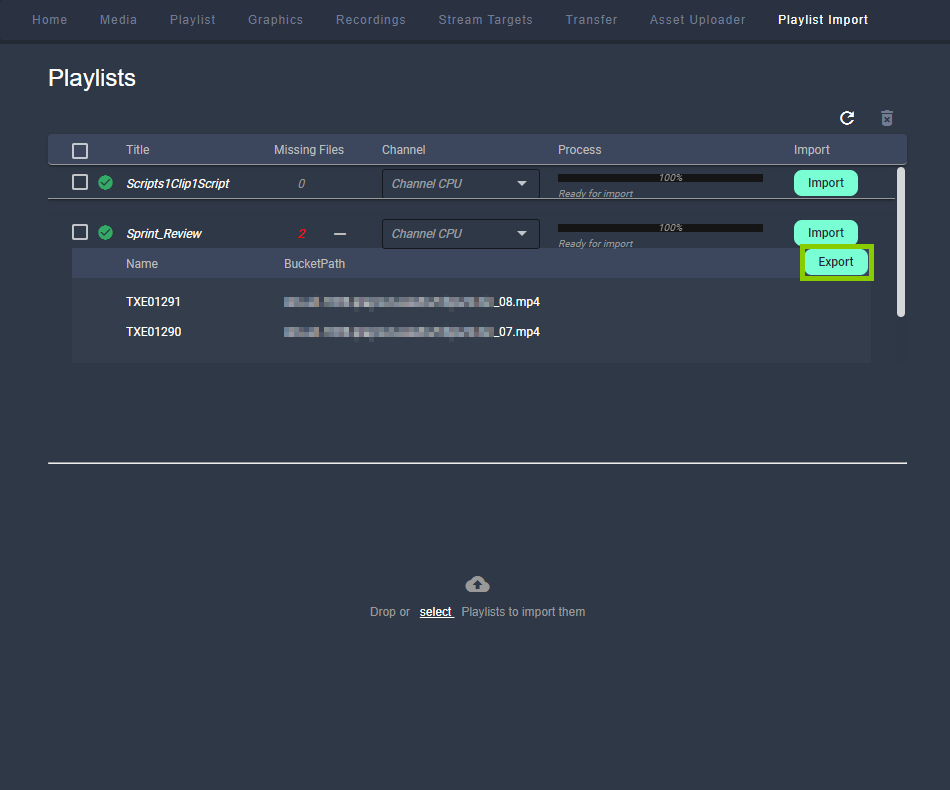
The missing file list is downloaded.
Notice
Missing file lists are exported as CSV files.
Restarting the player
Warning
Use the channel restart trigger only in case of an emergency (e.g. if a player error occurs).
Restarting the player takes a short amount of time. During this time, no output signal is generated.
To manually restart the player, proceed as follows:
-
Click the menu button to the right of the system health status indicator and select Restart player.
A dialog is displayed that asks you to confirm this action.
-
Confirm the dialog, by clicking Yes.
The player is restarted.