Recording
Recording is an optional Makalu module that enables you to record multiple source/input streams at the same time in different formats (profile-based). It can be used e.g. for live recordings or compliance recording.
Encoder types
The modules that are used for creating recordings are internally referred to as "encoders". Makalu provides the following types of encoders:
| Encoder type | Features |
|---|---|
| Standard | Stream recording (in/out) with MP4 file output |
| Broadcast | Stream recording (in/out) with broadcast file format output (e.g. XDCAM-HD422, AVC-Intra or XAVC) and growing file support |
Recording job types
Recordings are internally managed based on recording jobs. For each recording a corresponding recording job is created. Makalu provides the following types of recording jobs:
| Job type | Description |
|---|---|
| Crash | The recording can be started immediately using Makalu Automation (manual start and stop). |
| Schedule | The recording can be scheduled for a fixed time and period (automatic start and stop or automatic start and manual stop). Scheduled recording jobs can be created via Makalu Automation and Makalu Traffic. |
Notice
The decision which application to use for creating a recording job depends on the workflow.
Makalu Automation is designed for editing the rundown at short notice. It enables you to create recording jobs immediately and independent of the used playlists and shows.
Makalu Traffic is designed for creating reusable templates for shows and playlists. It enables you to automatically create recording jobs whenever a specific show template or playlist is used in the rundown.
Creating a recording job via Makalu Traffic
Notice
In the following it is assumed that you already have created a show and want to add a recording job to this existing show. For information about how to create a new show, see section Schedule (Creating a show).
You can also add recording jobs to playlists in a similar way. For more information about how to edit a playlist, see section Schedule (Editing a playlist).
To add a recording job to a show, proceed as follows:
-
Either use the Shows area in the sidebar on the left or the list of shows on the right to search for the show to be edited.
-
Click on the name of the show to be edited.
The show details are opened in a new tab.
-
In the sidebar on the left select Secondary Events > Recordings.
The list of available encoders is displayed.
-
Select the encoder type to be added and drag it onto the Drop Zone in the Show Addons area.
-
Edit the recording properties, by selecting the corresponding Recording event in the Show Addons list and click the Edit Addon icon.
The recording details are displayed to the right.
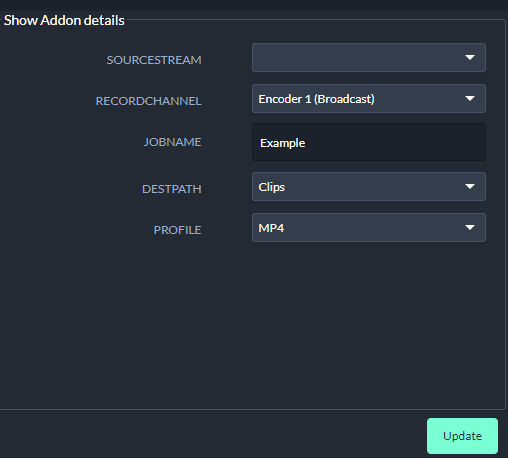
Figure: Makalu Traffic - Recording properties
-
Edit the properties as required.
-
To save your changes, click Update.
The show is saved. Whenever you add the show to the rundown, a recording job is automatically created with the properties you selected. You can control it via Makalu Automation in the Recordings area.
Creating a recording job via Makalu Automation
Creating a crash recording job
To create a crash recording job, proceed as follows:
-
On the right side select the Recordings tab.
The recording controls are displayed.
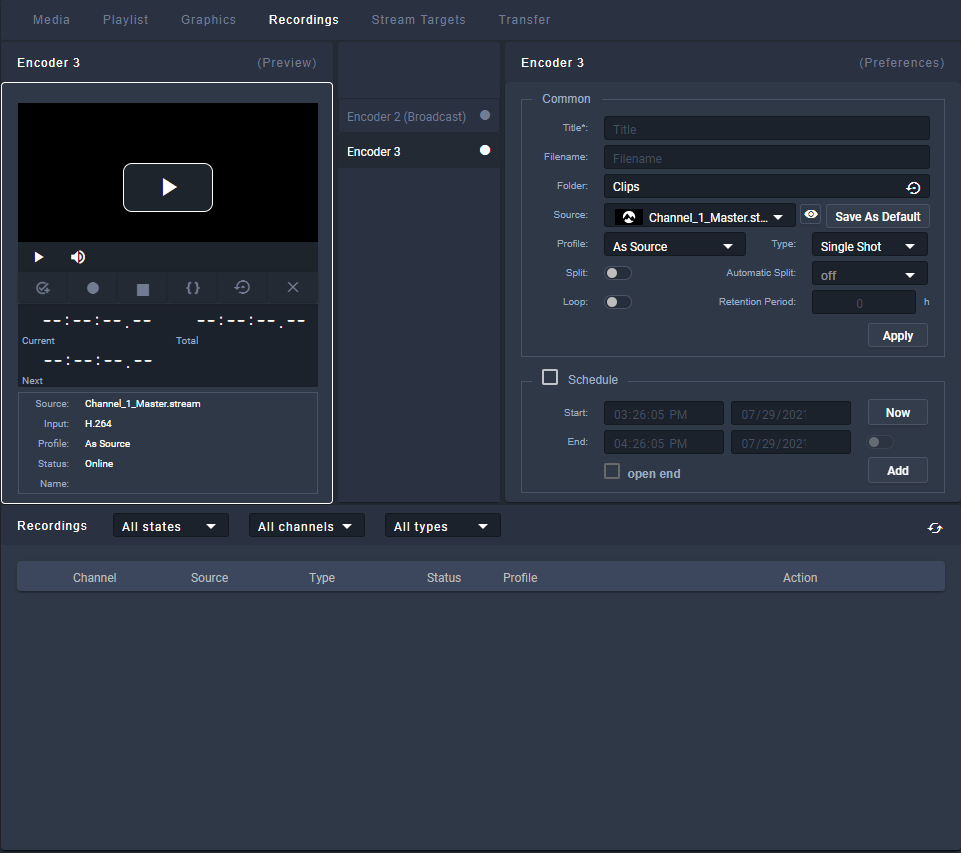
Figure: Makalu Automation - Recordings
-
In the encoder list select the encoder to be used for the recording.
-
In the Preferences area edit the recording settings.
Notice
To create a recording job you must enter at least the title.
-
Select the Folder where to save the recording.
-
Select the Source to be recorded.
Tip
To watch a preview of the selected source, click the Play icon in the Preview area of the selected encoder.
-
Optional: If you want to reuse the recording job and create multiple recordings, select Type Multi Shot. To create only a single recording, leave the default Type Single Shot.
-
Optional: If you want to split the recording automatically, enable Split and select an Automatic Split interval. To split a recording manually, select Automatic Split off.
-
Optional: If you want to delete the recording automatically after a predefined time, enable Loop and select a Retention Period.
-
Click Apply.
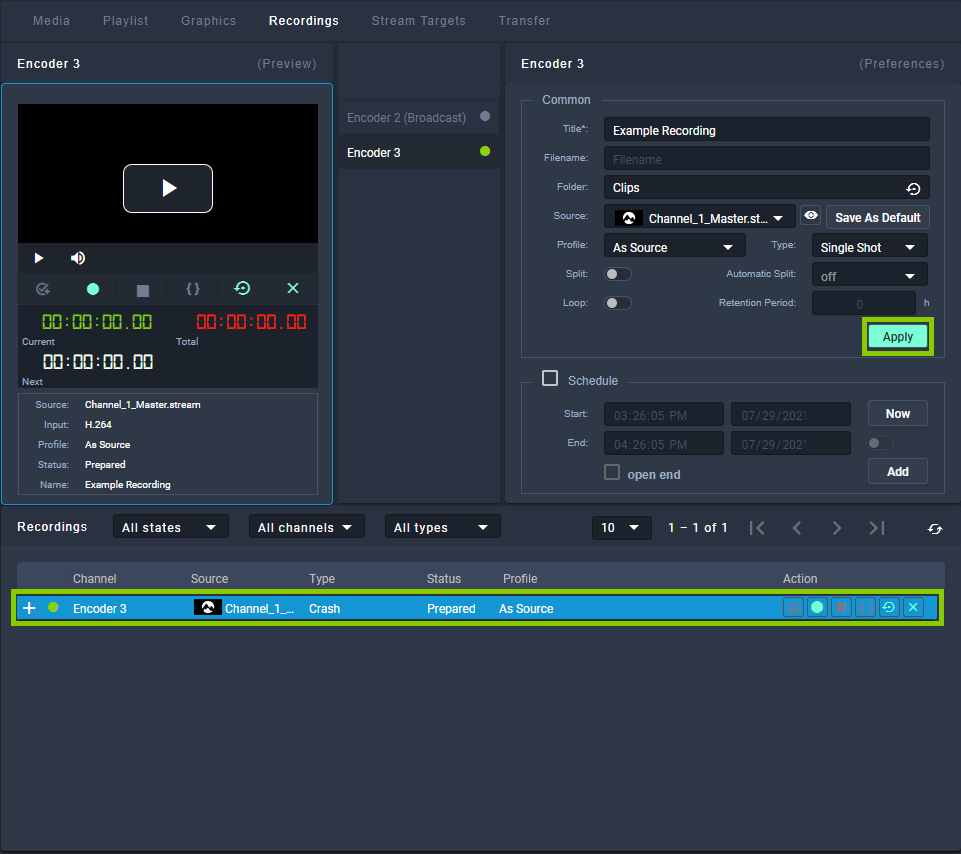
Figure: Makalu Automation - Apply crash job
The crash job is created, added to the Recordings list, and prepared. There you can control it manually. For more information see section Controlling a recording job.
Creating a scheduled recording job
To create a scheduled recording job, proceed as follows:
-
Repeat steps 1 to 9 as described in section Creating a crash recording job.
-
Enable Schedule.

Figure: Makalu Automation - Add schedule job
-
Enter a Start time and date or, if you want to use the current time and date, click Now.
-
Enter an End time and date or, if you want to enter a duration, enable the toggle switch to the right of the end date. Alternatively you can create a scheduled recording job without specifying an end time, by selecting Open end.
-
Click Add.
The scheduled job is created and added to the recording list.
Controlling a recording job
In the Recordings area, the list of available recording jobs is displayed. You can control a recording job via the icons in the Action column.

Figure: Makalu Automation - Controlling recordings
-
To prepare a recording job, click the Prepare icon
 .
.Notice
Crash recording jobs are prepared automatically.
-
To start a recording job, click the Start record icon
 .
. - To stop a recording job, click the Stop record icon
 .
. - To split a recording job, click the Split record icon
 .
. - To cancel a recording job, click the Cancel record icon
 .
. - To delete a recording job, click the Delete record icon
 .
.
Deleting a recording job
To delete a recording job, proceed as follows:
-
In the Recordings section, select the recording job to be deleted.
-
Click the Delete record icon
. -
Confirm the displayed dialog by clicking Yes.
The recording job is deleted.
Previewing a recorded file
To preview a recorded file, proceed as follows:
-
On the right side select the Media tab.
-
Below the preview player select the source Playoutdata.
-
Search the file to be previewed either by using the search field or by selecting the corresponding folder.
-
Select the file to be previewed and either add it to the preview player via drag and drop or by clicking Play
 on the right side.
The file is opened in the preview player. Use the player controls to control the preview.