Editing the rundown
Editing the start time of a show or clip
To edit the start time of a show or clip, proceed as follows:
Notice
You can only edit the start time if the corresponding show or clip is not currently on-air.
-
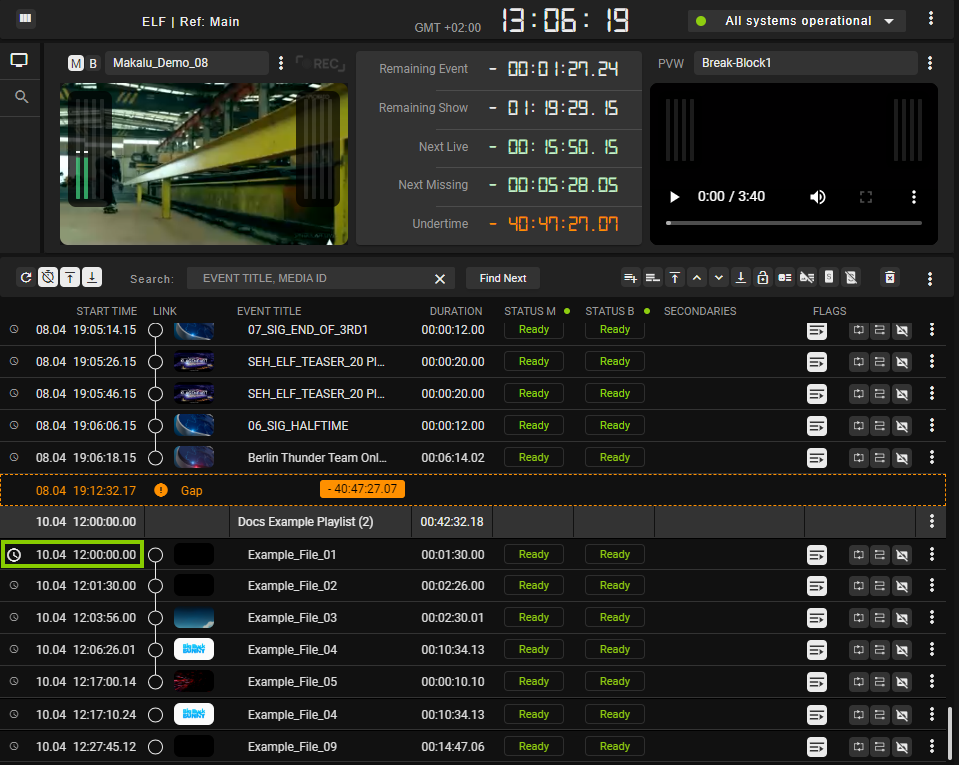
In the rundown, click the clock icon
 of the show or clip to be edited.
Tip
If the show display is expanded, the clock icon is not displayed for the show, but for the first clip of the show. In this case, click the clock icon of the first clip.
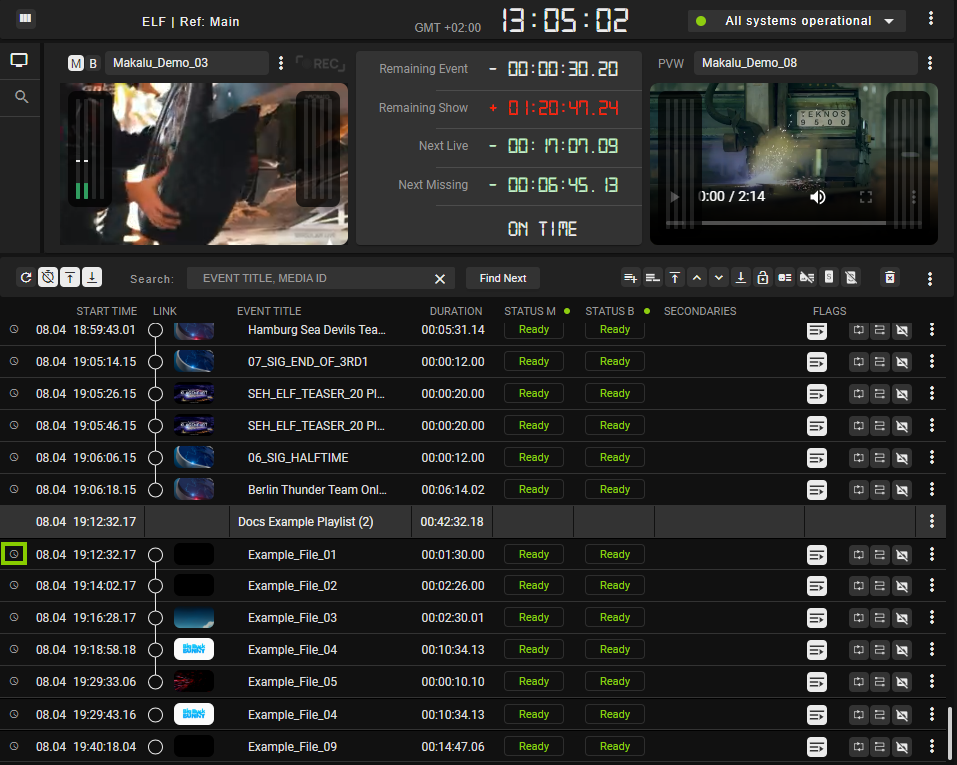
Automation - Edit show start time -
A dialog is displayed that asks you to select a start date and time (in the format
hh:mm:ss:ff).Notice
You can only enter a start time that lies in the future.
-
To confirm the new value, click Apply.
The edited scheduled start time is applied, and the start times of all clips used in the show are updated accordingly.
Editing a clip
Via the Edit clip menu, you can view additional clip/event metadata and edit the following properties:
- title
- start time
- offset
- end time
- duration
- flags
To edit a clip, proceed as follows:
-
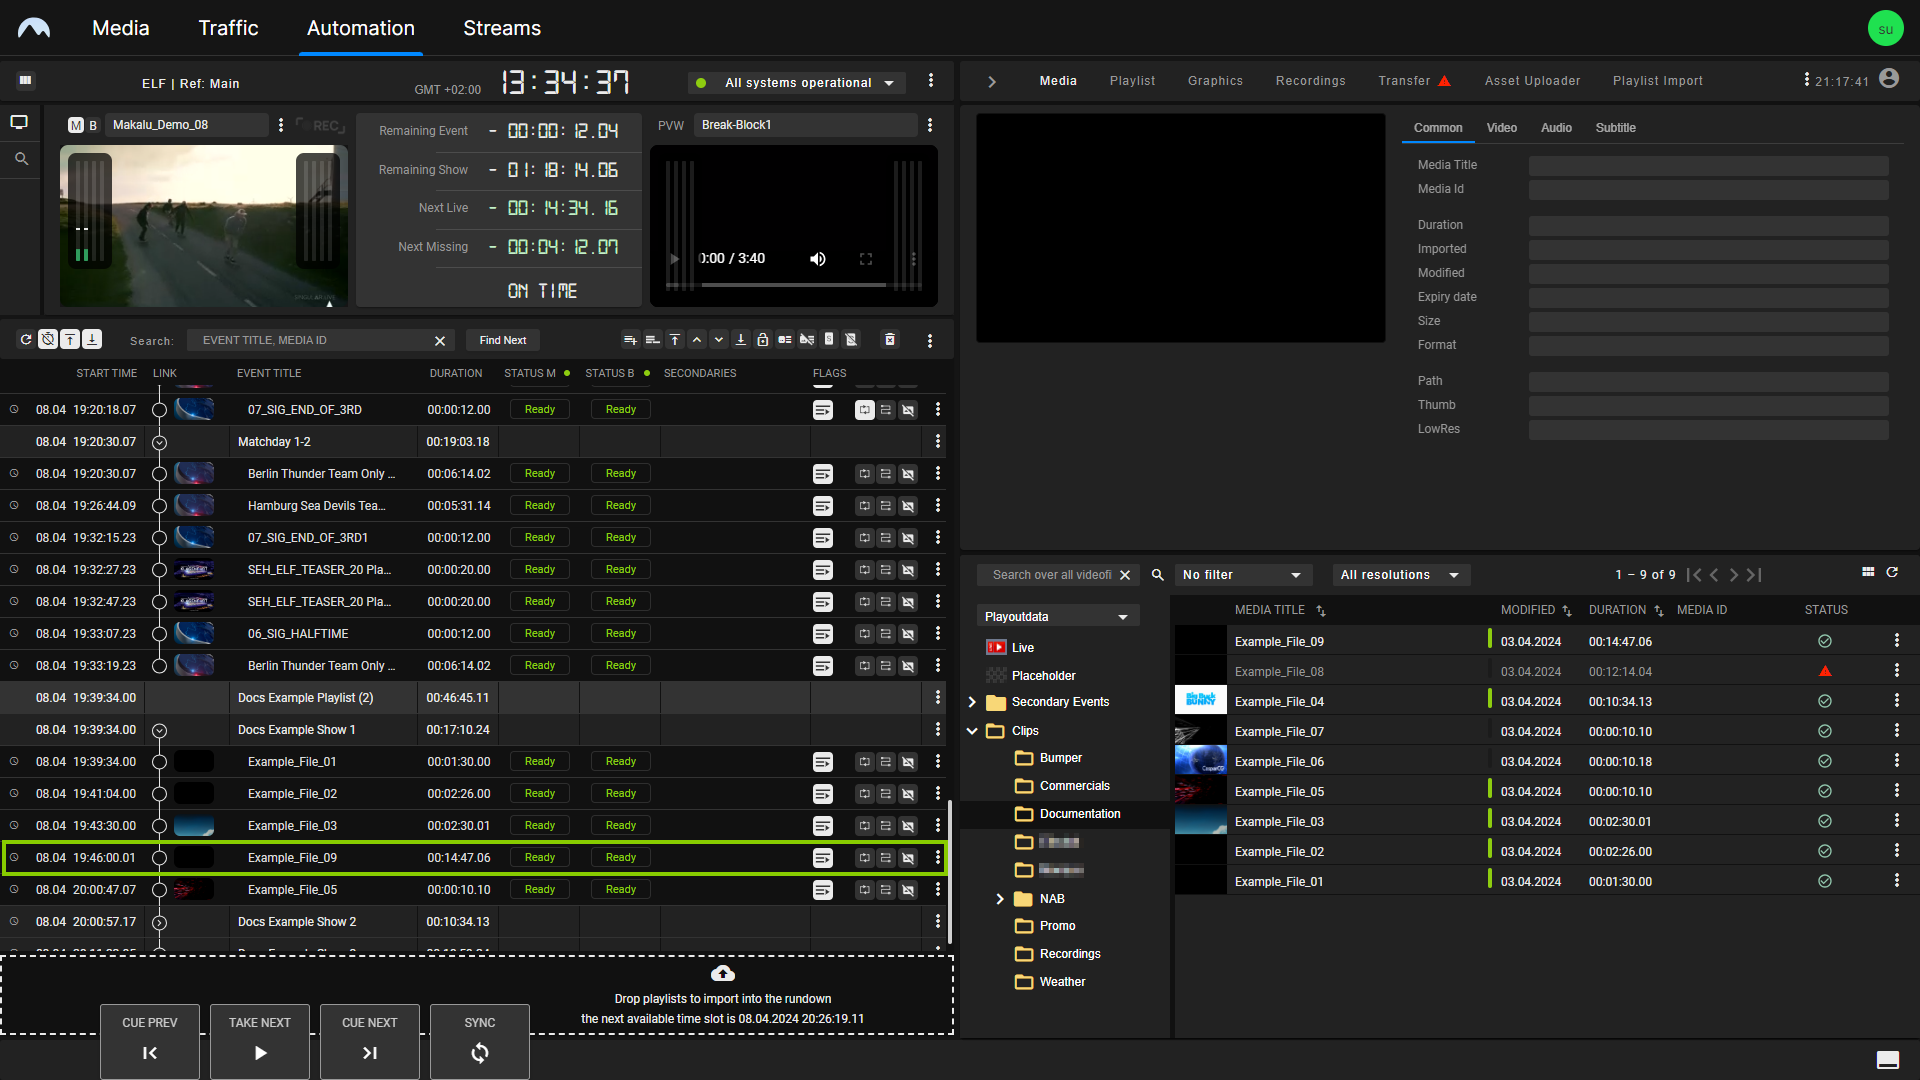
Expand the show that contains the clip to be edited by clicking the corresponding Expand icon
 in the link column.
The show is expanded, and all included clips are listed.
-
Open the Edit clip menu either by clicking the Duration field of the clip to be edited or by clicking the Options icon
 on the right side of the clip and selecting Edit clip.
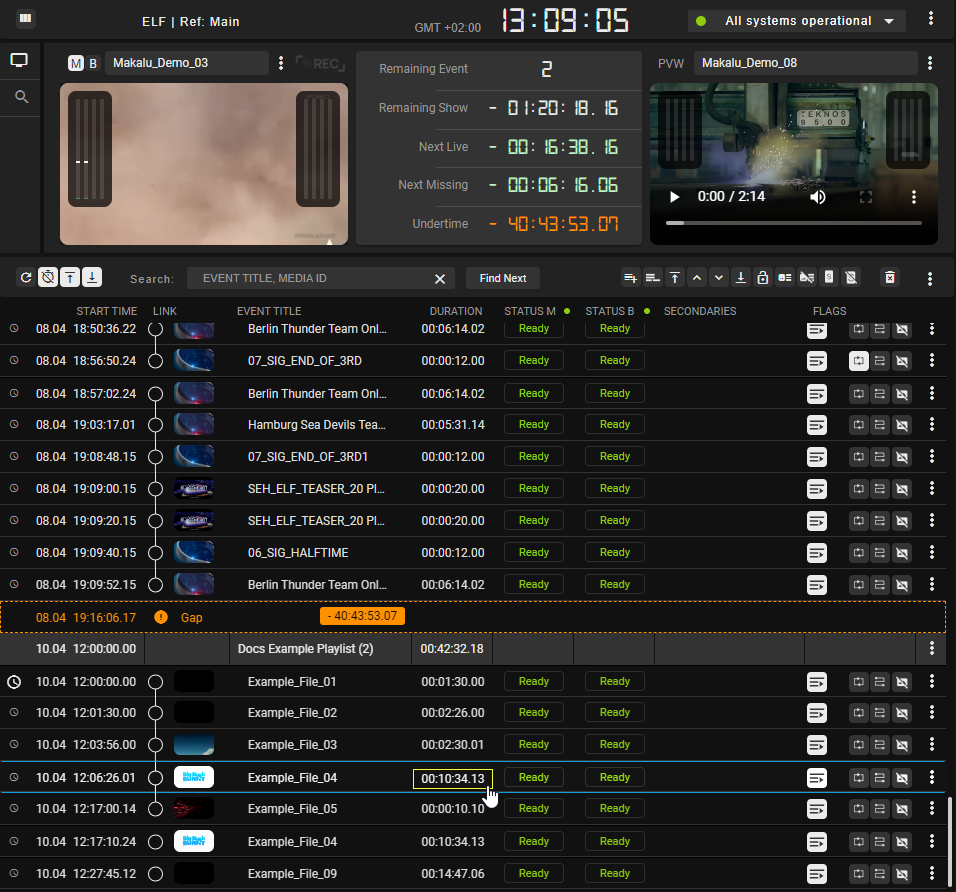
Automation - Open the Edit clip menu The Edit clip menu opens.
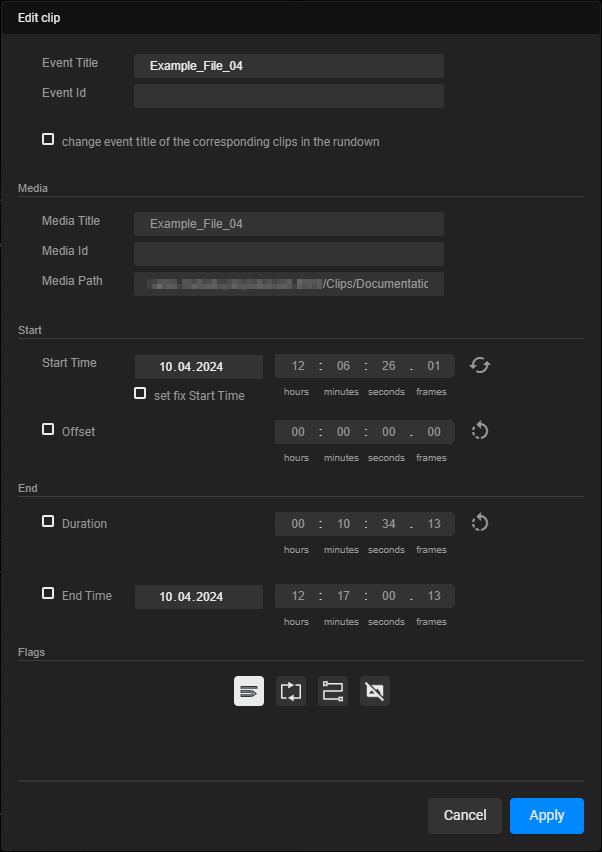
Automation - Edit clip menu -
Edit the clip properties:
-
To edit the title, select the Event Title field and edit it as desired.
Notice
If you want to apply your changes not only to the clip currently selected but also to all occurrences of the clip in the rundown, enable the checkbox Change event title of the corresponding clips in the rundown.
-
To edit the start time, enable the checkbox Set fix Start Time and set the desired date and time.
-
To use an offset, enable the checkbox Offset and set the time as desired.
Notice
The Offset property can only be set for file-based clips. It is not available for live and placeholder clips.
-
To edit the duration, enable the checkbox Duration and set the time as desired.
Notice
If you enter a scheduled duration that is longer than the original duration, the clip will loop during playback. When the original duration ends, the clip playback starts from the beginning and plays until the entered scheduled duration is reached.
If you enter a scheduled duration that is shorter than the original duration, the clip playback stops when the entered scheduled duration is reached.
-
To edit the end time, enable the checkbox End Time and set the desired date and time.
-
If the clip is part of a show that currently exceeds its planned duration, you can shorten the clip duration to remove the overtime of the show by enabling the checkbox Adjust Clip.
-
To edit the clip flags, enable or disable the corresponding Flags (for more information, see the section Clip flags).
-
-
To confirm your changes, click Apply.
The edited properties are saved.
Editing a secondary event
To change the properties of a secondary event assigned to a show or a clip, proceed as follows:
-
Expand the list of secondary events of the corresponding element (show or clip):
-
If you want to edit a secondary event of a show in the rundown, click the Secondary Events icon
 in the Secondaries column of the corresponding show.
 -
If you want to edit a secondary event of a clip in the rundown, click the icon of the corresponding secondary event type in the Secondaries column of the corresponding clip.
-
Open the Edit secondary event menu, by clicking the Options icon
 on the right side of the corresponding secondary event and selecting Edit Secondary.
The Edit secondary event menu opens. Depending on the type of the selected secondary event, different properties are available for editing.
-
Edit the properties of the selected secondary event.
-
To confirm your changes, click Apply.
The edited properties are saved.
Using groups
The group feature allows you to assign multiple clips within a show to a group and play them back in a loop. Each group is highlighted in a distinct color to facilitate the differentiation of groups.
To add clips to a group, proceed as follows:
-
In the rundown, expand the show that contains the clips to be grouped by clicking the corresponding Expand icon
 in the link column.
The show is expanded, and all included clips are listed.
-
In the selected show, select multiple clips to be grouped.
-
In the top right corner of the rundown, click the Create group icon
 .
.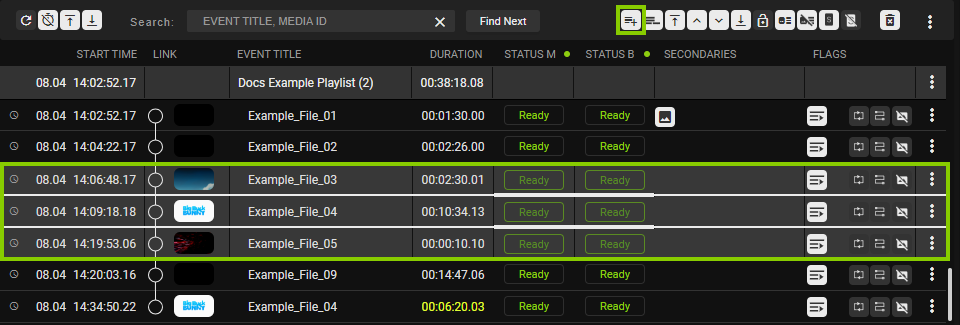
Automation - Rundown - Create group
The selected clips are assigned to a new group and are highlighted in the group color (orange in the example below).
Tip
You can play a group of clips in a loop by activating the loop flag for the last clip in a group. When the playback of the last clip in the group is finished, the playback of the first clip in the group starts again.
Tip
In addition to grouping individually selected clips, you can group all clips of a show to play them in a loop. To do this, select the corresponding show and click the Create group icon ![]() above the rundown. All clips of the show are grouped, and the loop flag is activated for the last clip of the group.
above the rundown. All clips of the show are grouped, and the loop flag is activated for the last clip of the group.
To remove clips from a group, proceed as follows:
-
Expand a show and select the clips to be removed from the group.
-
In the top right corner of the rundown, click the Delete group icon
 .
.
Automation - Remove clips from group
The selected clips are removed from the group. If all clips are removed from a group, the group is removed.
Moving clips
To change the clip order of a show, proceed as follows:
-
In the rundown, expand the show that contains the clip(s) to be moved by clicking the corresponding Expand icon
 in the link column.
The show is expanded, and all included clips are listed.
-
Select one or more clips to be moved.
-
Depending on where you want to move the clips, select the corresponding function in the toolbar above the rundown:
-
To move the clips one position up in the list, click the File up icon
 .
. -
To move the clips one position down in the list, click the File down icon
 .
. -
To move the clips to the beginning of the selected show’s clip list, click the First file icon
 .
. -
To move the clips to the end of the selected show’s clip list, click the Last file icon
 .
.
Tip
Alternatively, you can also move selected clips via drag and drop instead of using the rundown toolbar.
-
The clips are moved to the selected position.
Replacing a clip with another media item
Notice
This function can be used, for example, to replace a placeholder clip with another media asset (physical media file). Additionally, it can be used to replace any clip in the rundown (regardless of the type) with any other available media asset (primary event), which is listed in the Media tab, either in the Clips folder (physical media files) or under Live (live sources).
Notice
Placeholders cannot be played back because they are virtual assets without a linked physical media file. If a placeholder scheduled in the rundown is not replaced before its actual playback starts, then the configured emergency screen or video is played for the planned duration of the placeholder.
To replace a clip in a rundown with another media item via the Media tab, proceed as follows:
-
In the rundown, expand the show that contains the clip to be replaced by clicking the corresponding Expand icon
 in the link column.
The show is expanded, and all included clips are listed.
-
On the right side, select the Media tab.
-
In the media list, select the type of media asset (video file, live source, or placeholder).
-
Select one or more media assets.
-
Hold [Ctrl] and drag the selected item(s) from the media list on the right side and drop them on the clip to be replaced in the rundown on the left side.
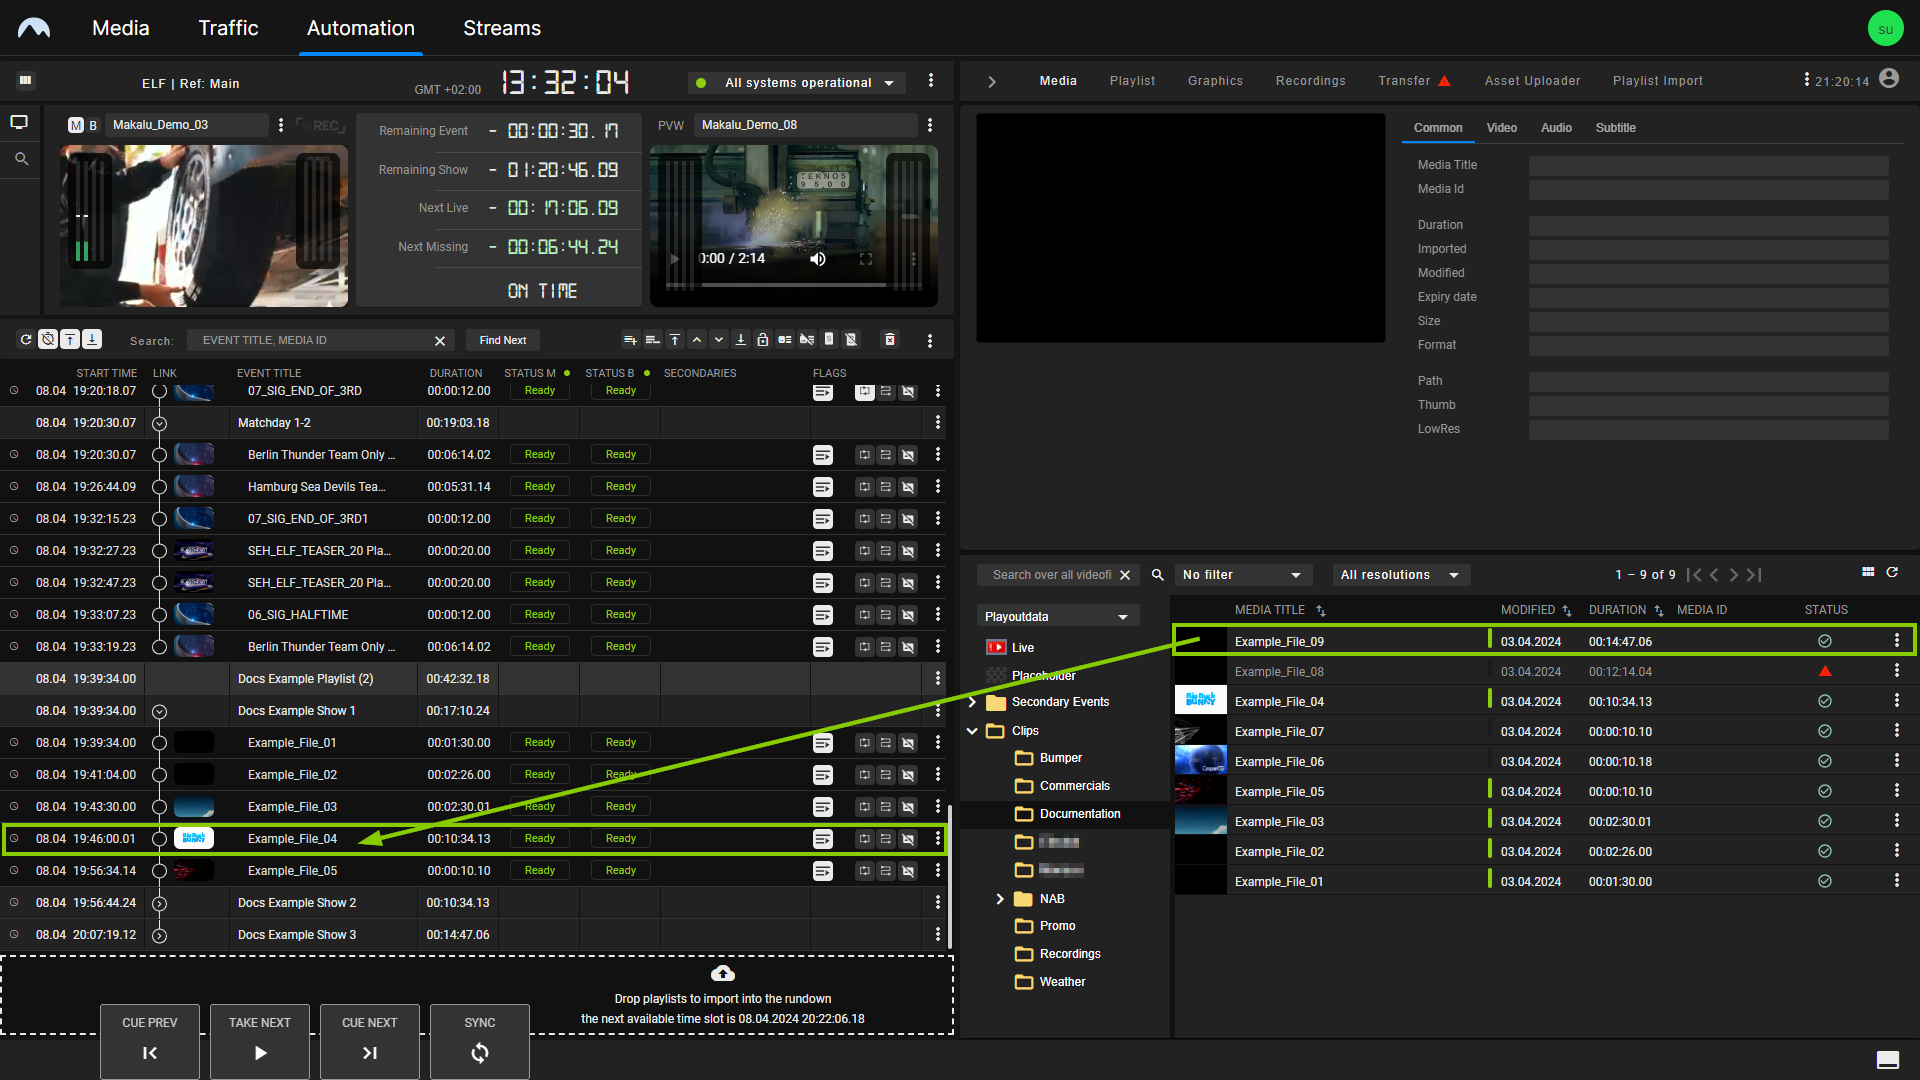
Automation - Replace clip Notice
If the new item you want to use as a replacement is a live source, you must select the duration of the live clip and confirm it by clicking Apply.
If you select and drag only a single item, the Replace Assets menu opens, and all future occurrences of the clip to be replaced in the rundown are listed.
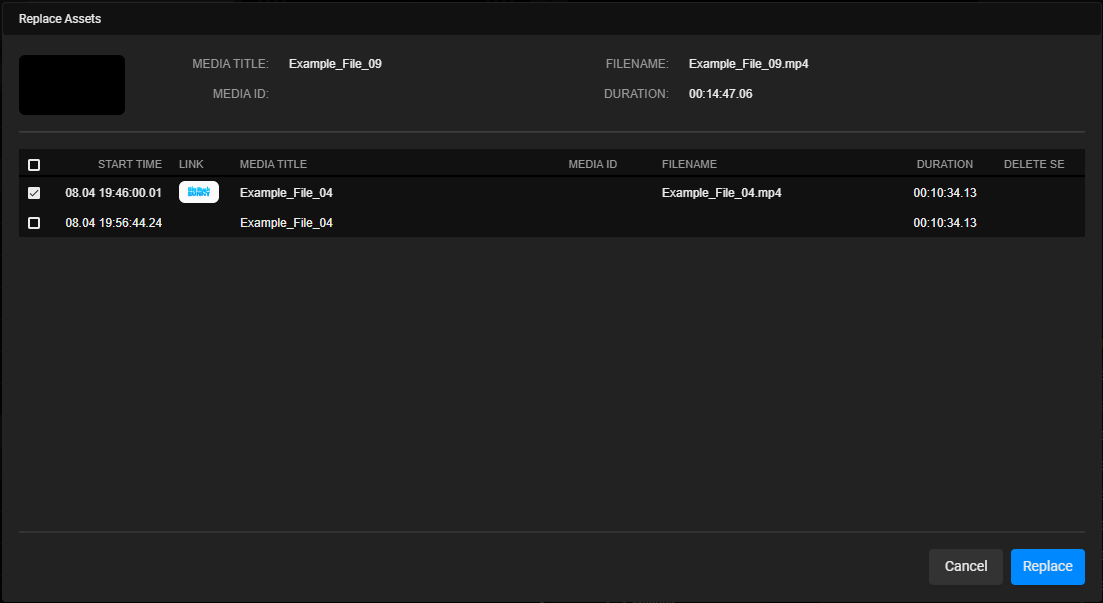
Automation - Replace assets menu If you select and drag multiple items instead, they immediately replace the original item, and the Replace Assets menu is not displayed.
-
Select all the occurrences of the clip that you want to replace by enabling the corresponding checkbox(es).
-
To confirm the replacement, click Replace.
All selected occurrences of the original rundown item are replaced by the new item.
Notice
If the new file is not available on the playout nodes of the channel, file transfers are automatically started. As a result, the corresponding file is copied from the ingest storage to all playout nodes that are assigned to the channel.
Replacing a clip with another playlist item
In addition to replacing a clip with another media item via the Media tab, you can also replace a clip in the rundown with one or more items from another playlist via the Playlist tab. If the playlist items you use as replacements have assigned secondary events and/or enabled clip flags, they will remain assigned after the replacement in the rundown. If default secondary events are configured for the corresponding Makalu channel, they are also added automatically when the playlist items are added to the rundown.
Replacing clips in this way may be especially useful for users who focus on playlists and prefer to search clips/assets using playlists rather than searching for files in the corresponding folder structures in the Media tab.
To replace a clip with one or more items from another playlist (via the Playlist tab), proceed as follows:
-
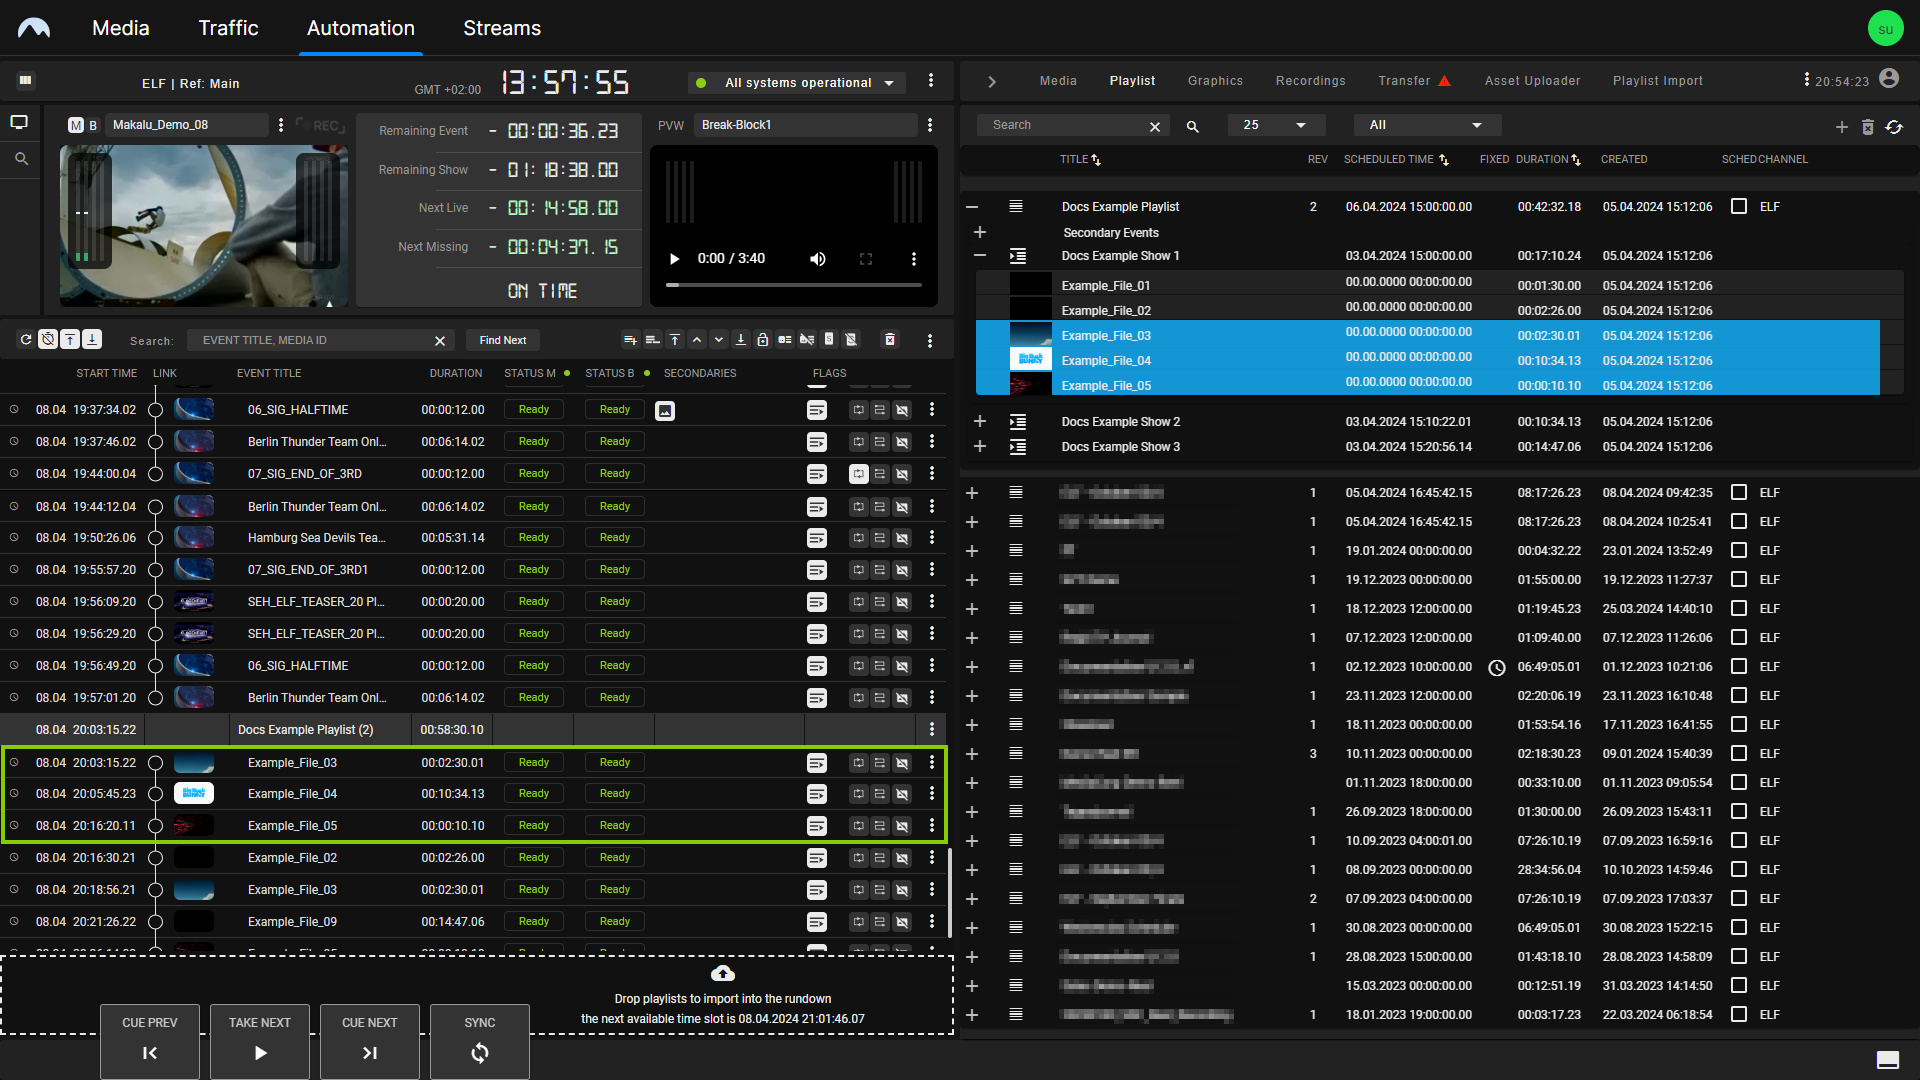
On the right side, select the Playlist tab.
All available playlists are listed.
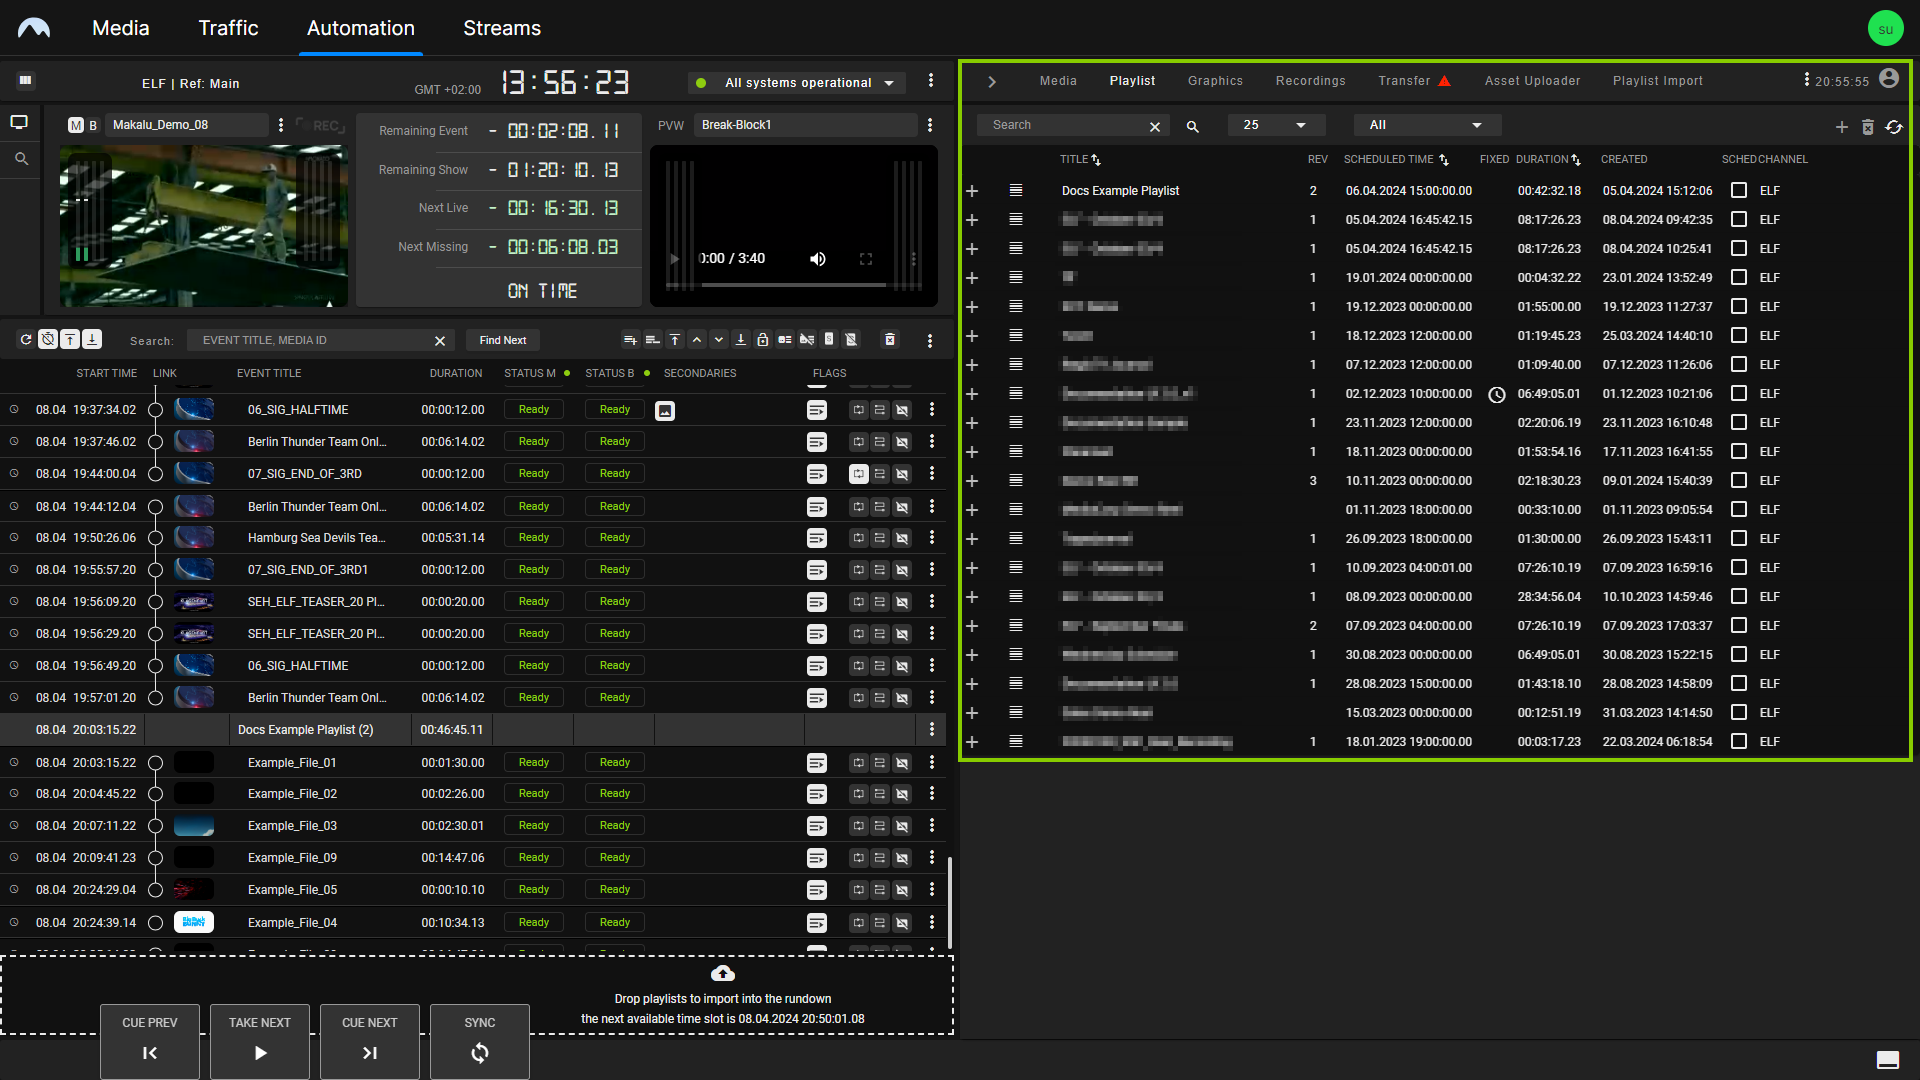
Automation - Playlist tab -
Expand a playlist by clicking the corresponding Plus icon.
All shows included in the playlist are listed.
-
Expand a show by clicking the corresponding Plus icon.
All clips included in the show are listed.
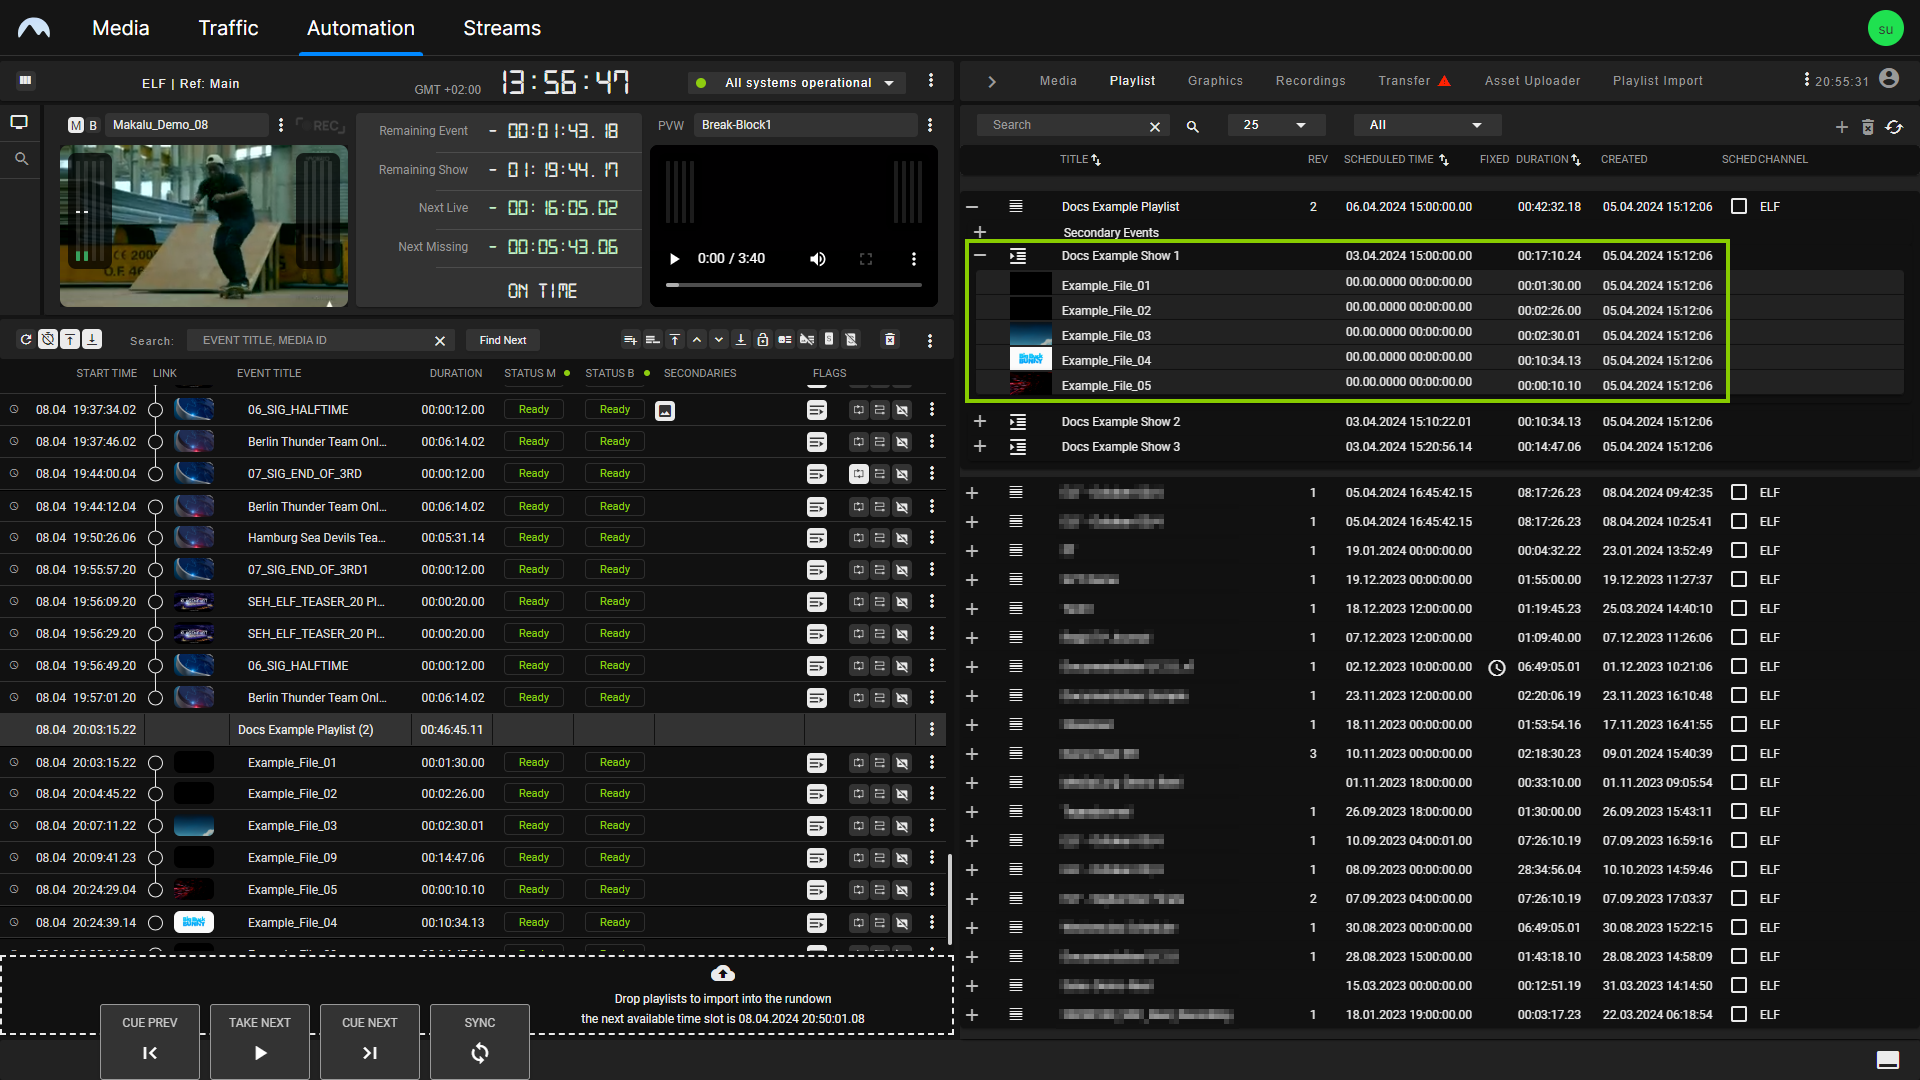
Automation - List of clips -
Select one or more clips to be used as a replacement.
Tip
You can select multiple individual clips from one or more playlists by holding [Ctrl]. To select multiple consecutive clips from a playlist, hold [Shift].
-
Hold [Ctrl] and drag the selected clip(s) onto the clip to be replaced in the rundown.
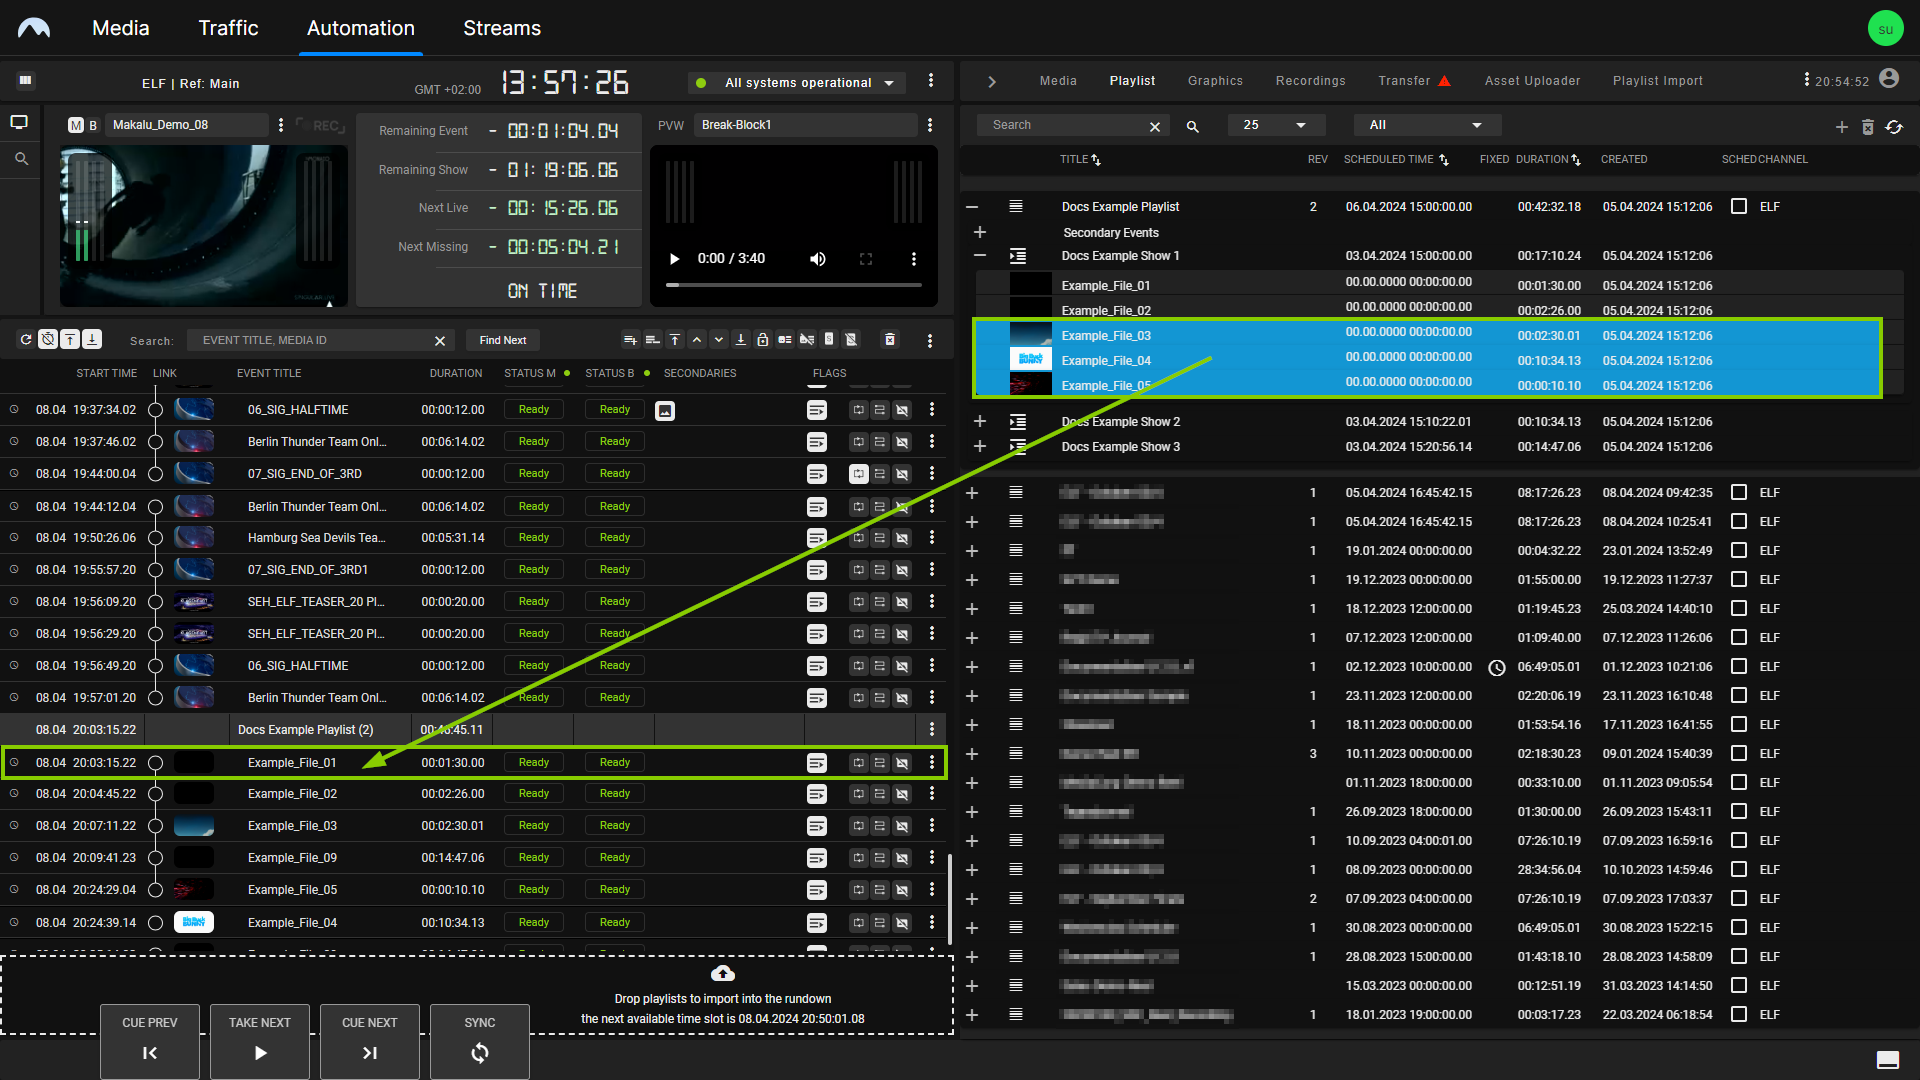
Automation - Replace playlist items via drag and drop Tip
To find and select a specific playlist as a target for the replacement, you can jump between the playlists in the rundown by using the Next playlist icon
 and Previous playlist icon
  on the left side, above the rundown.
If you selected multiple clips as replacements, they directly replace the target clip in the rundown without requiring any additional actions. If you selected a single clip as a replacement, the Replace Assets menu opens as described in section Replacing a clip with another media item. It enables you to decide whether you only want to replace the single occurrence of the clip in the rundown or also other or all future occurrences of it in the rundown.
Tip
If you only want to add new items to the rundown instead of replacing existing elements, execute step five without holding [Ctrl].
Searching for and replacing clips
In addition to replacing a clip via drag and drop as described in section Replacing a clip with another media item or with another playlist item, you can alternatively use the search/replace view for this purpose. This also enables you to search for rundown items, based on their event title, media ID, and/or duration, and replace them with a different media item.
Notice
When replacing rundown items via the search/replace view, all properties and metadata of the original item are usually replaced by those of the new item. This includes, for example, the title, file path, and any existing secondary events.
There is a special optional feature when replacing placeholders with a file-based media item that enables you to keep all the metadata of the original placeholder item instead, so that only the file path is replaced.
To use this feature, enable the checkbox between the Delete icon and the Replace button below the Dropzone of the search/replace view.

A use case where this feature can be particularly useful is a rerun of a live show in "fast turnaround mode". This applies when a live element is scheduled in the rundown and a rerun is scheduled to play shortly afterward (scheduled with a corresponding placeholder asset). The live element is recorded, and the placeholder has a specific title and media ID. Only the actual file name of the recording is unknown before the recording. When the recording of the live element is completed, and you replace the corresponding rerun placeholder with the mentioned checkbox enabled, the original metadata of the placeholder is retained, but the actual file name of the recorded live element is used.
To use the search/replace view, proceed as follows:
-
In the preview area navigation at the top left, click the Search icon
 .
.The search/replace view is displayed.
-
Enter your search term in the Search field.
-
(Optional) If you only want to search based on the Event title or Media ID, select/deselect the corresponding checkbox.
-
(Optional) If you also want to search based on the duration, enable the Duration checkbox and enter the desired duration.
-
Click Search at the top right of the search/replace view area.
The search results are listed below.
-
In the search result list, select the item(s) to be replaced by enabling the checkbox to the left of the item(s).
-
Drag the item to be used as a replacement from the Media area on the right and drop it on the Dropzone on the right side of the search/replace view.
-
To confirm the replacement, click Replace.
The selected rundown items are replaced by the new item.
Tip
To clear the dropzone, click the Delete icon ![]() below it.
below it.
Notice
If the new file is not available on the playout nodes of the channel, file transfers are automatically started. As a result, the corresponding file is copied from the ingest storage to all playout nodes that are assigned to the channel.
Switching a running live source
When a live source is on-air, it may be necessary to switch to another live source at short notice, for example, if the current live source becomes unavailable due to a signal outage. For this purpose, Makalu enables you to edit the rundown and quickly switch to another live source.
To switch a running live source, proceed as follows:
-
In the rundown, click the Select source icon
 of the live clip to be changed.
A dropdown menu with all available live sources opens.

Automation - Running live source 
Automation - List of available live sources -
Select the new live source from the dropdown menu.
Tip
In this menu, the current connection status of each live source is indicated by a corresponding icon:
 - live source is connected
 - live source is not connected
When switching a running live source, select a source that is listed as "connected". This enables uninterrupted switching between the two live sources. It is still possible to select a live source that is listed as "not connected" (regardless of whether the initial live source is currently on-air or scheduled for a later time). This is necessary, for example, if you want to switch a live source that is not currently on-air but is scheduled for a later time in the rundown. However, you should avoid selecting a live source that is listed as "not connected" when switching the on-air live source, as this usually results in black frame channel output.
-
Confirm the dialog by clicking Yes.
The switchover to the new live clip is prepared. A new clip that uses the selected live source is added to the rundown directly after the current clip and is cued. The end time of the original clip is applied to the new clip, which ensures that this change has no impact on the scheduled start times of subsequent clips in the rundown. A countdown is displayed for switching to the new live source.

Automation - Countdown for live source switchover Notice
The duration of the switchover interval countdown is configurable. It is set to 10 seconds by default.
When the countdown expires, playback switches to the new live source.
Updating a playlist
Makalu enables you to efficiently update and replace individual items of a playlist or entire playlists in the rundown via the Update rundownplaylist menu/dialog. It is designed to compare and update two almost identical playlists. A typical use case for this feature is when a new revision of a playlist is created with minor changes, but an older revision of the same playlist is already scheduled in the rundown (or even currently on-air), and you want to replace the parts of it that have changed.
Notice
To update a playlist in the rundown, the start time of the playlist can be in the past, but its end time must be in the future. Playlists with an end time in the past cannot be updated.
Example: The playlist currently on-air contains a live element with an unknown duration (the Open end flag is enabled; see the section Clip flags). The actual duration of the live element is only known when it actually ends and may be shorter or longer than originally planned. This may have an impact on the durations of subsequent clips. For example, it may be necessary to remove, add, shorten, or extend clips to compensate for the changed duration of the live element. To do this, you can create a new revision of the playlist via Makalu Traffic and use the Update rundownplaylist menu/dialog in Makalu Automation to update the old revision of the playlist in the rundown with the new one.
Notice
A new revision of a playlist is created whenever it is sent to playout from Makalu Traffic. The revision number of a playlist in the rundown can be recognized by the number in brackets after the name of the playlist. In the Playlist tab, the revision number is listed in the Rev column.
For more information, see the section Sending a playlist to playout.
Notice
When you update a playlist, you are not limited to using a new revision of an original playlist as a replacement. Instead, you can update or replace any playlist in the rundown with any available playlist.
You can open the Update rundownplaylist menu/dialog by holding [Ctrl] and dragging a playlist from the Playlist tab onto a playlist in the rundown.
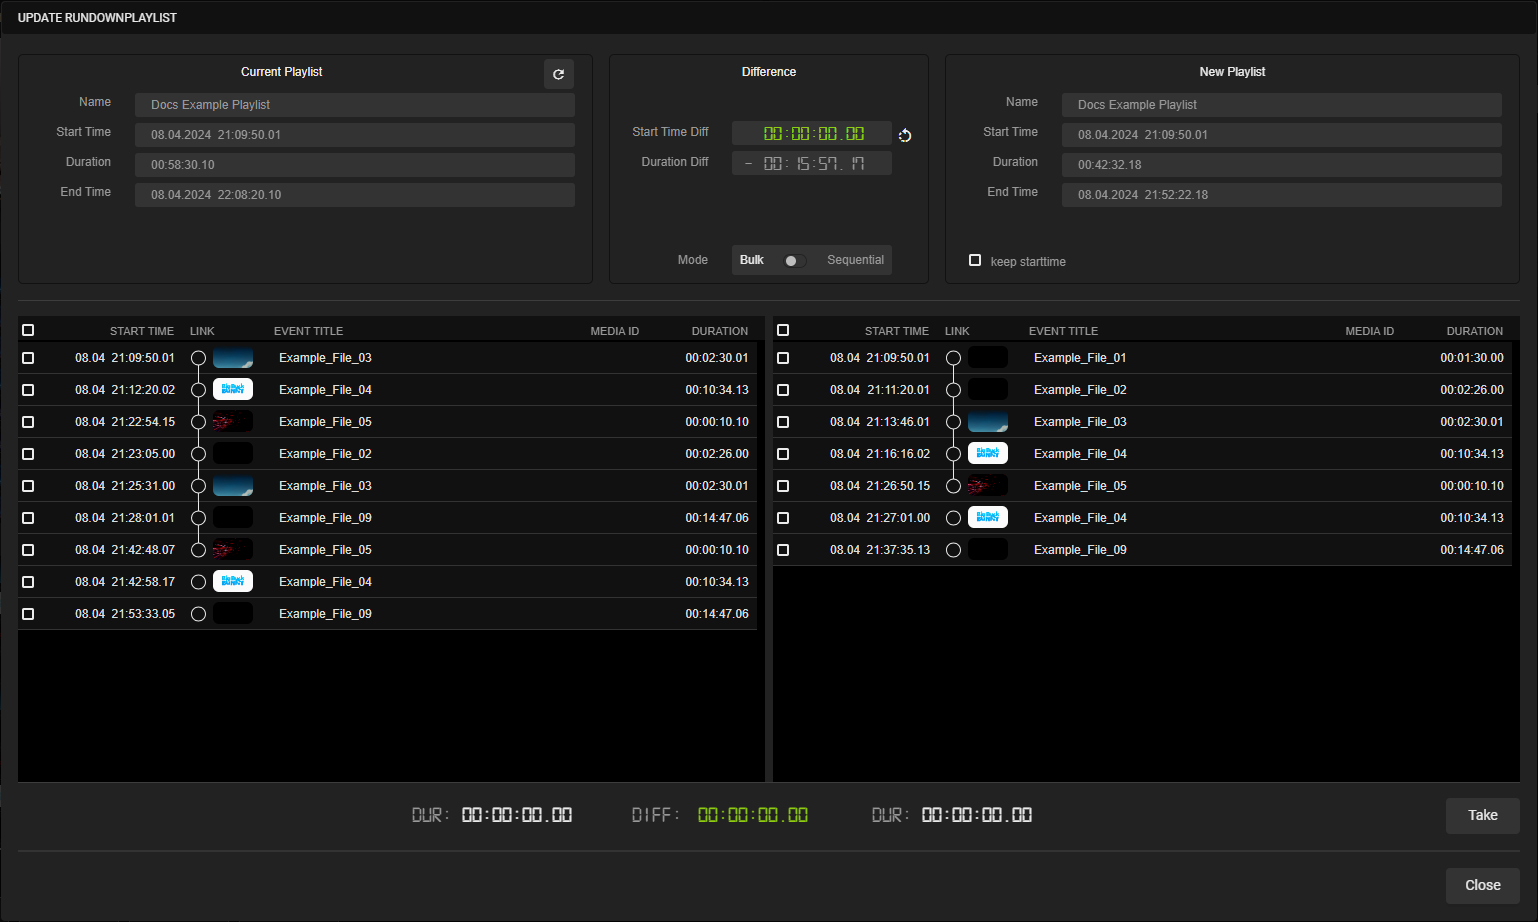
The menu is divided into two sections. The section Current Playlist on the left side displays information about the current playlist to be updated in the rundown. Section New Playlist on the right side displays information about the playlist to be used for the update. Section Difference in the upper middle area displays information about the time differences between both playlists. Below this information, there is a Mode toggle that enables you to switch between the two update/replacement modes bulk and sequential.
Bulk mode enables you to select a clip in the current playlist and the new playlist. All clips, starting with the first selected clip and continuing through to the last clip of the playlist, are automatically selected. When you click the Take button at the bottom right, all clips are replaced based on your selection.
The Keep starttime option is only available in bulk mode and enables you to decide how to handle the start times of the items in the new playlist. If enabled, the exact planned start times of the items of the new playlist are applied, which may create gaps. If disabled, the start times are ignored and the selected items of the new playlist are added directly after the last clip in the current playlist, which is not selected to be updated.
Sequential mode is designed for making incremental changes to the playlist one at a time. It automatically recognizes and displays the differences between the two playlists, enabling you to switch between them individually via the corresponding icons in the DIFF area at the bottom right, which also displays the total number of detected differences. You can apply each change by enabling the corresponding checkbox in the clip list of the new playlist and clicking the Take button at the bottom right.
Update via bulk mode
To replace one or more items of a playlist in the rundown with one or more items from another playlist via the Update rundownplaylist menu/dialog in bulk mode, proceed as follows:
-
On the right side, select the Playlist tab.
All available playlists are listed.
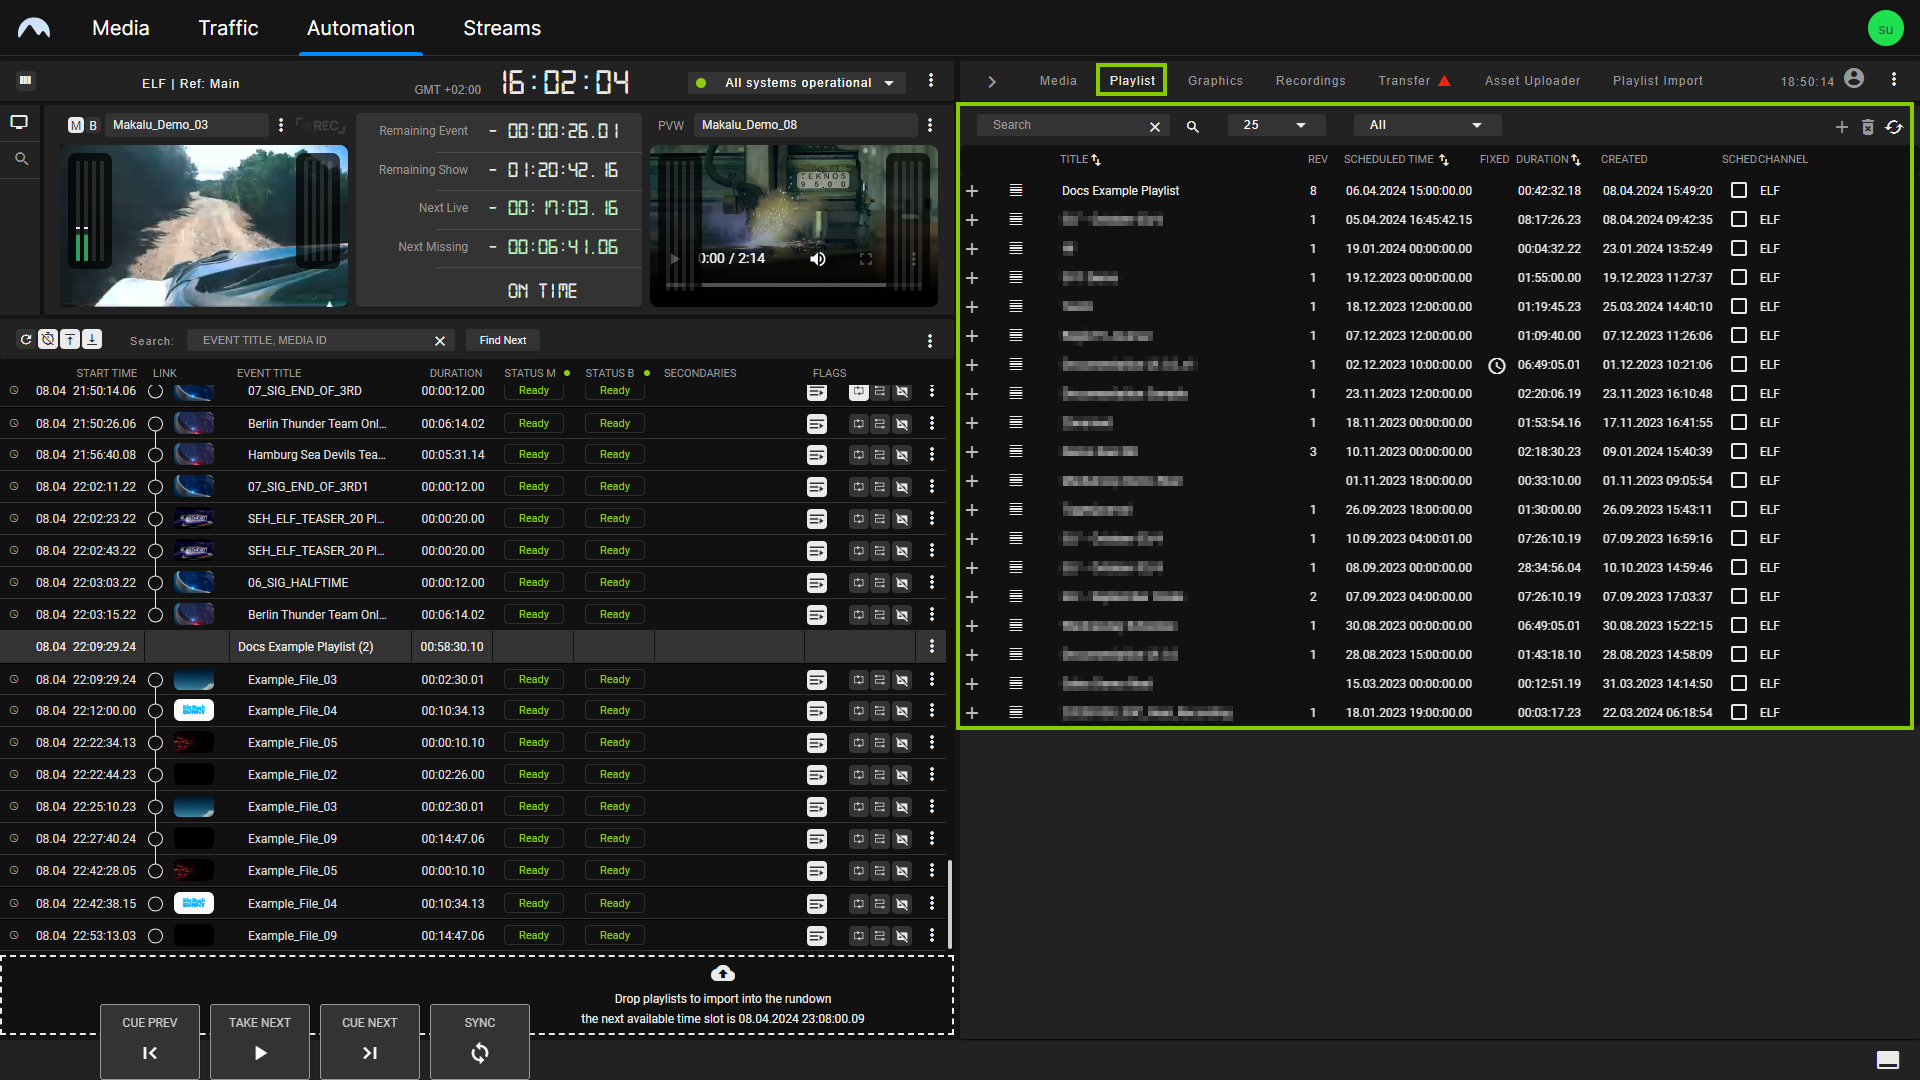
Automation - Playlist tab -
Hold [Ctrl] and drag the new playlist from the Playlist tab onto the playlist to be updated in the rundown.
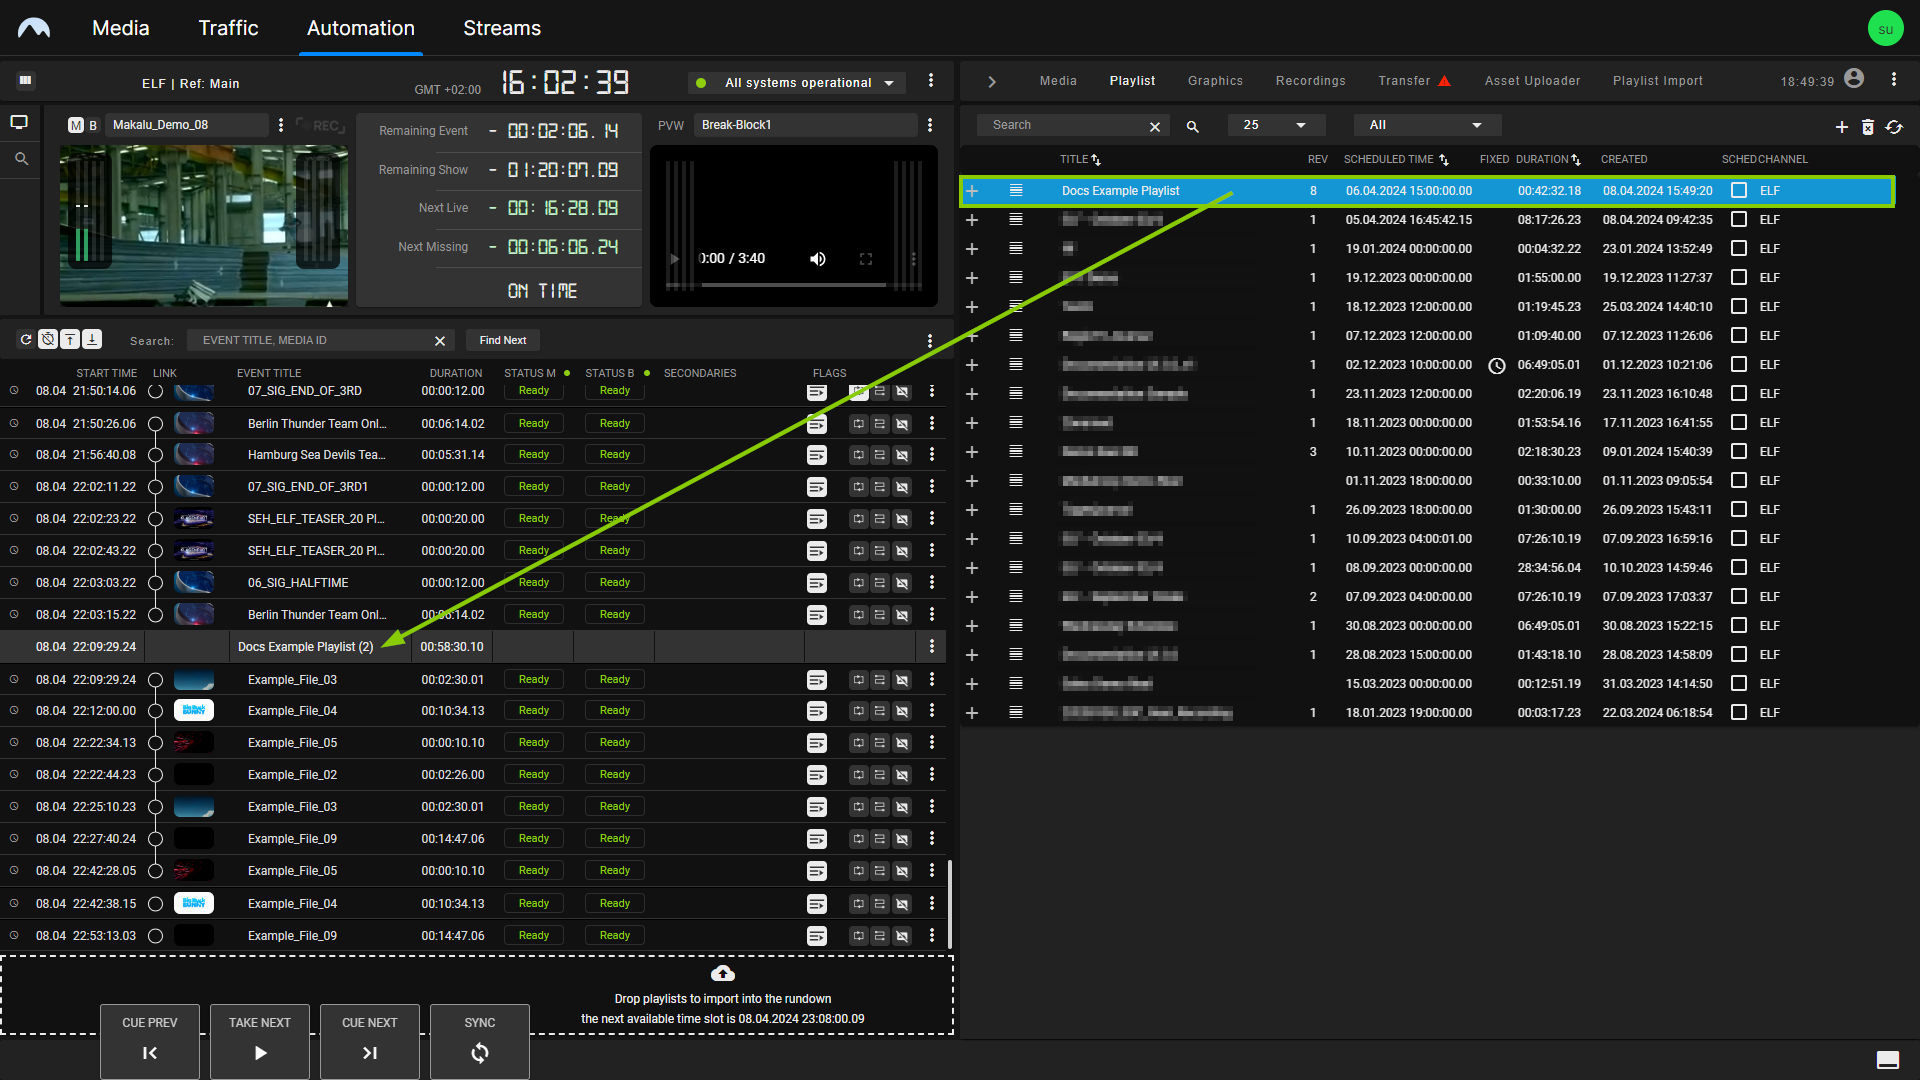
Automation - Drag new playlist into rundown Tip
To find and select a specific playlist as a target for replacement, you can conveniently jump between playlists in the rundown by using the Next playlist icon
 and Previous playlist icon
  on the left side, above the rundown.
The Update rundownplaylist menu/dialog opens.
Notice
If you want to update the playlist that is currently on-air, some clips cannot be updated/replaced. This includes the following types of clips, which are highlighted as follows in the Update rundownplaylist menu/dialog:
- the clip currently on-air (highlighted in green)
- the clip currently cued (highlighted in blue)
- one or more protected clips after the cued clip (the actual number depends on the duration of the clips and if it lies within a configurable protected time period, highlighted with stripes)
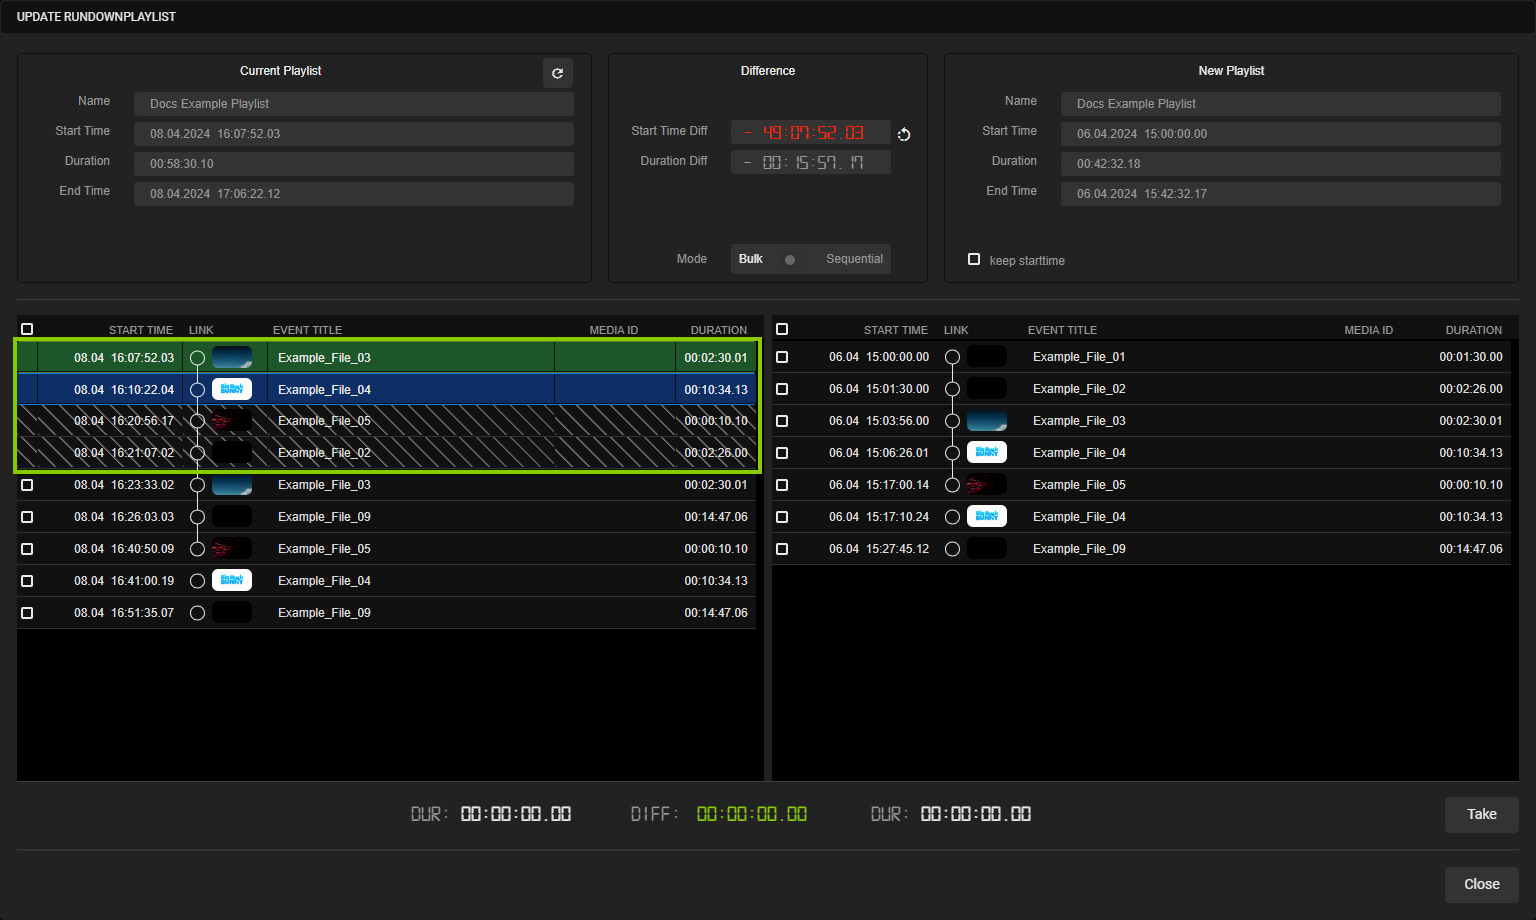
Automation - Clips that cannot be updated The clip list (including the highlighted clips) in the Update rundownplaylist menu/dialog is automatically updated when the playback of the next clip starts.
-
Leave the Mode toggle set to Bulk.
-
Select the first clip to be replaced in the current playlist by enabling the corresponding checkbox on the left side.
The clip and all subsequent clips until the end of the playlist are selected. The total duration of all selected clips is displayed below under DUR.
-
Select the first clip to be used as a replacement in the new playlist by enabling the corresponding checkbox on the right side.
The clip and all subsequent clips until the end of the playlist are selected. The total duration of all selected clips is displayed below under DUR. If the total duration of the selected clips differs between the two playlists, the time difference is displayed at the bottom, centered under DIFF.
-
(Optional) If you want to apply the exact start times of the items in the new playlist, enable the Keep starttime option.
Warning
If the start time of the first selected clip in the new playlist does not begin immediately after the end of the last unselected clip in the current playlist, the playlist update may result in gaps.
-
To apply your settings and execute the replacement, click Take.
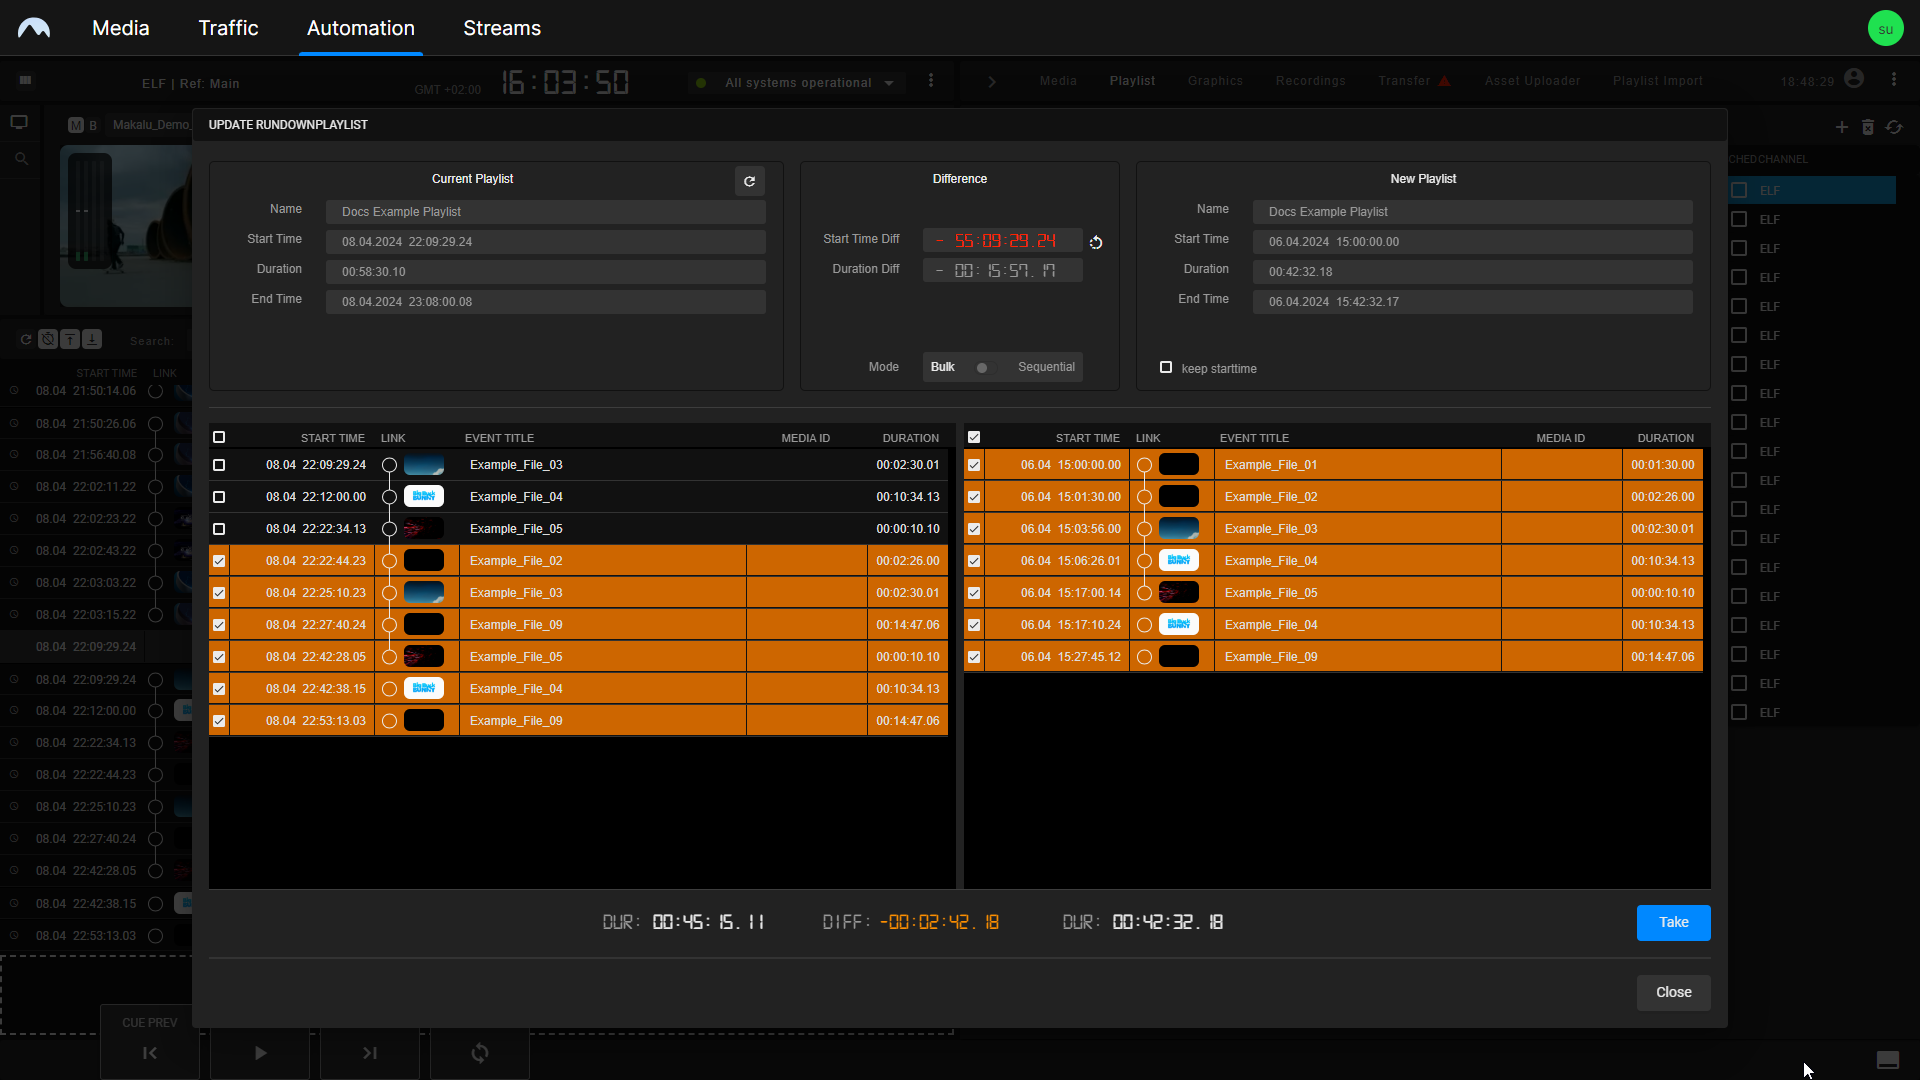
Automation - Apply playlist update The selected clips in the current playlist are replaced by the selected clips from the new playlist. When this is completed, the view is updated accordingly.
-
Close the Update rundownplaylist menu/dialog by clicking Close.
The update/replacement is complete.
Update via sequential mode
To replace one or more items of a playlist in the rundown with one or more items from another playlist via the Update rundownplaylist menu/dialog in sequential mode, proceed as follows:
-
Execute steps one and two as described in the section Update via bulk mode.
-
(Optional) If the start times of both playlists differ (recognizable by a positive or negative value in the upper middle area in the field Difference > Start Time Diff), adjust them by clicking the Adjust playlist starttime icon
 right to the field Difference > Start Time Diff.
The start time of the new playlist is synchronized with the start time of the current playlist. Afterward, both playlists have the same start time, which is recognizable by the value
00:00:00:00displayed in the field Difference > Start Time Diff and highlighted in green. As a result, the Mode toggle is unlocked.Tip
Instead of adjusting the start times of both playlists (based on the start time of the first included clip), you can also select a specific clip in the current and new playlist where the synchronization should start.
-
Set the Mode toggle to Sequential.
-
On the right side in the clip list of the new playlist, select one of the detected changes (groups of clips highlighted in orange) that you want to apply.
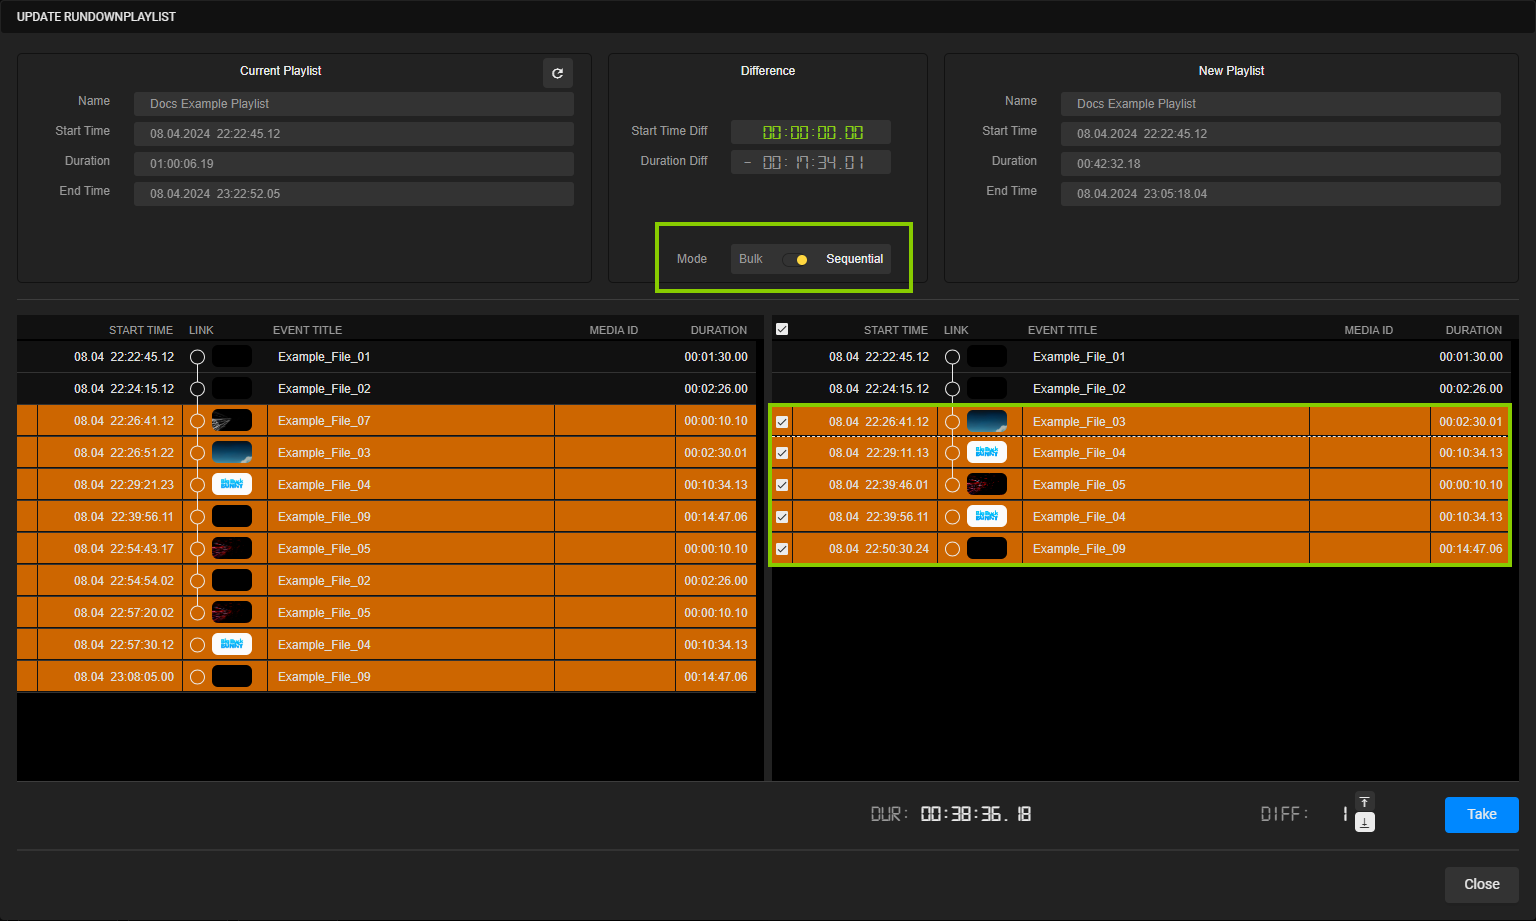
Automation - Select detected change -
To apply the replacement, click Take.
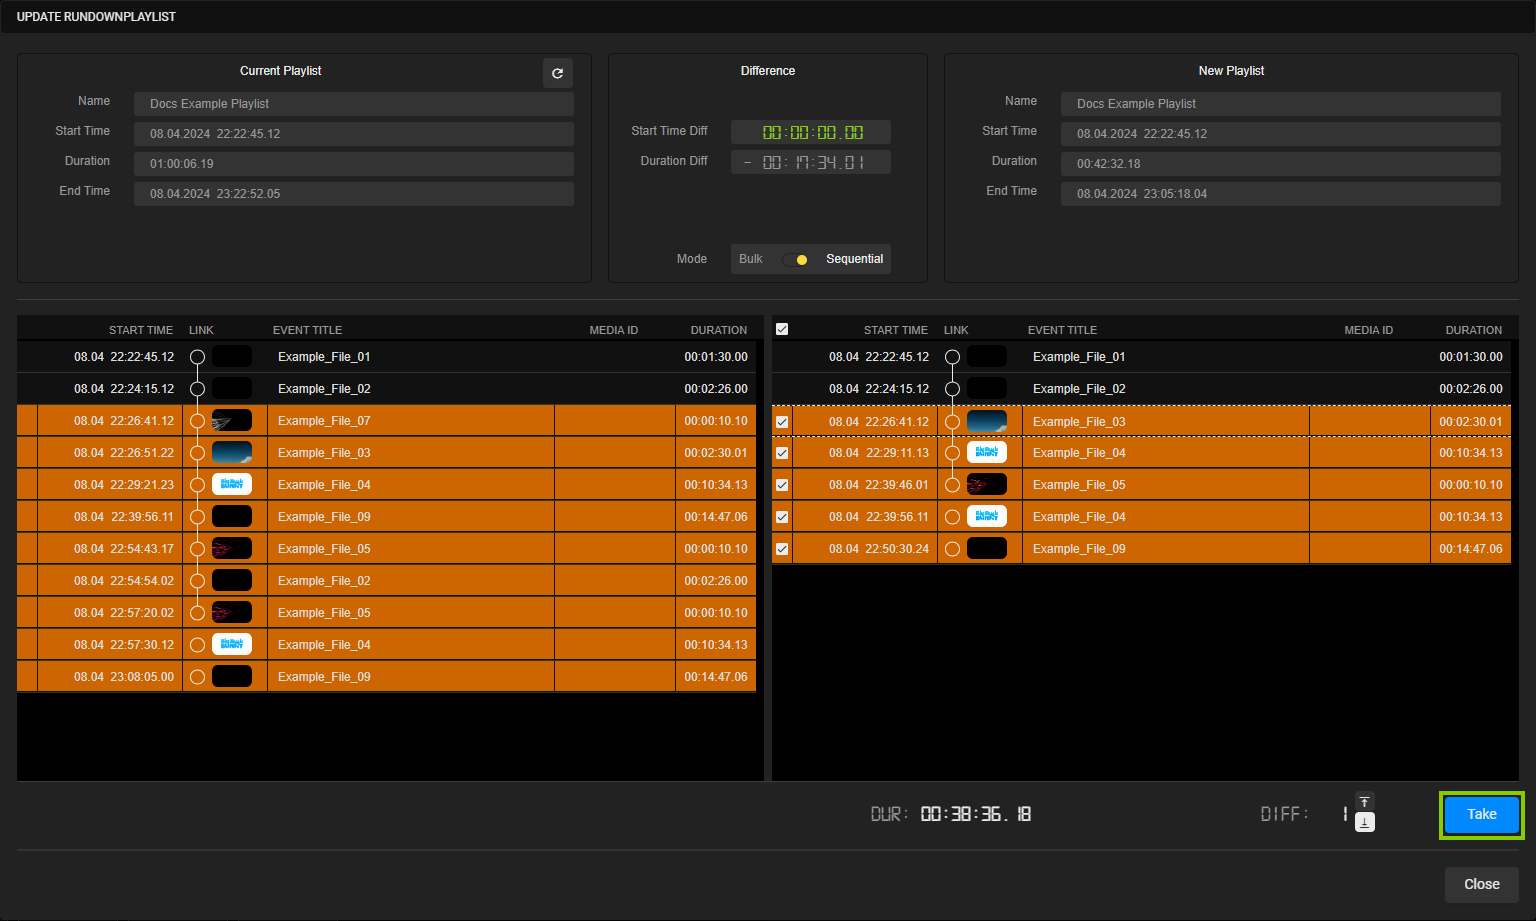
Automation - Apply playlist update The selected clips in the current playlist are replaced by the selected clips from the new playlist. When this is completed, the view is updated accordingly.
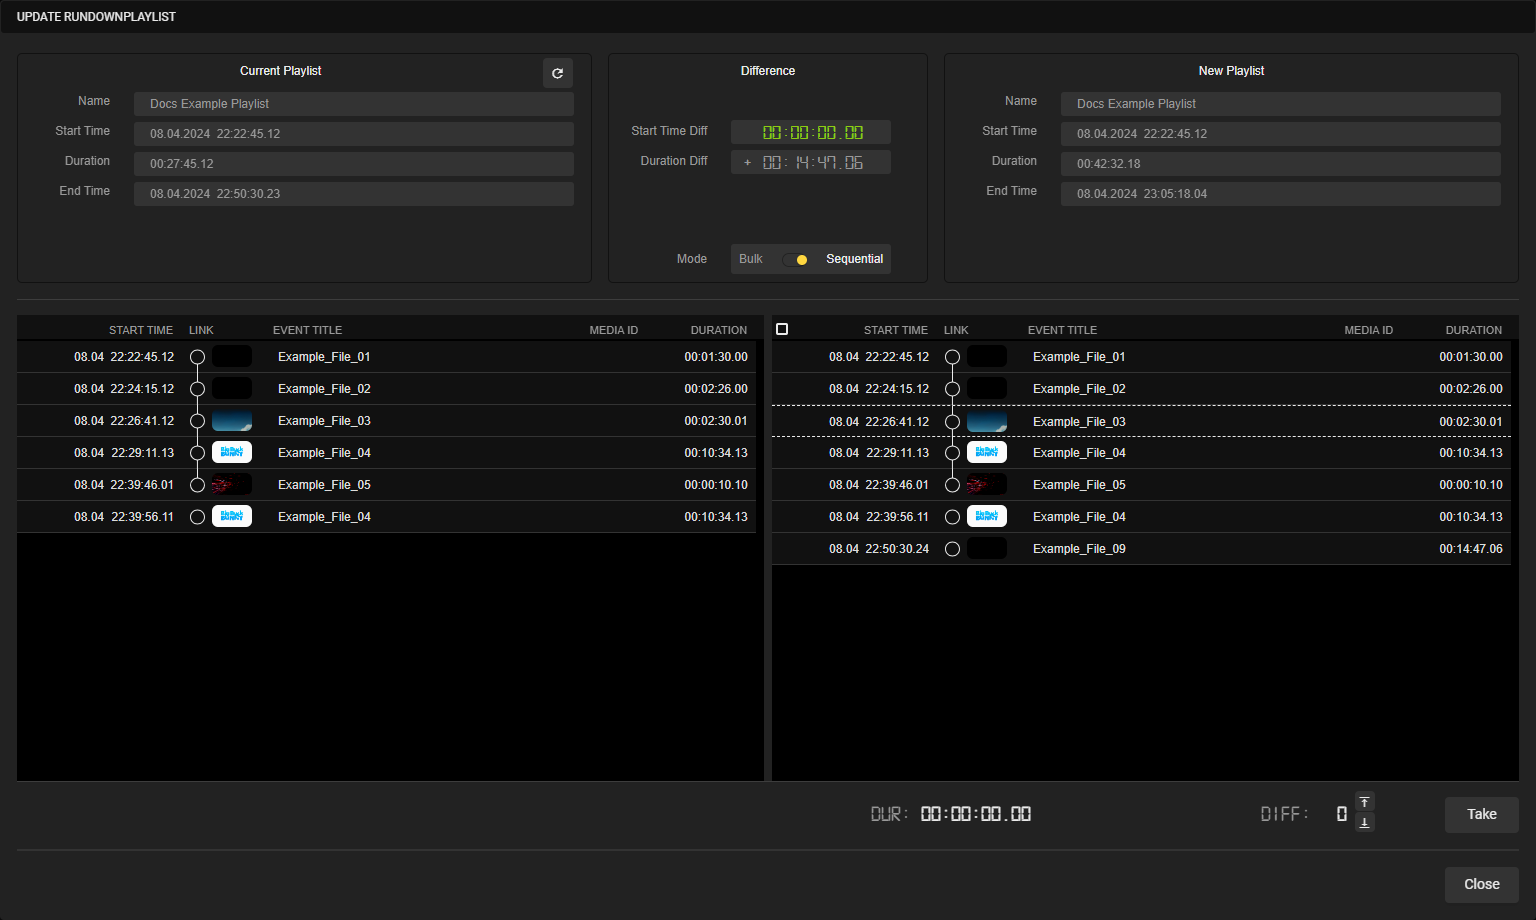
Automation - Playlist updated -
To apply other detected changes, repeat steps four and five.
Tip
You can switch between the detected changes via the Previous icon
 and Next icon
  in the DIFF area at the bottom right.
 -
Close the Update rundownplaylist menu/dialog by clicking Close.
The update/replacement is complete.
Quick update via rundown (MOS integration)
Another method for updating a playlist is the quick update function. It minimizes the required user interaction and updates the playlist in the rundown automatically to the latest available version. From a technical point of view, this method corresponds to the previously described update via bulk mode but does not require using its update menu/dialog.
Notice
The quick update method is only available for playlists that were created in a connected NRCS (Newsroom Computer System) and sent to Makalu via its MOS (Media Object Server) integration. When such a playlist is used in the rundown and a playlist update is received by Makalu, it is announced via a notification at the top of the screen. In addition, it is indicated by a playlist revision number highlighted in yellow in the Playlist tab.

To update a playlist via the quick update function, proceed as follows:
-
On the right side, select the Playlist tab.
All available playlists are listed.

Automation - Playlist tab -
To jump to the corresponding position of the playlist in the rundown, click the highlighted revision number of the playlist to be updated.

Automation - Jump to playlist The rundown jumps/scrolls to the position of the playlist. The Update available button is displayed in the Flags column.
-
Click the Update available button.

Automation - Start update A confirmation dialog is displayed, showing the current revision number of the playlist used in the rundown and the new revision number to which it will be updated.
-
Confirm the update by clicking Yes.
The playlist in the rundown is updated to the latest available version.
Assigning or removing the default graphic
Notice
The default graphic is part of the Makalu system configuration. It is usually defined when the system is first set up and cannot be changed by the user afterward. To request a change of the default graphic, please contact [email protected].
To assign the default graphic to a playlist, show, or clip, proceed as follows:
-
In the rundown, select a playlist, show, or clip.
-
Click the Add default graphic icon
 in the toolbar above the rundown list.
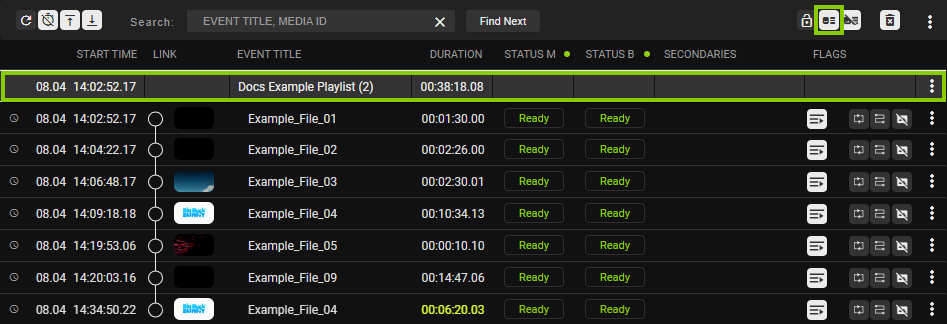
Automation - Assign the default graphic
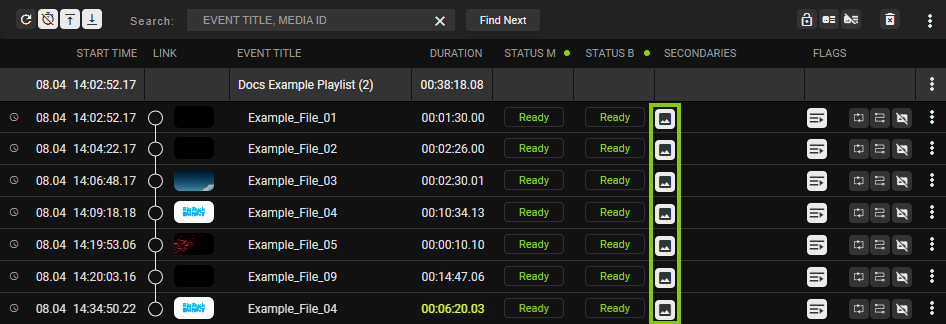
The default graphic is assigned to the selected element(s), which is recognizable by the corresponding icon in the Secondaries column.
To remove the default graphic from a playlist, show, or clip, proceed as follows:
-
In the rundown, select a playlist, show, or clip to which the default graphic is assigned.
-
Click the Delete default graphic icon
 .
.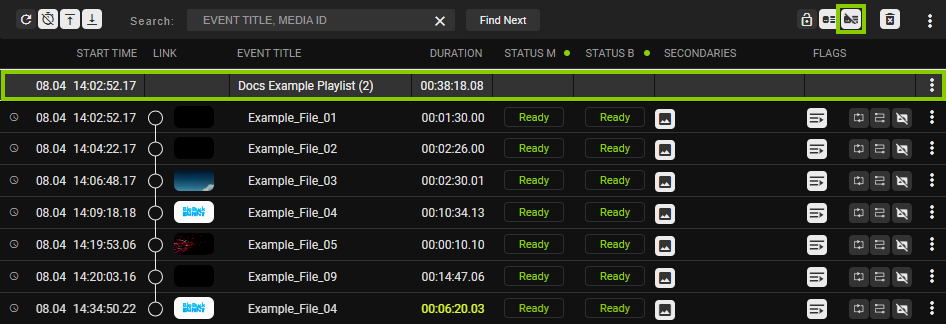
Automation - Remove default graphic -
Confirm the following dialog by clicking Yes.
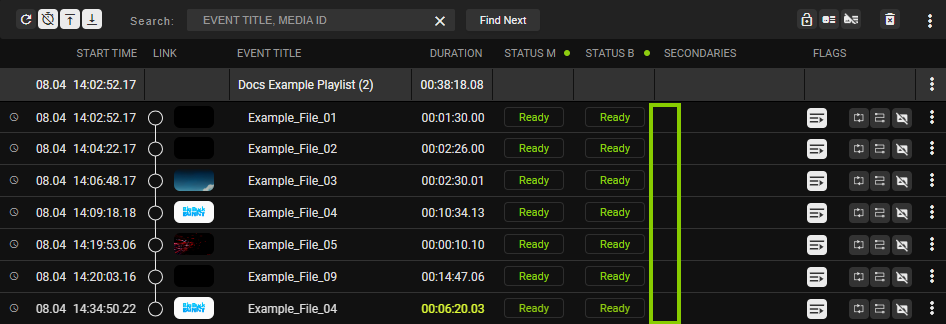
The default graphic is removed from the selected element(s).
Adding or removing a recording secondary event
For information about how to use recording secondary events, see the section Recording.
Adding or removing a splicing secondary event
For information about how to use splicing secondary events, see the section Ad triggering.
Deleting a clip or a playlist
Notice
You can only delete a clip if it is in status Ready or if it is a placeholder. You cannot delete a clip if it is currently cued or on-air.
The same applies to playlists and shows. You can only delete a playlist or a show if no clip in the playlist or show is currently cued or on-air.
To delete a clip from the rundown, proceed as follows:
-
Select the clip to be deleted by clicking the Options icon
 and selecting Delete clip.
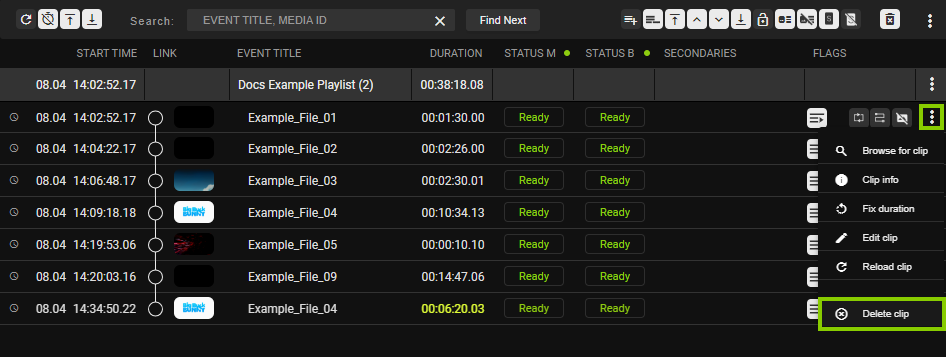
Automation - Delete a clip -
Confirm the following dialog by clicking Yes.
The clip is deleted.
To remove a playlist from the rundown, proceed as follows:
Notice
Playlists can only be removed if they are displayed in the rundown. To display playlists, click the Options icon ![]() in the toolbar above the rundown list and select Show playlists.
in the toolbar above the rundown list and select Show playlists.
-
Select the playlist to be removed by clicking the Options icon
 and selecting Delete playlist.
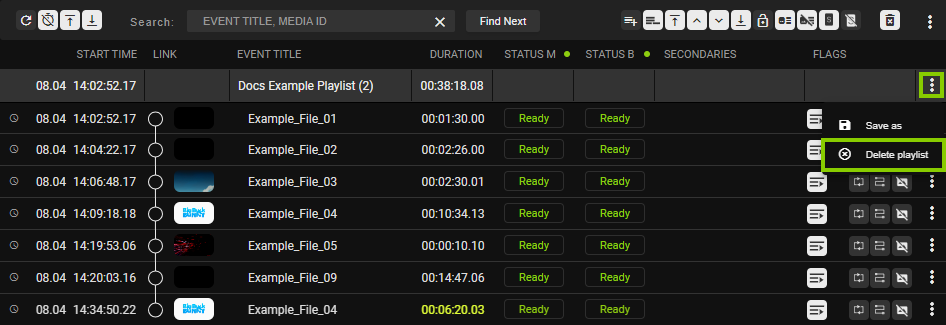
Automation - Remove a playlist -
Confirm the following dialog by clicking Yes.
The playlist is removed.
Tip
You can remove multiple playlists by selecting the playlists to be removed. Then click the Options icon ![]() in the toolbar above the rundown list and select Delete playlists.
in the toolbar above the rundown list and select Delete playlists.
To delete a show from the rundown, proceed as follows:
-
Select the show to be deleted by clicking the Options icon
 and selecting Delete show.
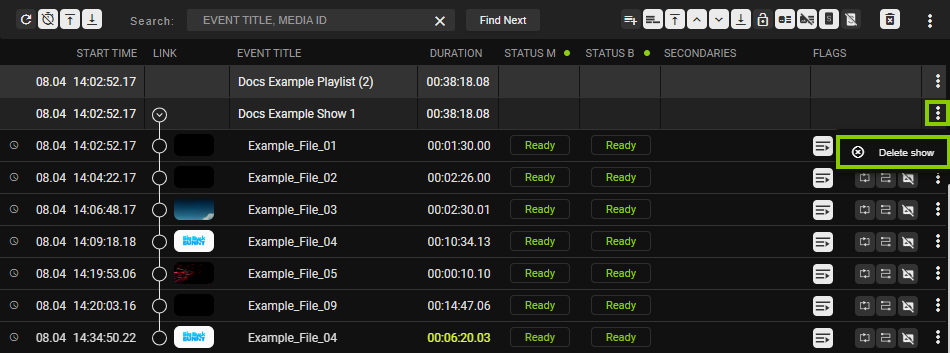
Automation - Delete a show -
Confirm the following dialog by clicking Yes.
The show is deleted.
Deleting a fixed start time
To delete a fixed start time of a show in a rundown, proceed as follows:
-
In the rundown, expand the show with the fixed start time to be removed by clicking the corresponding Expand icon
 in the link column.
The show is expanded, and all included clips are listed.
-
Select the first clip of the show.
-
Click the Delete fix start time icon
 in the toolbar above the rundown list.
Automation - Delete fixed start time
The fixed start time is removed from the selected element. The clock icon in the first column changes from white to gray ![]() .
.
Tip
Alternatively, you can delete a fixed start time via the Configure start time menu as follows:
-
Click the Clock icon to the left of the start time of the corresponding clip to disable it.
The Configure start time menu opens.
-
In this menu, click the clock icon on the right side.
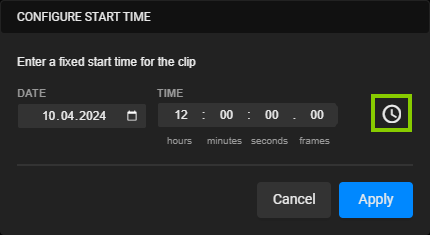
Automation - Delete fixed start time (alternative way) -
Confirm your action by clicking Apply.
The fixed start time is removed. The corresponding clip or show is moved and placed directly after the previous element in the rundown with a specific time (if available). This automatically closes any gaps.
Reloading the rundown
Notice
Manually reloading the rundown is only necessary if an error occurs, for example, if the clip status is displayed as "Unknown".
To manually reload the rundown, click the Reload rundown icon ![]() in the toolbar on the left above the rundown list.
in the toolbar on the left above the rundown list.
