Using shows
Using the Shows view
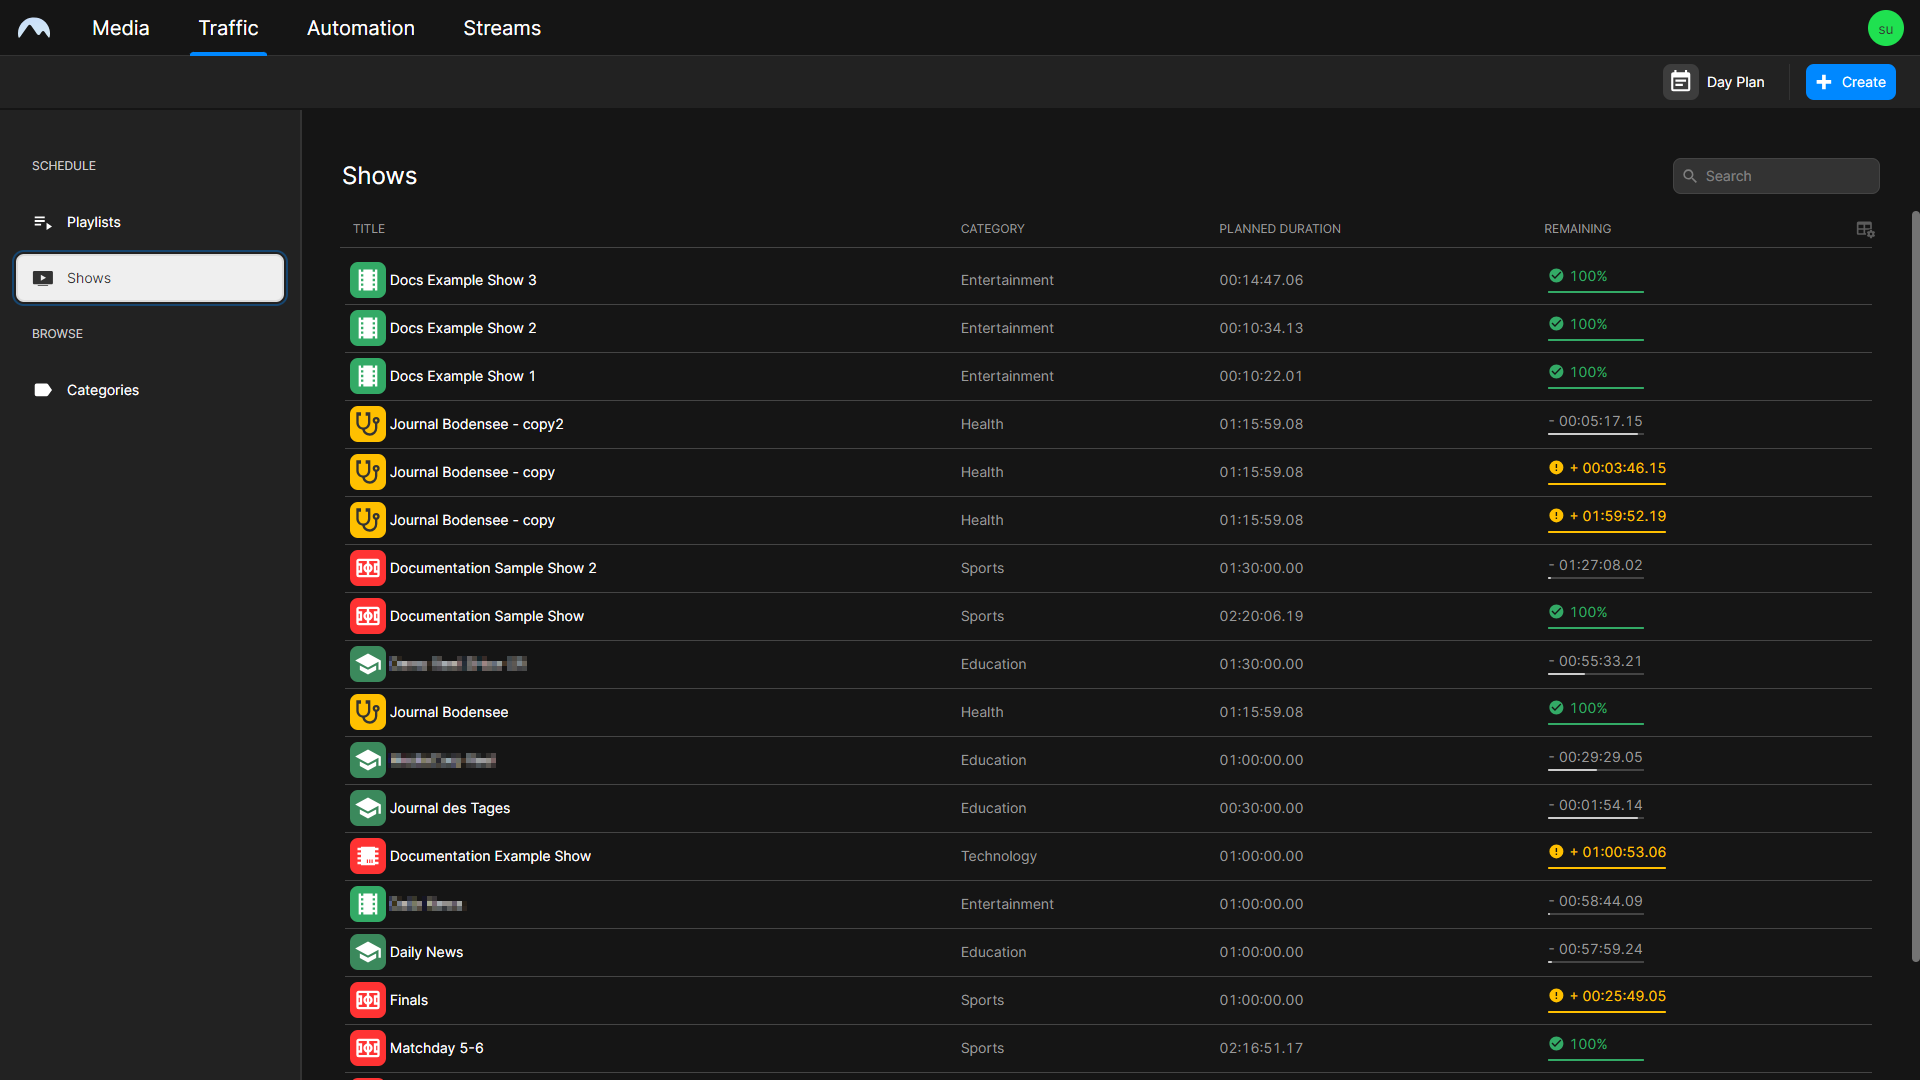
To open the Shows view, select Shows in the sidebar on the left. It provides an overview of all available shows of the currently selected channel. The list of shows can be narrowed by using the search field at the top right.
By default, a selection of available columns is displayed. To customize the columns, click the Column selection icon ![]() at the top right and select the columns to be displayed.
at the top right and select the columns to be displayed.
Additional functions (Duplicate and Delete) are available per show via the Options icon ![]() on the right side of each show row. You can create a new show by clicking Create at the top right.
on the right side of each show row. You can create a new show by clicking Create at the top right.
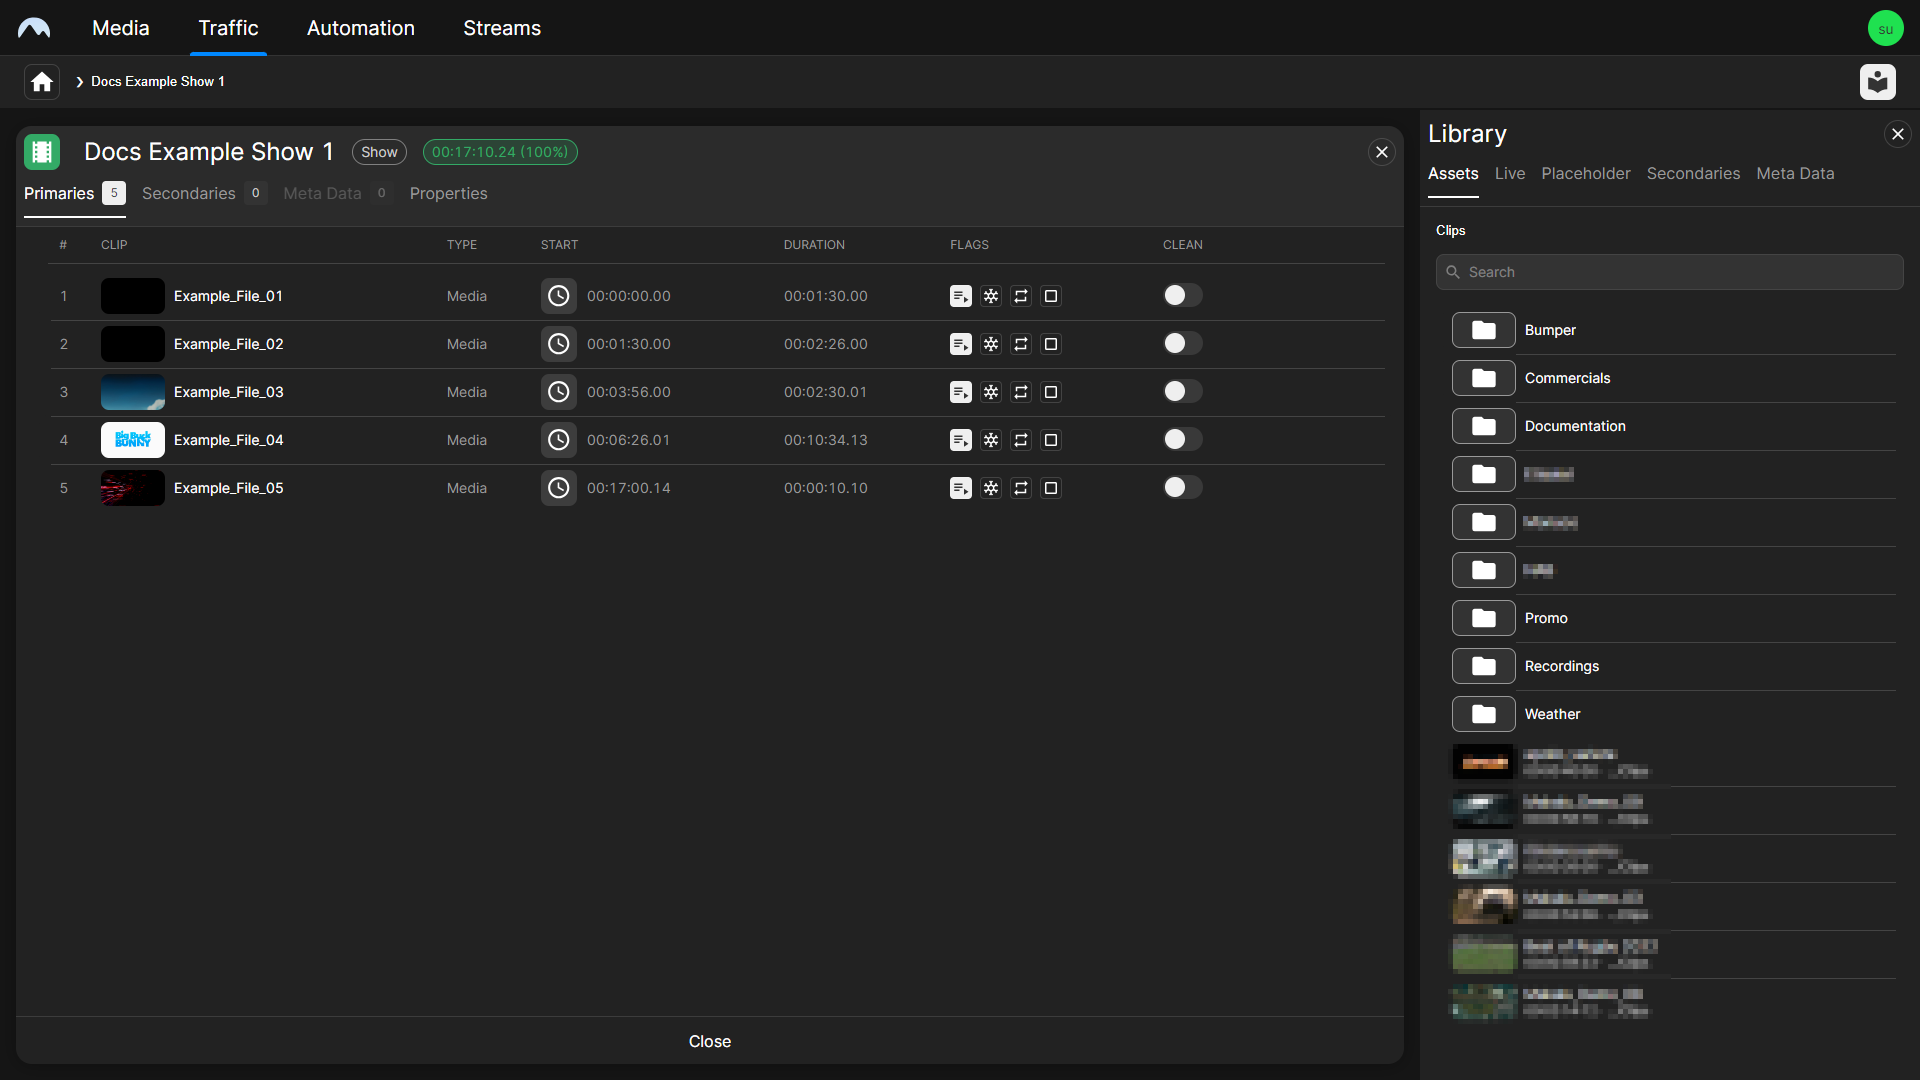
To display a detailed view of a show, hover your mouse over the show and click Open.
At the top of the detailed show view, the fill level is displayed, and below tabs for included primary events (clips), secondary events, metadata, and show properties.
Tip
You can display a larger version of a clip thumbnail image by hovering your mouse over it.
On the right side, the library of assets/clips, live sources, placeholders, secondary events, and metadata is displayed. Depending on the type of the selected library item tab, a sub-selection may be available via additional tabs (for example, to select a specific secondary event or metadata type).
When the detailed view of a show is opened, the library lists all available items that can be added to a show or clip based on your access permissions. It can be displayed or hidden by clicking the Library icon ![]() at the top right.
at the top right.
Depending on where you want to add a clip, the following options are available to you for this purpose:
-
Add a clip as the last clip of a show by dragging it onto the area above the clip list.
-
Add a clip at a specific position by dragging it onto the position in the clip list (for example, between two clips).
-
Replace a clip by dragging the new clip onto the existing one and confirming the replacement.
You can also change the order of the clip list via drag and drop.
Additionally, the clip list includes icons for setting clip flags, enabling/disabling graphics, and removing clips from the list.
You can open the detailed view of a clip by hovering your mouse over the clip in the clip list and clicking Open on the right side of the corresponding row. This view provides access to the clip preview, clip properties, as well as assigned secondary events and metadata.
Using the Preview
The Traffic UI includes a preview player that enables you to preview video files and live sources, either by opening the corresponding clips of a show or the corresponding assets in the library.
Regardless of whether you open clips or assets, the preview player always provides the following default controls:
| Icon | Description |
|---|---|
| Start/pause playback | |
| Restart playback from the beginning | |
| Mute/unmute audio | |
| Change playback speed | |
| Show/hide audio peak meter | |
| Toggle full-screen playback |
Below these controls, you can find the Mark In & Out area with a trim bar and input fields for start and end offset. For more information about trimming, see the section Trimming a clip.
Notice
The Mark In & Out area is only available if you open a clip of a show, but not if you open an asset from the library.
To preview a clip of a show, proceed as follows:
-
In the left sidebar, select Shows.
All available shows of the currently selected channel are listed in the middle.
-
Hover your mouse over the show that contains the clip to be played and click Open on the right side of the corresponding row.
The show details are displayed.
-
Hover your mouse over the clip to be played and click Open on the right side of the corresponding row.
The clip details are displayed.
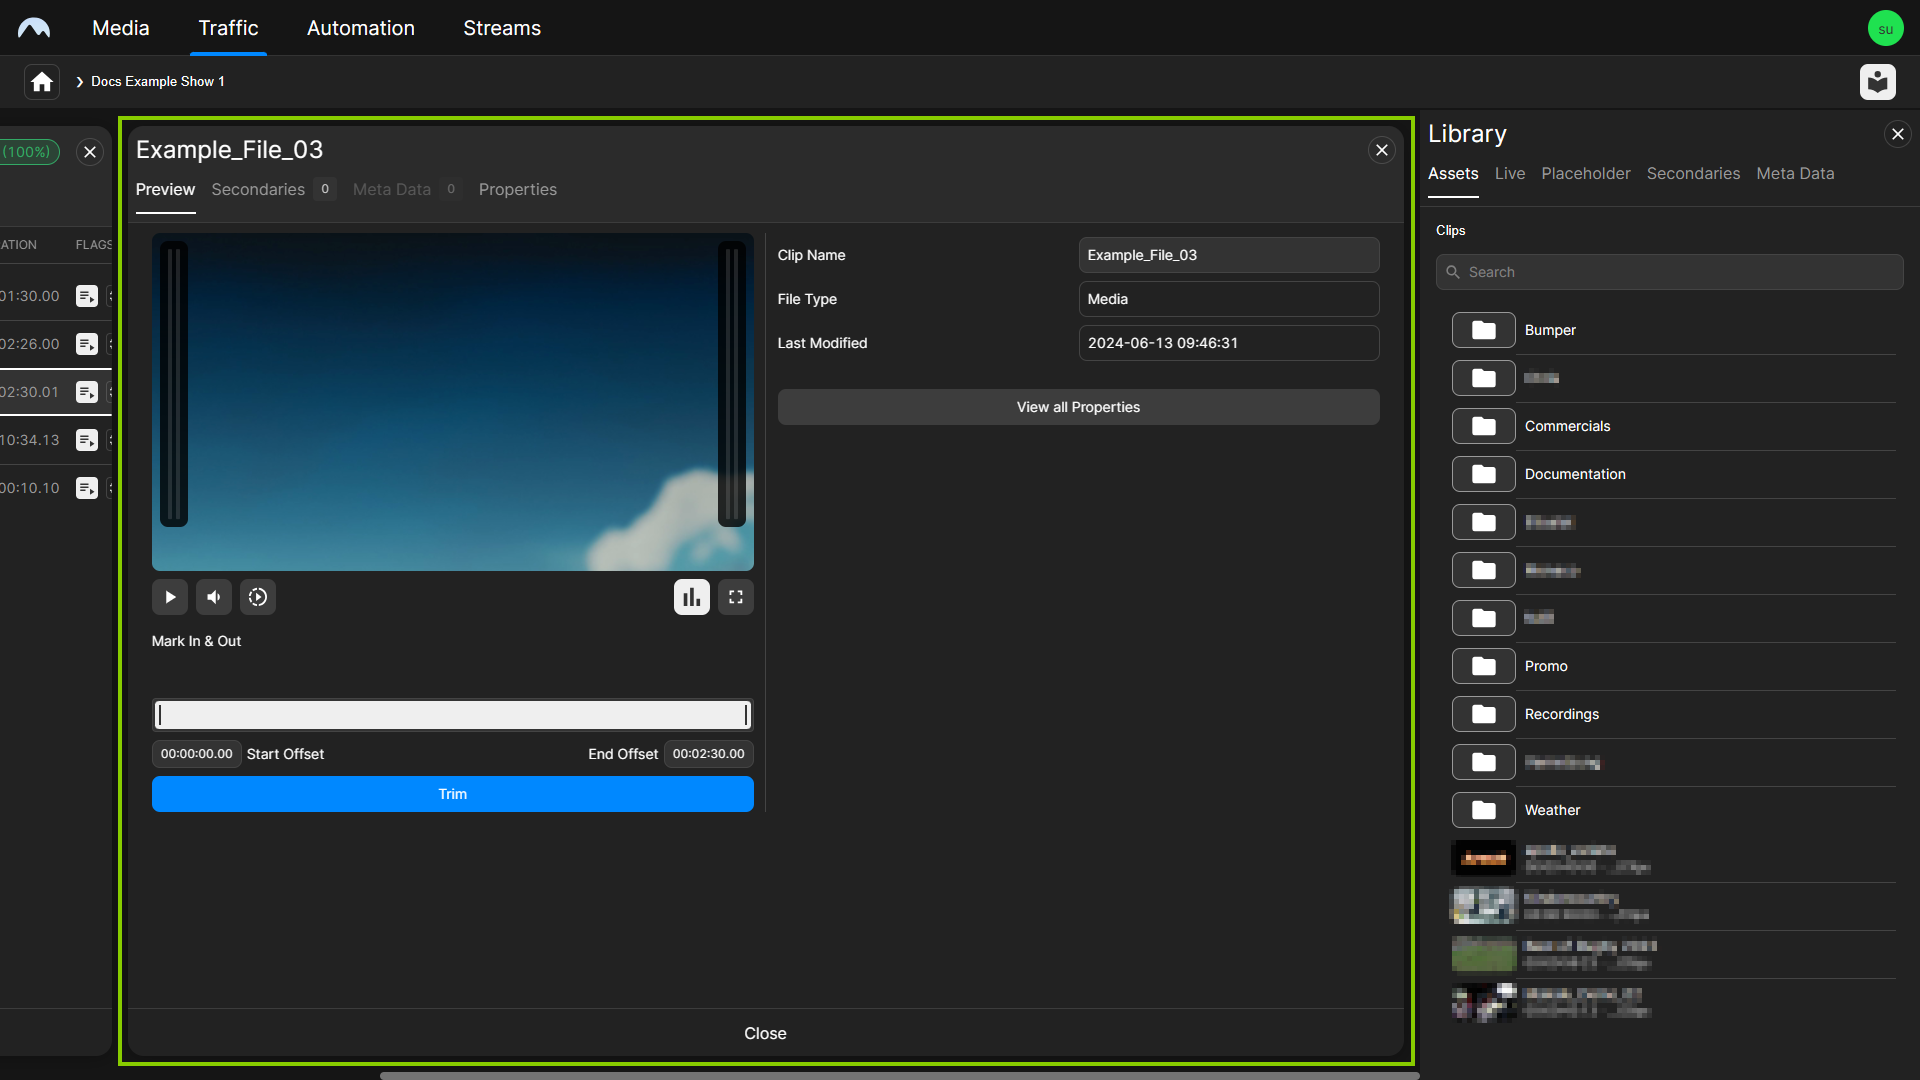
Traffic - Clip details incl. preview -
To start the preview playback, click the Play icon
 below the preview player.
The preview playback starts.
-
Use the preview player controls to control the playback.
The preview plays accordingly.
Notice
When previewing a live source, some of the preview player controls are not available (for example, the control for changing the playback speed).
To preview assets from the library, proceed as follows:
-
In the left sidebar, select Shows.
All available shows of the currently selected channel are listed in the middle.
-
Hover your mouse over any show and click Open on the right side of the corresponding row.
The show details are displayed. The library is displayed on the right.
-
Depending on whether you want to preview a video file or a live source, proceed as follows:
-
To preview a video file, select the Assets tab in the library. Select the folder that contains the file to be played, hover your mouse over the file, and click the Play icon.
-
To preview a live source, select the Live tab in the library. Hover your mouse over the live source to be played, and click the Play icon.
Notice
When previewing a live source, some of the preview player controls are not available (for example, the control for changing the playback speed).
The preview player opens to the left of the library, and the preview playback starts.
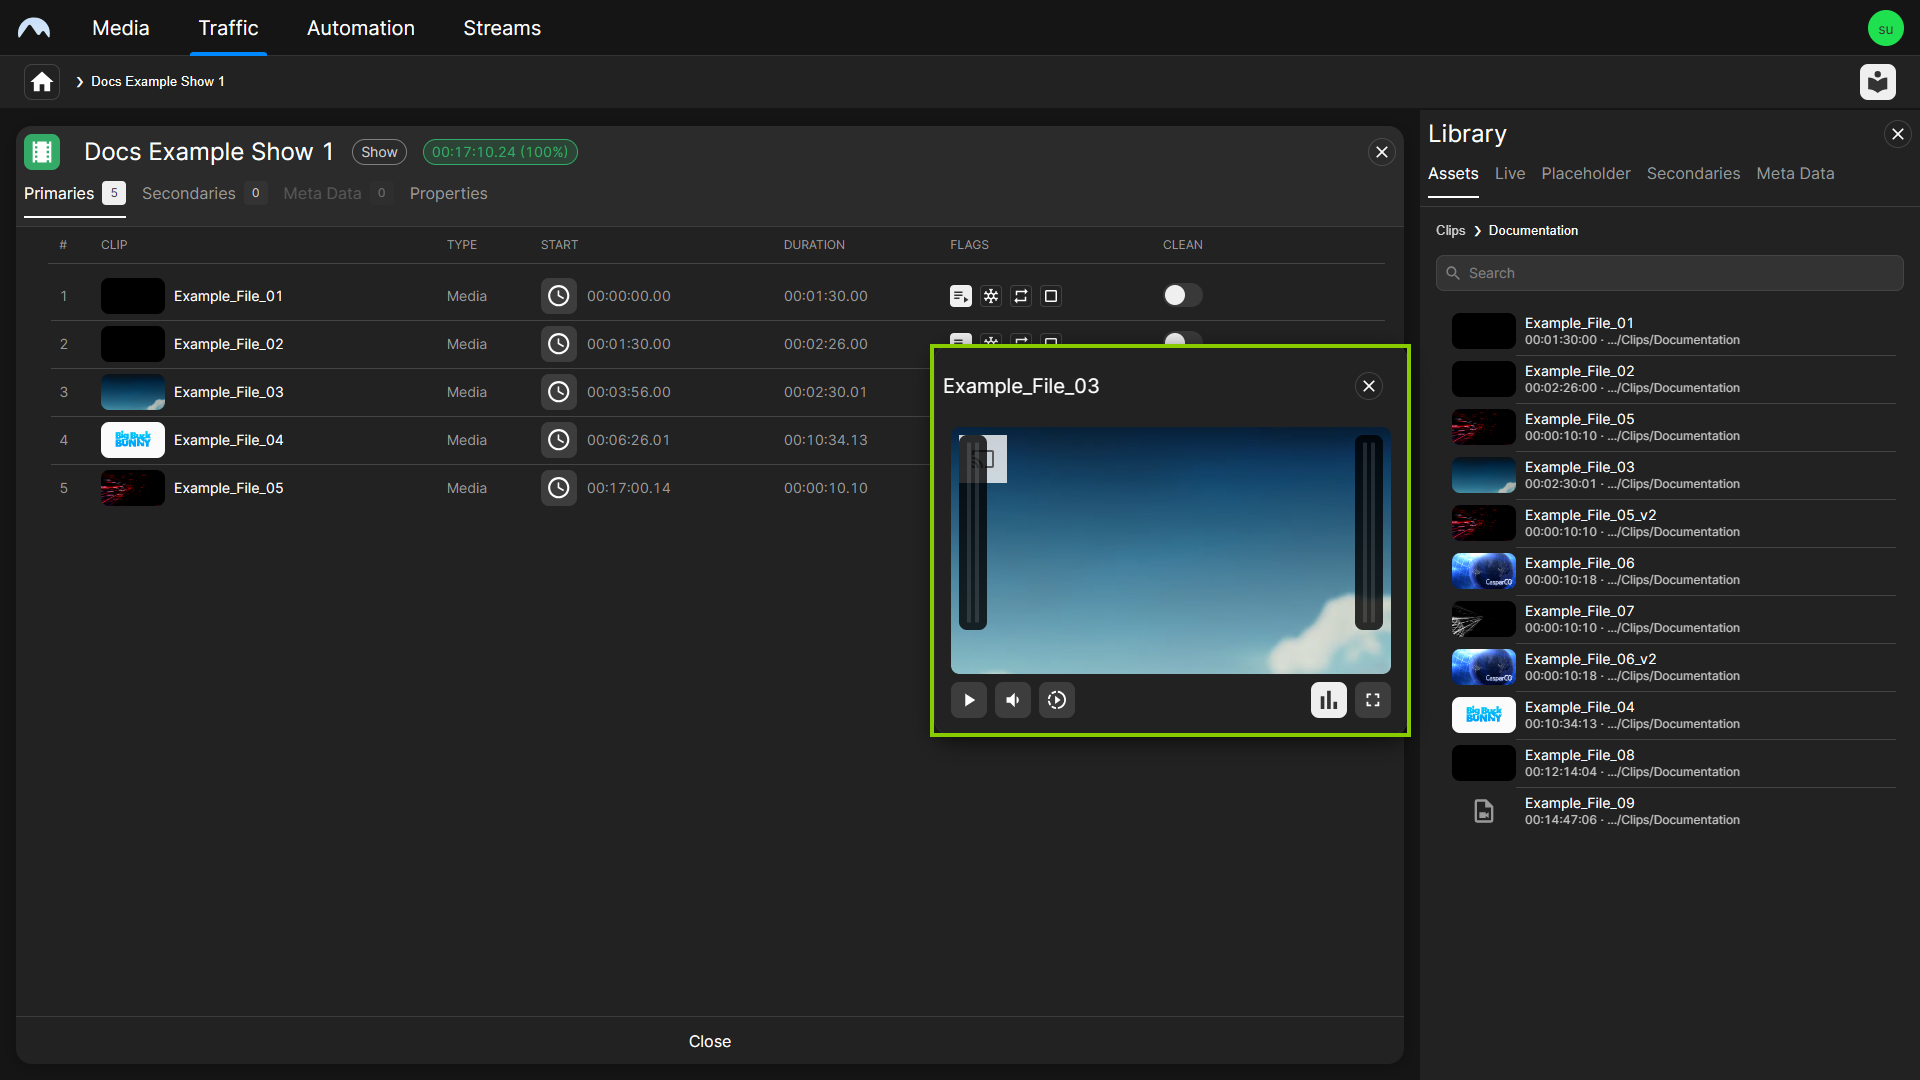
Traffic - Asset preview -
-
Use the preview player controls to control the playback.
The preview plays accordingly.
Using the Categories view
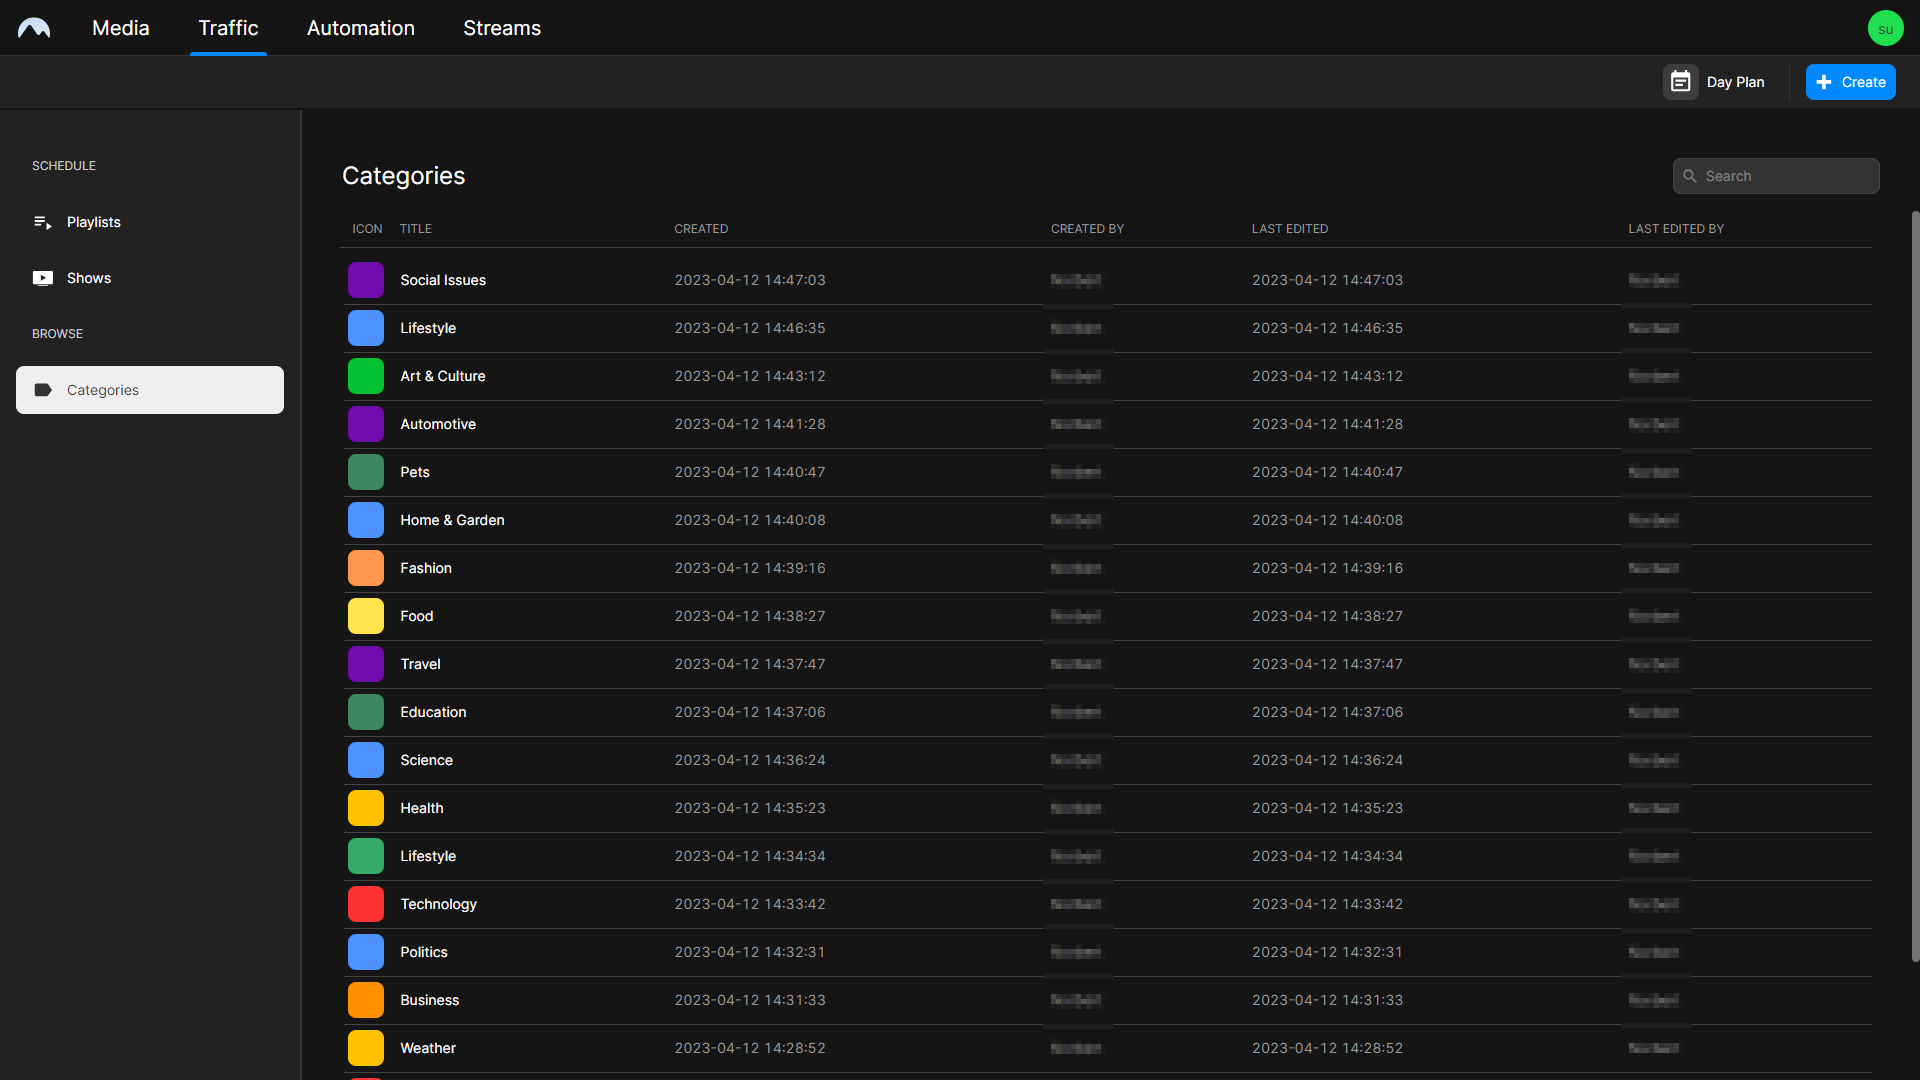
To open the Categories view, select Categories in the sidebar on the left. It provides an overview of all available categories, which are used to organize the content of shows.
The list of show categories can be narrowed by using the search field at the top right.
Additional functions (Edit and Delete) are available per show category via the Options icon ![]() on the right side of each show category row.
on the right side of each show category row.
You can create a new show category by clicking Create at the top right above the list of show categories. This opens a dialog that enables you to specify the category properties.
Creating a show category
To create a show category, proceed as follows:
-
In the sidebar on the left, select Categories.
All available show categories are listed in the middle.
-
At the top right, click Create.
The Create dialog is opened.
-
Enter a Category title and select a Background color.
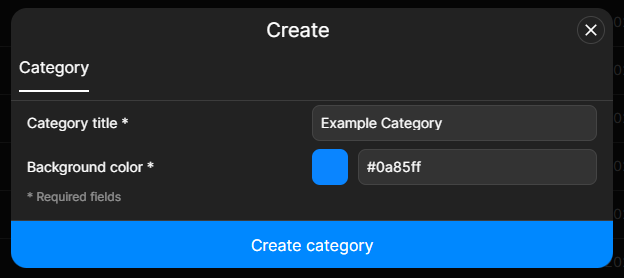
Traffic - Create a new show category -
(Optional) To add an icon, paste its SVG code into the Icon field.
-
(Optional) To use a custom image instead, enable Use Custom Image and paste the public image URL into the Image URL field.
-
Click Create category.
The category is created with the selected properties and can be used when creating or editing a show.
Creating a show
To create a show, proceed as follows:
-
In the sidebar on the left, select Shows.
All available shows are listed in the middle.
-
In the top right, click Create.
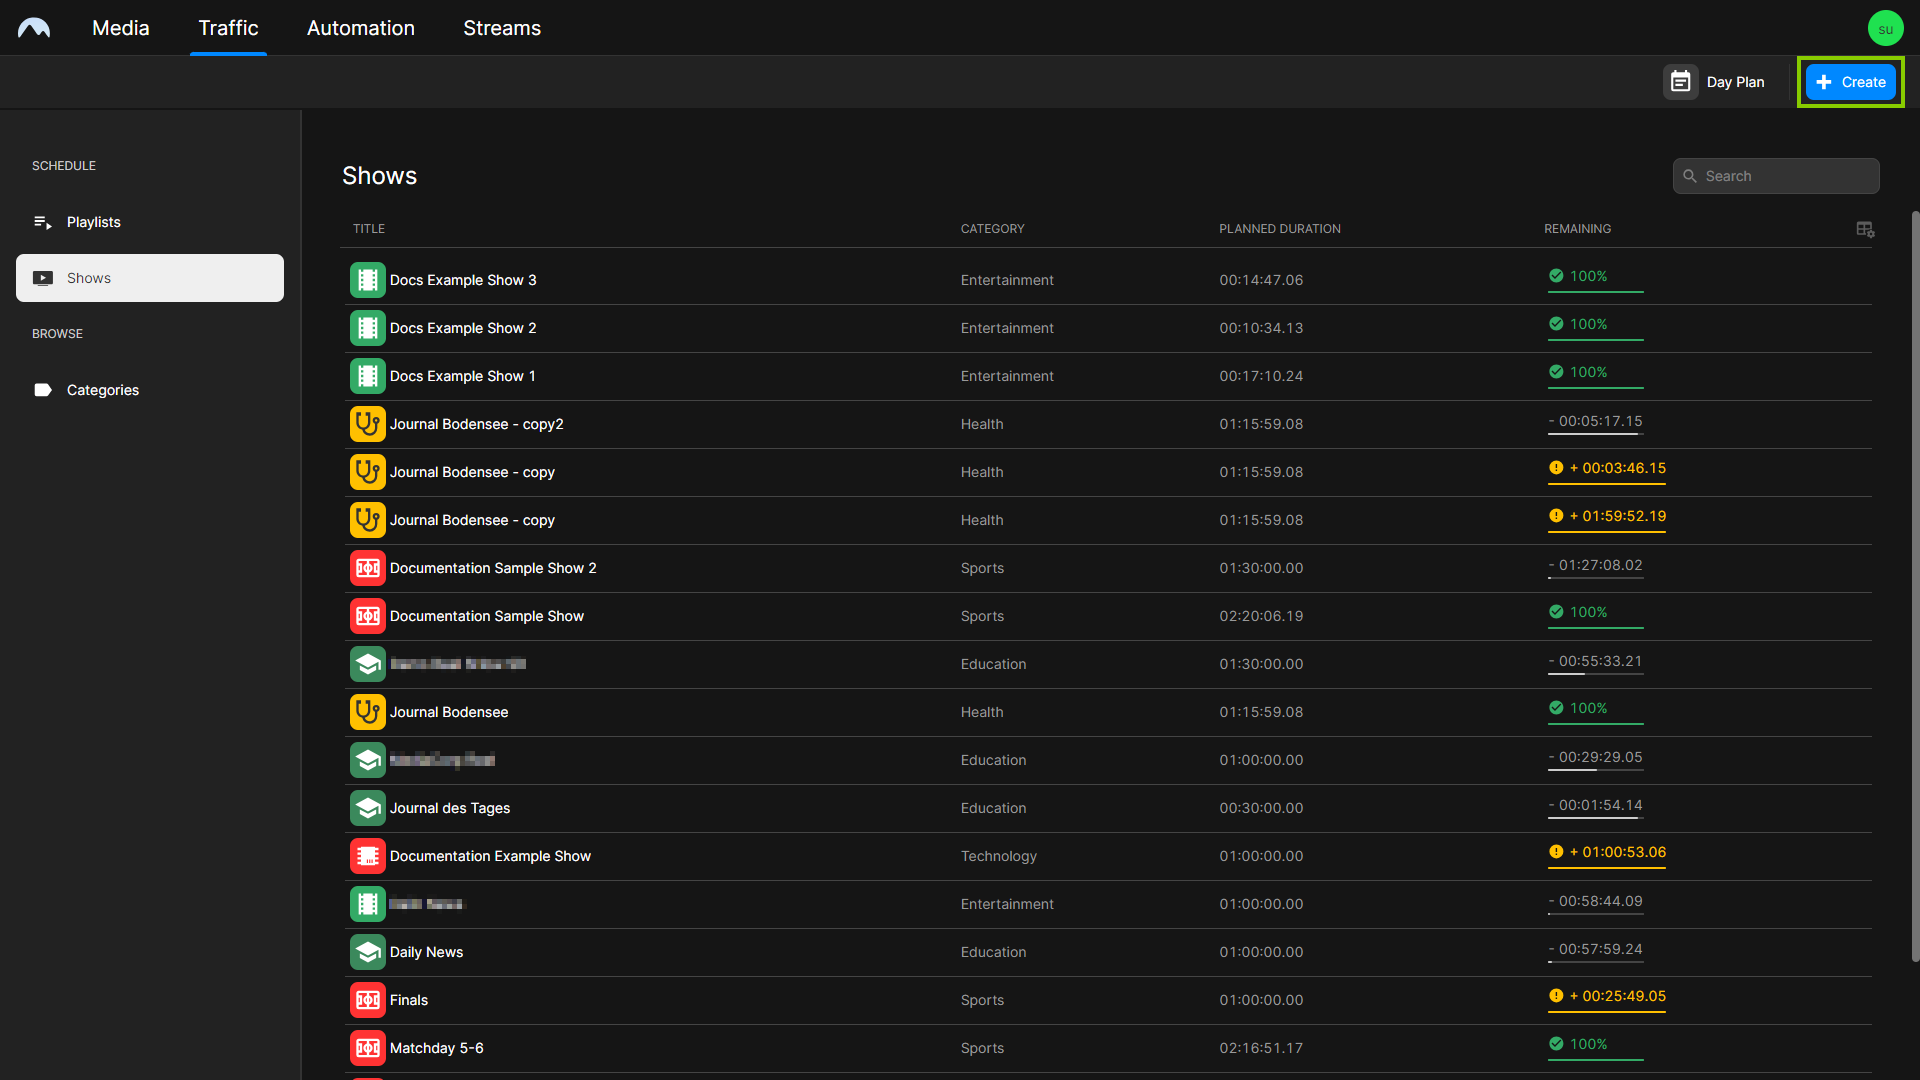
Traffic - Create show The Create dialog is displayed.
-
In the Show tab, set the basic show properties and fill in all required fields.
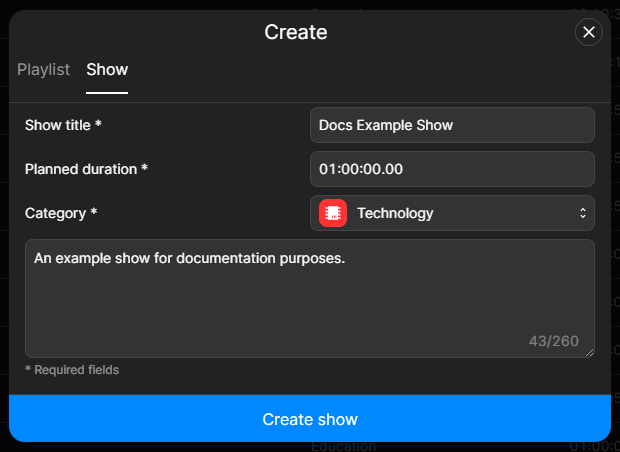
Traffic - Set basic show properties -
To create the show with the selected properties, click Create show.
The show is created, and the list of available shows is displayed again.
Since the newly created show is initially empty, the next step is to add content (primary and secondary events) to the show.
To add content to the show, proceed as follows:
-
Open the show by selecting it in the list of available shows and clicking Open on the right side of the corresponding row.

Traffic - Open show The show is opened.
-
(Optional) Edit the basic show properties in the Properties tab and confirm your changes by clicking Apply Changes at the bottom of the screen.
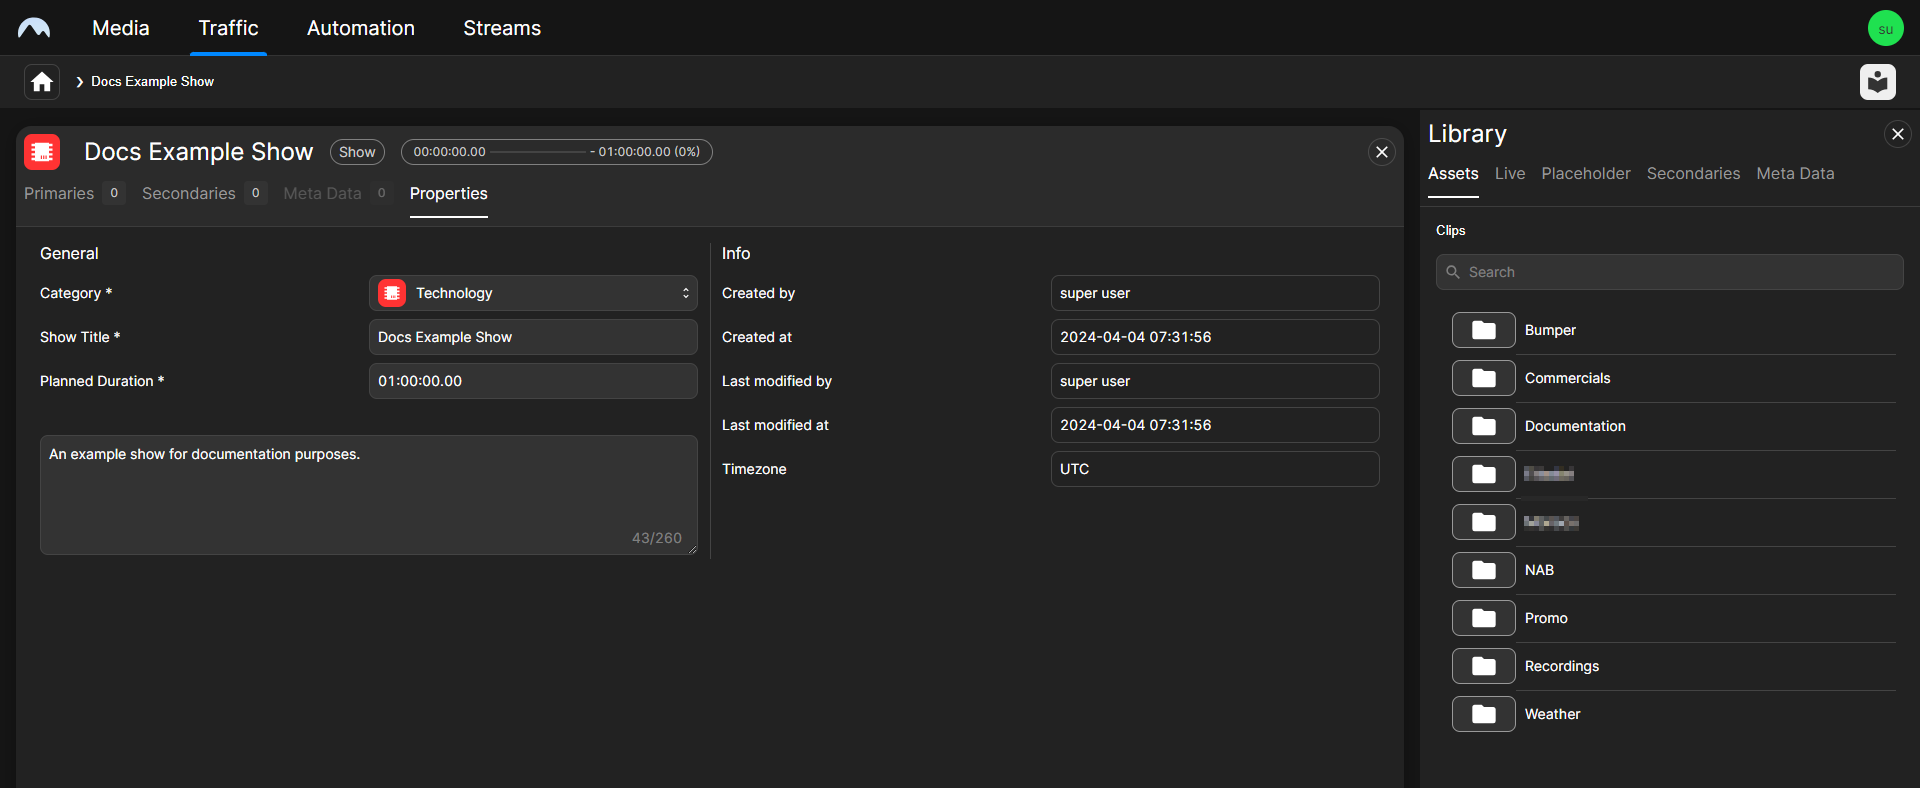
Traffic - Edit basic show properties -
Add one or more primary events to the show by proceeding as follows:
-
Depending on the type of primary event you want to add, select the corresponding tab in the library: Assets (file-based content), Live (live sources), or Placeholder (virtual placeholders).
All available items of the selected type are listed below.
Tip
To filter the available items, use the search field above the list.
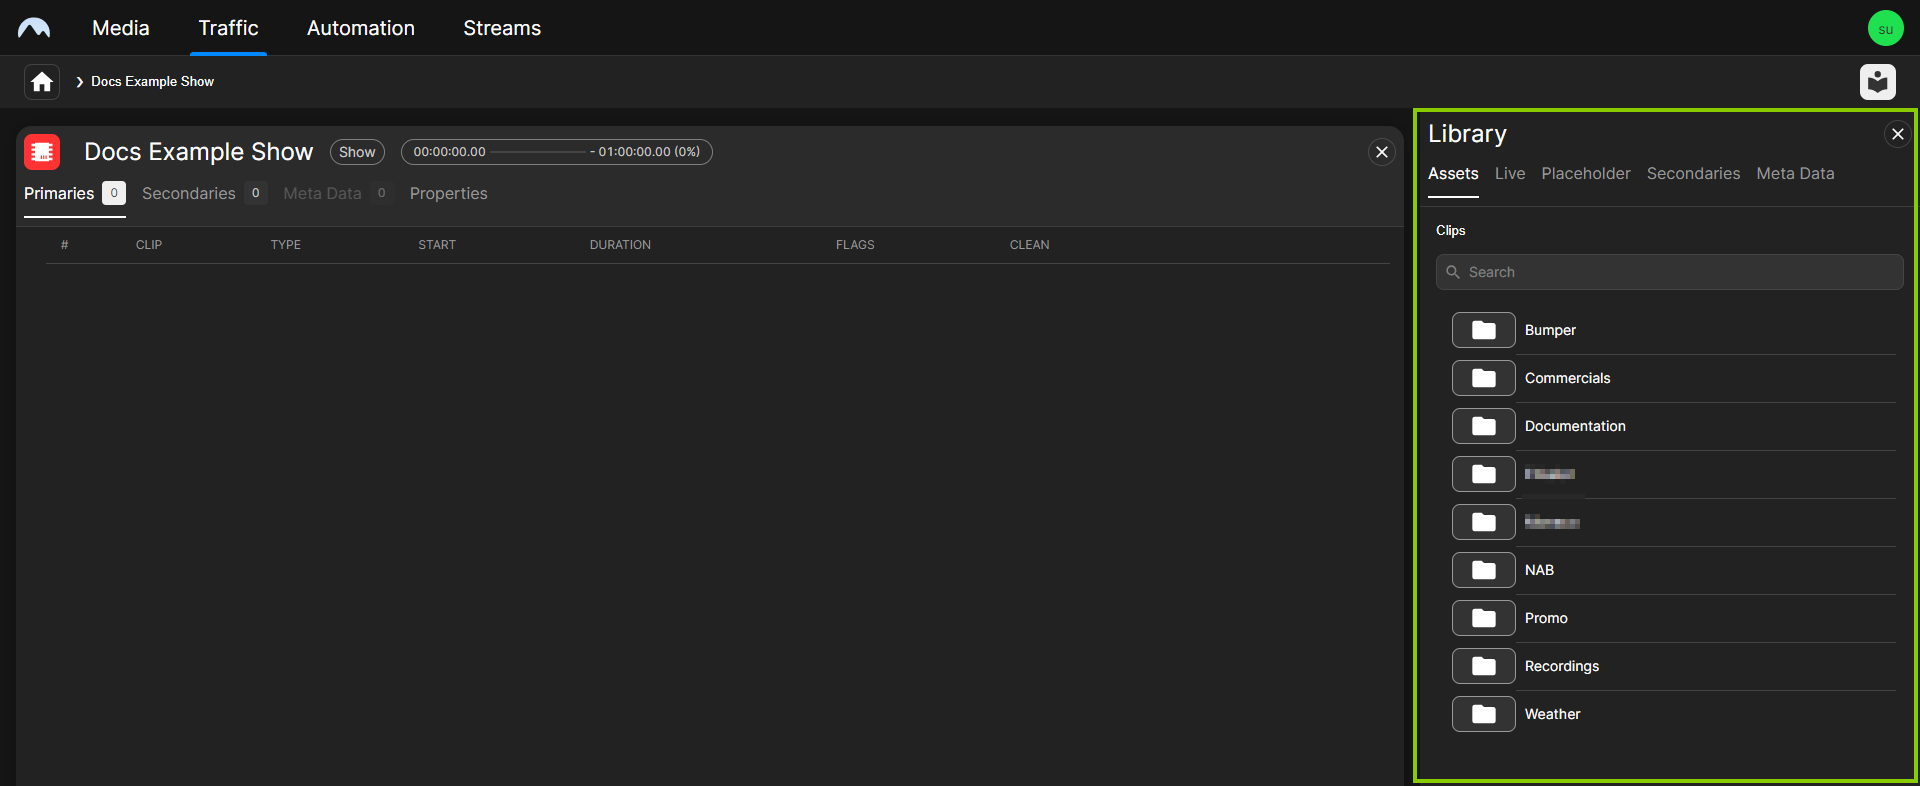
Traffic - Library of available assets Notice
For detailed information about the types of primary events and the other elements used in the planning concept, see the section Schedule > Overview.
-
Add one or more primary events to the show, which turns them into clips. To add them at the end of the show, select the corresponding items in the library and drag and drop them in the information area at the top of the show. Alternatively, you can insert one or more items at a specific position within the show by dragging and dropping them to the desired position within the clip order.
Tip
Adding a live source requires you to set the planned duration of the live event. By default, the remaining free time of the selected show is suggested as the duration of the live event. You can edit the duration as required.
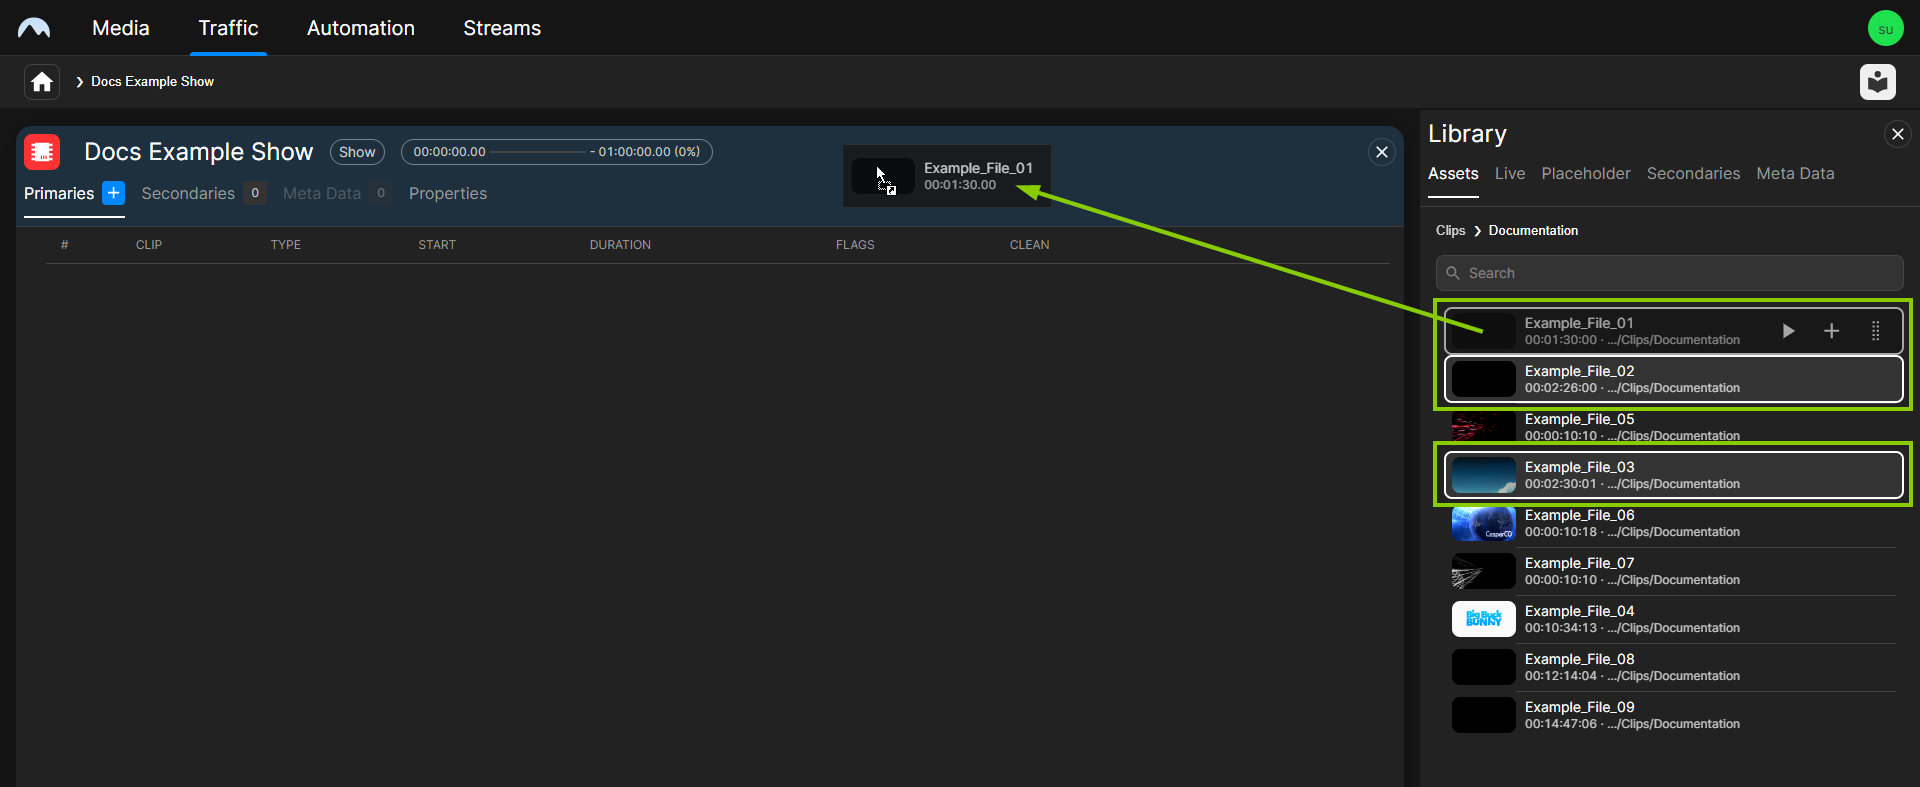
Traffic - Add clips to a show The clips are added to the show. The fill level display at the top is updated accordingly.
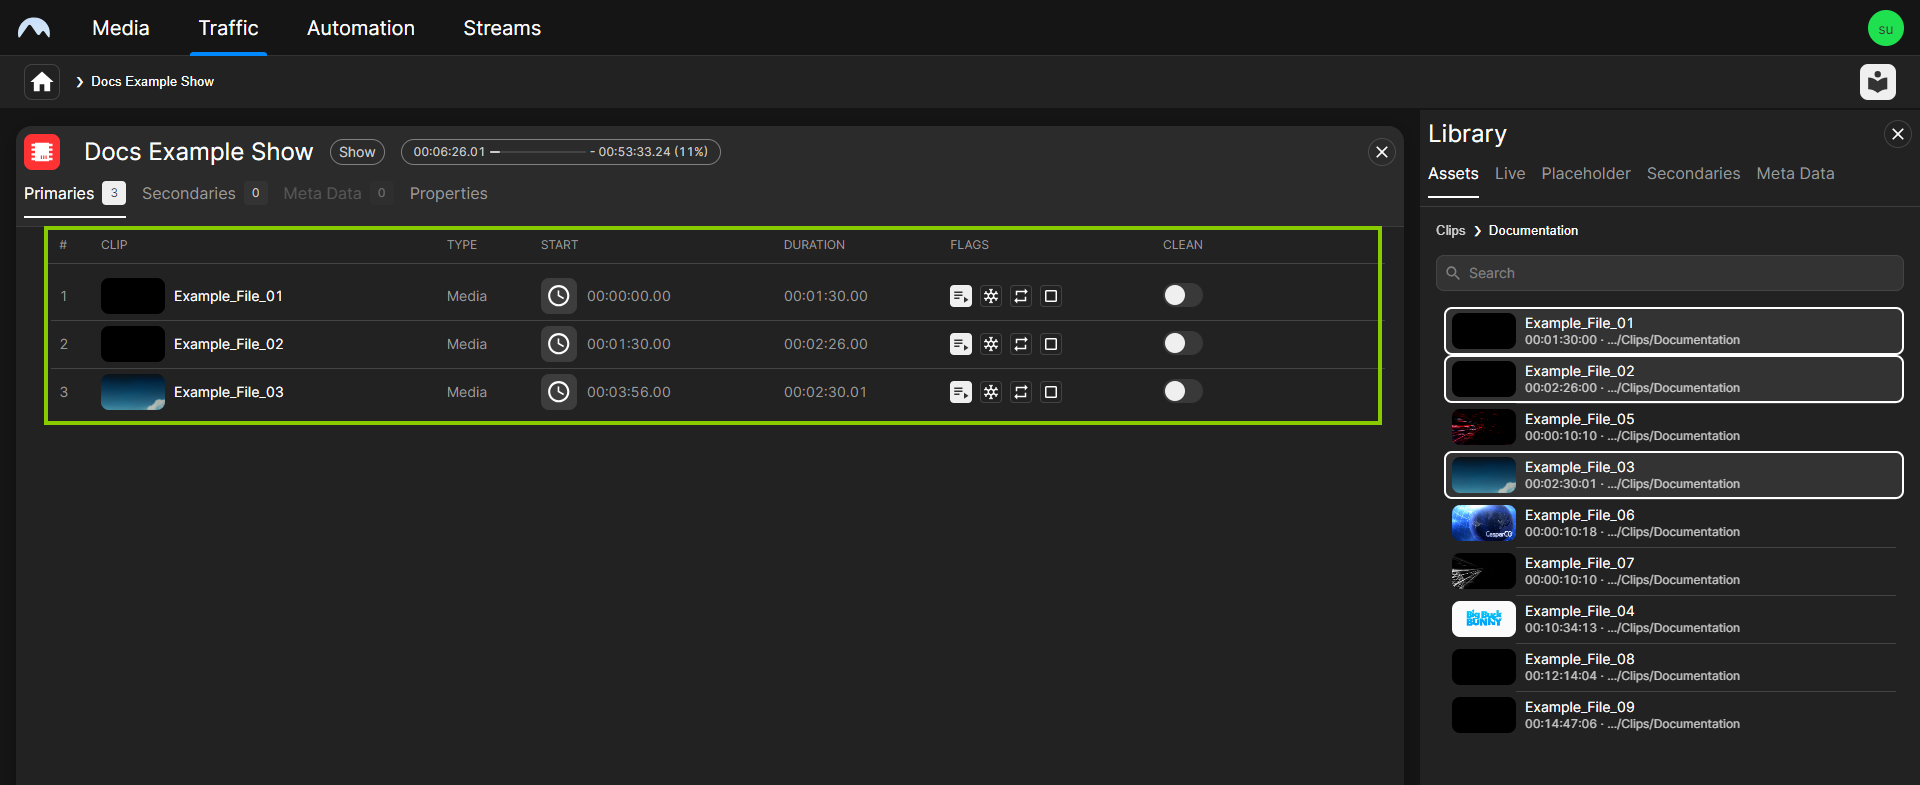
Traffic - Clips added to a show Tip
If the total duration of the added clips exceeds the planned duration of the show, the show is considered "overfilled" and the fill level is highlighted accordingly. If you want to extend the planned duration of the show to the total duration of the added clips, click Extend to the right of the fill level display.

Traffic - Extend planned show duration -
(Optional) Repeat steps a and b to add more clips to the show.
The clips are added to the show. The start time of each added clip is calculated accordingly, depending on the duration of the previously added clips.
Tip
You can manually adjust the start time of each added clip. To set a fixed start time, proceed as follows:
1 - Click the Clock icon
 in the Start column of the corresponding row.
2 - In the Set fixed time dialog, set Start Date and Start Time.
3 - Click Confirm.
The start time of the clip is updated accordingly and the Auto Follow flag is deactivated.
To deactivate the fixed start time afterward, click the Clock icon
 again.
Tip
To remove a clip from the show, proceed as follows:
1 - Select the clip to be removed.
2 - Click the Remove icon
 .
.3 - In the confirmation dialog, click Remove.
Tip
To change the order of the clips in the show, proceed as follows:
1 - Select the clip to be moved.
2 - Move it up or down within the clip order via drag and drop.
-
-
(Optional) Edit the clip flags.
Notice
By default, the Auto Follow flag is activated for all added primary events.
-
(Optional) Add secondary events to the show.
Notice
Graphics secondary events can be added to playlists, shows, and clips. If you add graphics to a show, they are displayed in addition to the added playlist and clip graphics.
-
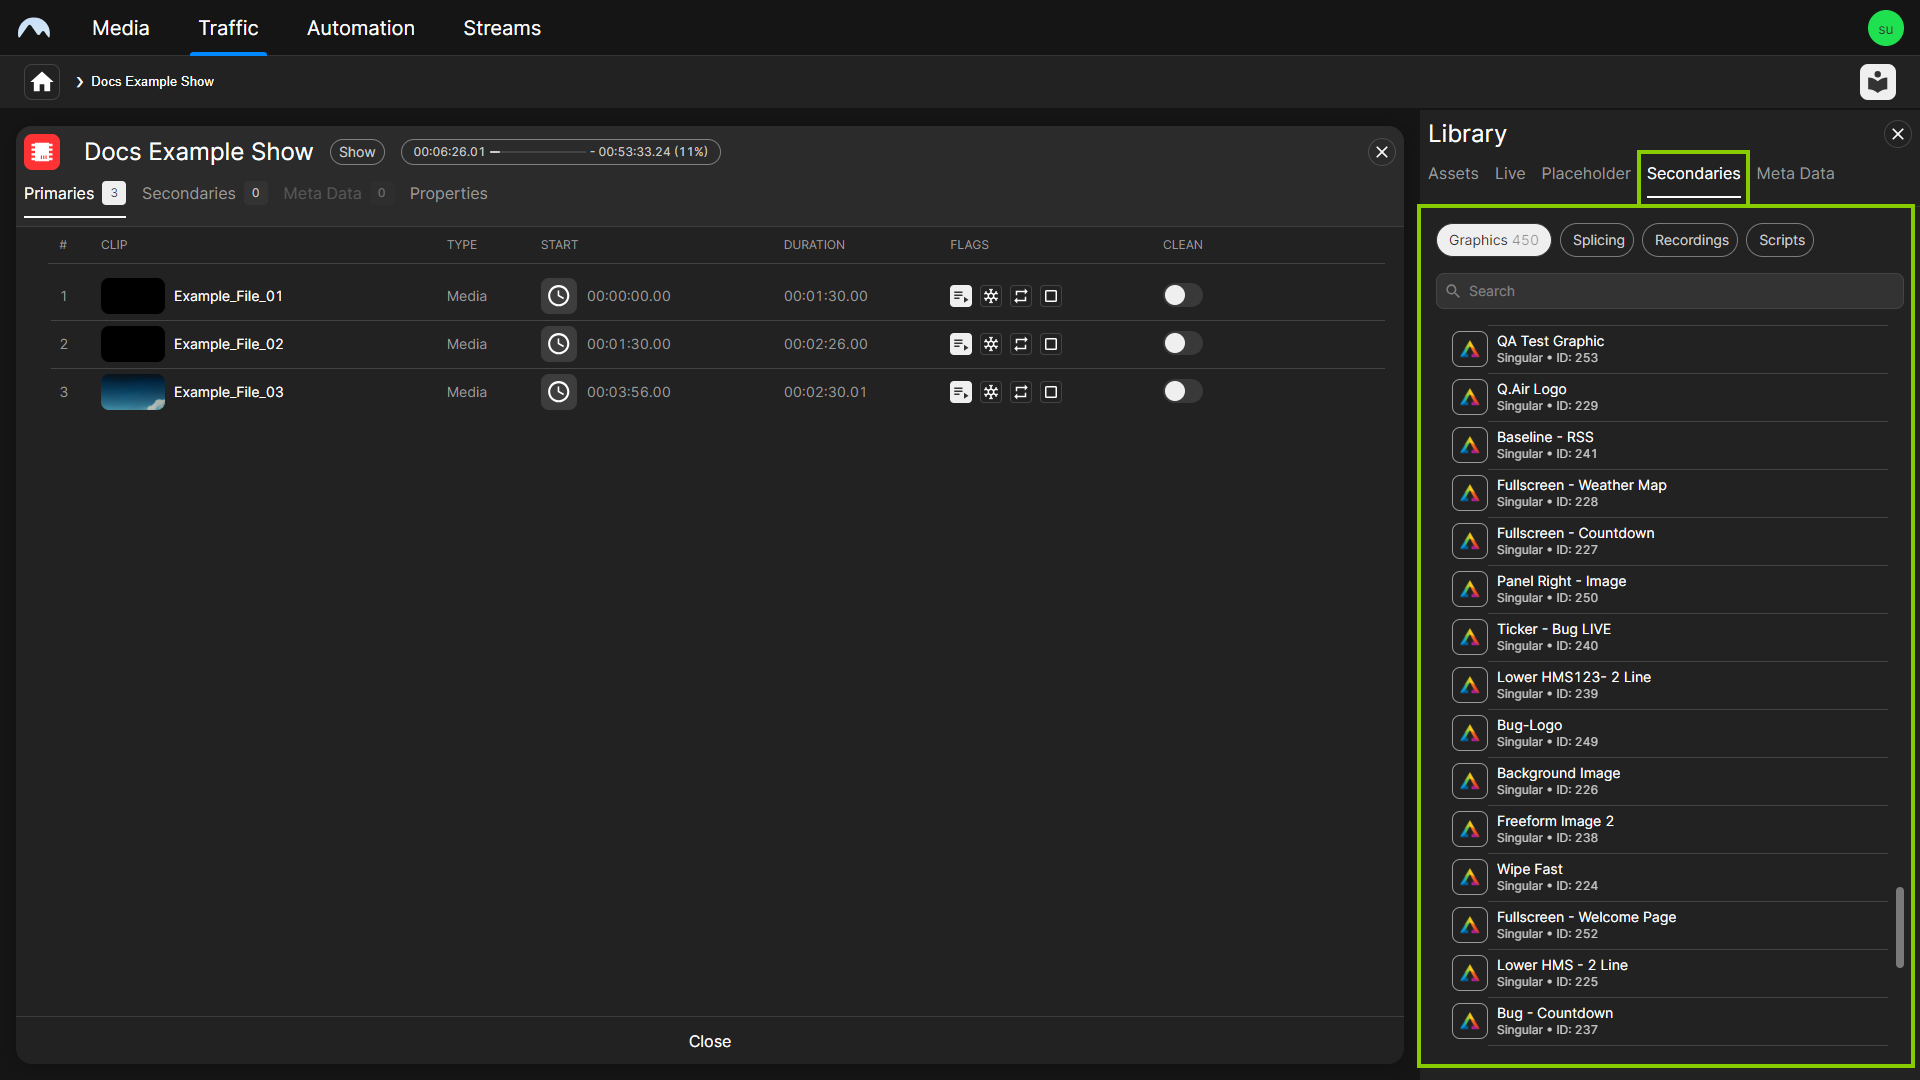
On the right side in the Library, select the Secondaries tab and below the type of secondary event you want to add (for example, Graphics, Splicing, Recordings, or Scripts).
Available secondary events of the selected type are displayed below.
Traffic - Secondary events -
(Optional) To search for specific secondary events, use the search field above the list of available secondary events.
-
To add a secondary event to a single clip in the show, select a secondary event in the library and drag it on the corresponding clip.

Traffic - Add secondary event to a clip The secondary event is added to the clip.

Traffic - Secondary event added to a clip Notice
If you add a secondary event to a clip, a Secondary event icon
 and the number of added events are displayed next to the clip name.
 -
To add a secondary event to the show, drag it from the library on the show information area. Alternatively, you can select the secondary event in the library and click the Plus icon on the right side of the corresponding row.

Traffic - Add a secondary event to a show The secondary event is added to the show.
-
(Optional) Repeat the previous two steps to add more secondary events to the show or to individual clips within the show.
-
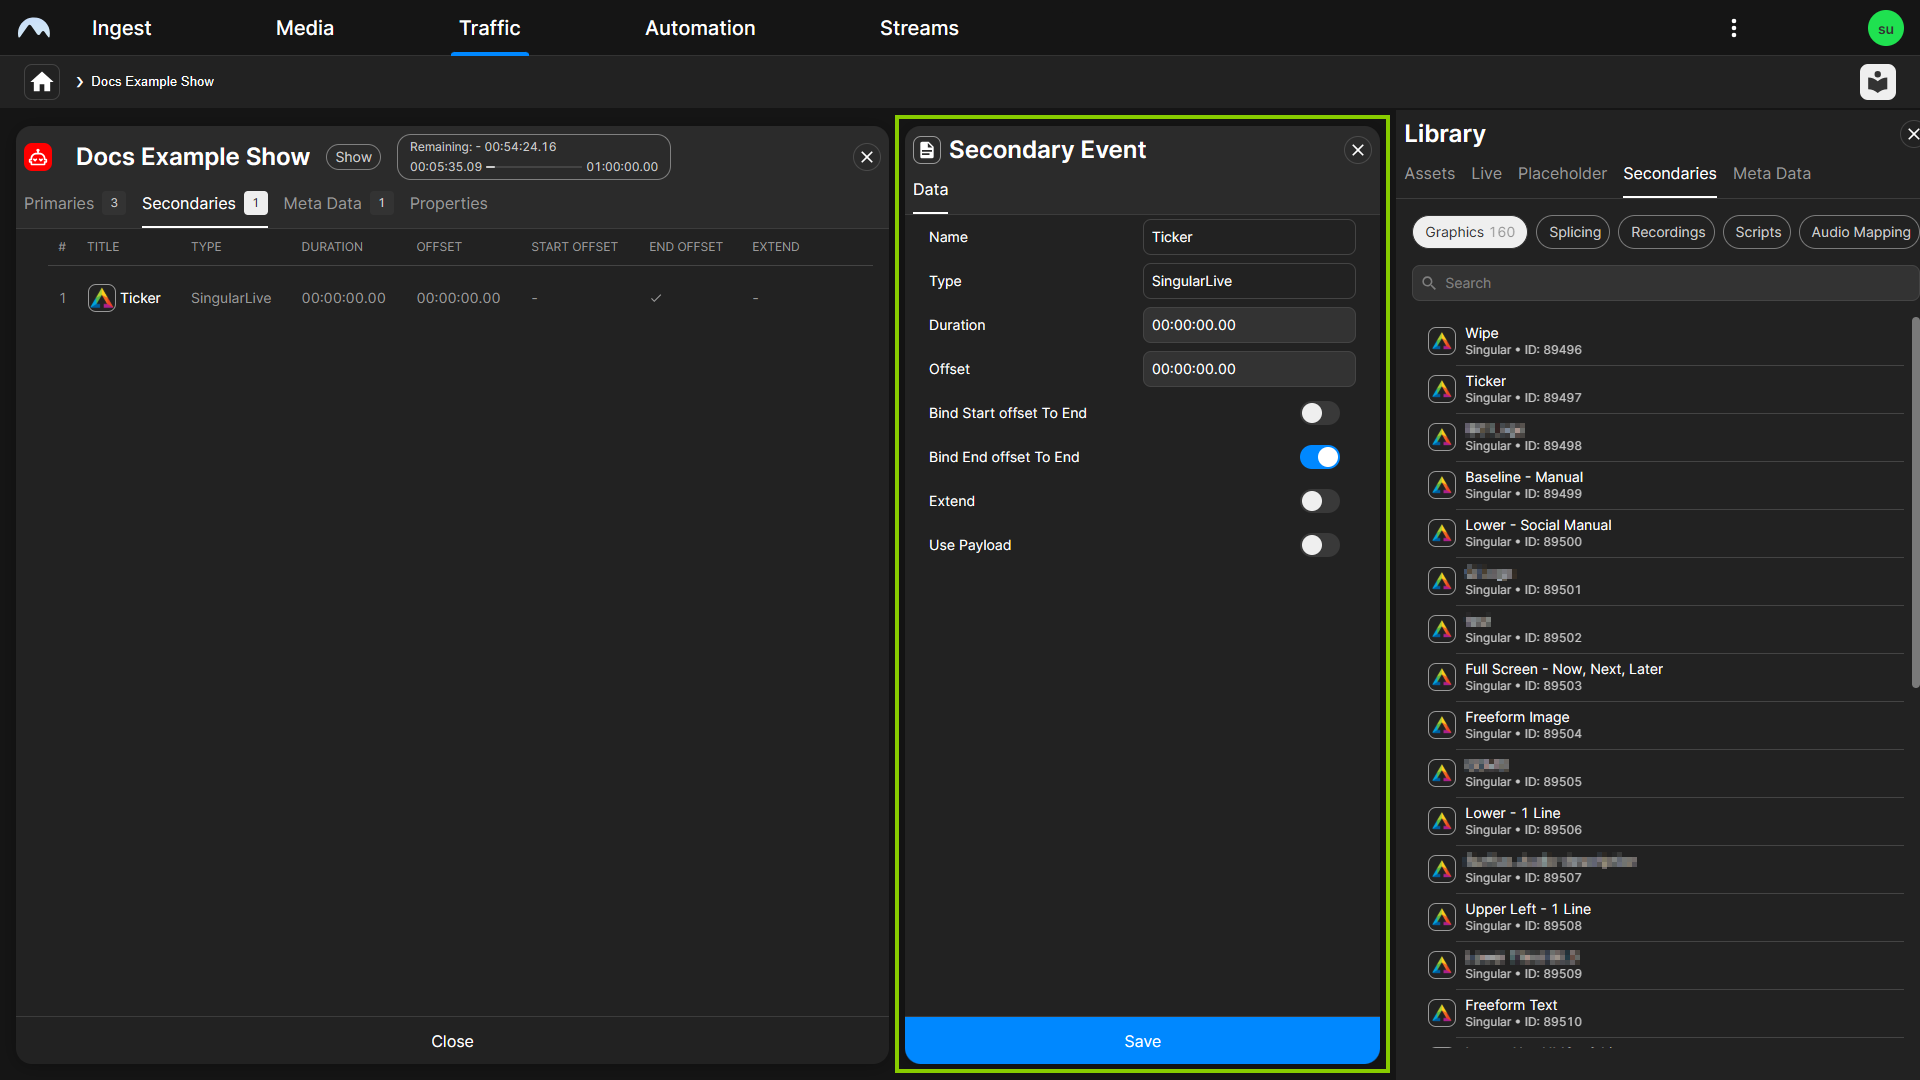
(Optional) Edit the properties of an added secondary event by either Editing a clip or by editing the secondary events of the show. To edit the secondary events of the show, select the Secondaries tab in the show information area. All added secondary events are listed below. Click Open at the right end of the row of the secondary event to be edited. The secondary event properties are displayed on the right side. Edit the properties as required and apply your changes by clicking Save.
Traffic - Edit secondary event properties Tip
To delete a secondary event of a single clip within the show, proceed as follows:
1 - In the clip list of the show, select the corresponding clip.
2 - In the clip details area on the right side, select the tab of the corresponding secondary event type (for example, Graphics).
3 - Click the Delete icon
 on the right side of the corresponding row.
4 - In the confirmation dialog, click Remove.
Tip
To delete a secondary event of the show, proceed as follows:
1 - In the show information area, select the tab of the corresponding secondary event type (for example, Graphics).
2 - Click the Delete icon
 on the right side of the corresponding row.
3 - In the confirmation dialog, click Remove.
-
-
(Optional) Add metadata to the show.
-
On the right side in the Library select the Meta Data tab and below the type Show.
Available metadata keysets of the selected type are displayed below.

Traffic - Available metadata keysets -
To add a metadata keyset to the show, drag it from the library and drop it in the show information area.

Traffic - Add a metadata keyset to a show The metadata keyset is added to the show.
Tip
To display a list of metadata keysets that are already added to the show, select the Meta Data tab in the show information area. The number displayed after the tab name indicates the number of metadata keysets currently added to the show.

Traffic - Metadata keysets added to a show Tip
If the added metadata keyset includes one or more mandatory properties that are currently empty (not filled out), a warning icon is displayed after the Meta Data tab title and the name of the corresponding metadata keyset. To remove this warning, edit the metadata keyset as described in step 6d, fill out the mandatory properties/fields, and save your changes.

Traffic - Empty mandatory property/field warning Tip
Instead of adding metadata to a show, you can also add it to a clip in the show (provided the corresponding metadata keyset is valid for clips). To do this, select the Meta Data tab on the right side in the Library and below the type Clip. Drag the metadata keyset from the library and drop it on the corresponding clip.
-
(Optional) Repeat the previous two steps to add more metadata keysets to the show or its clips.
-
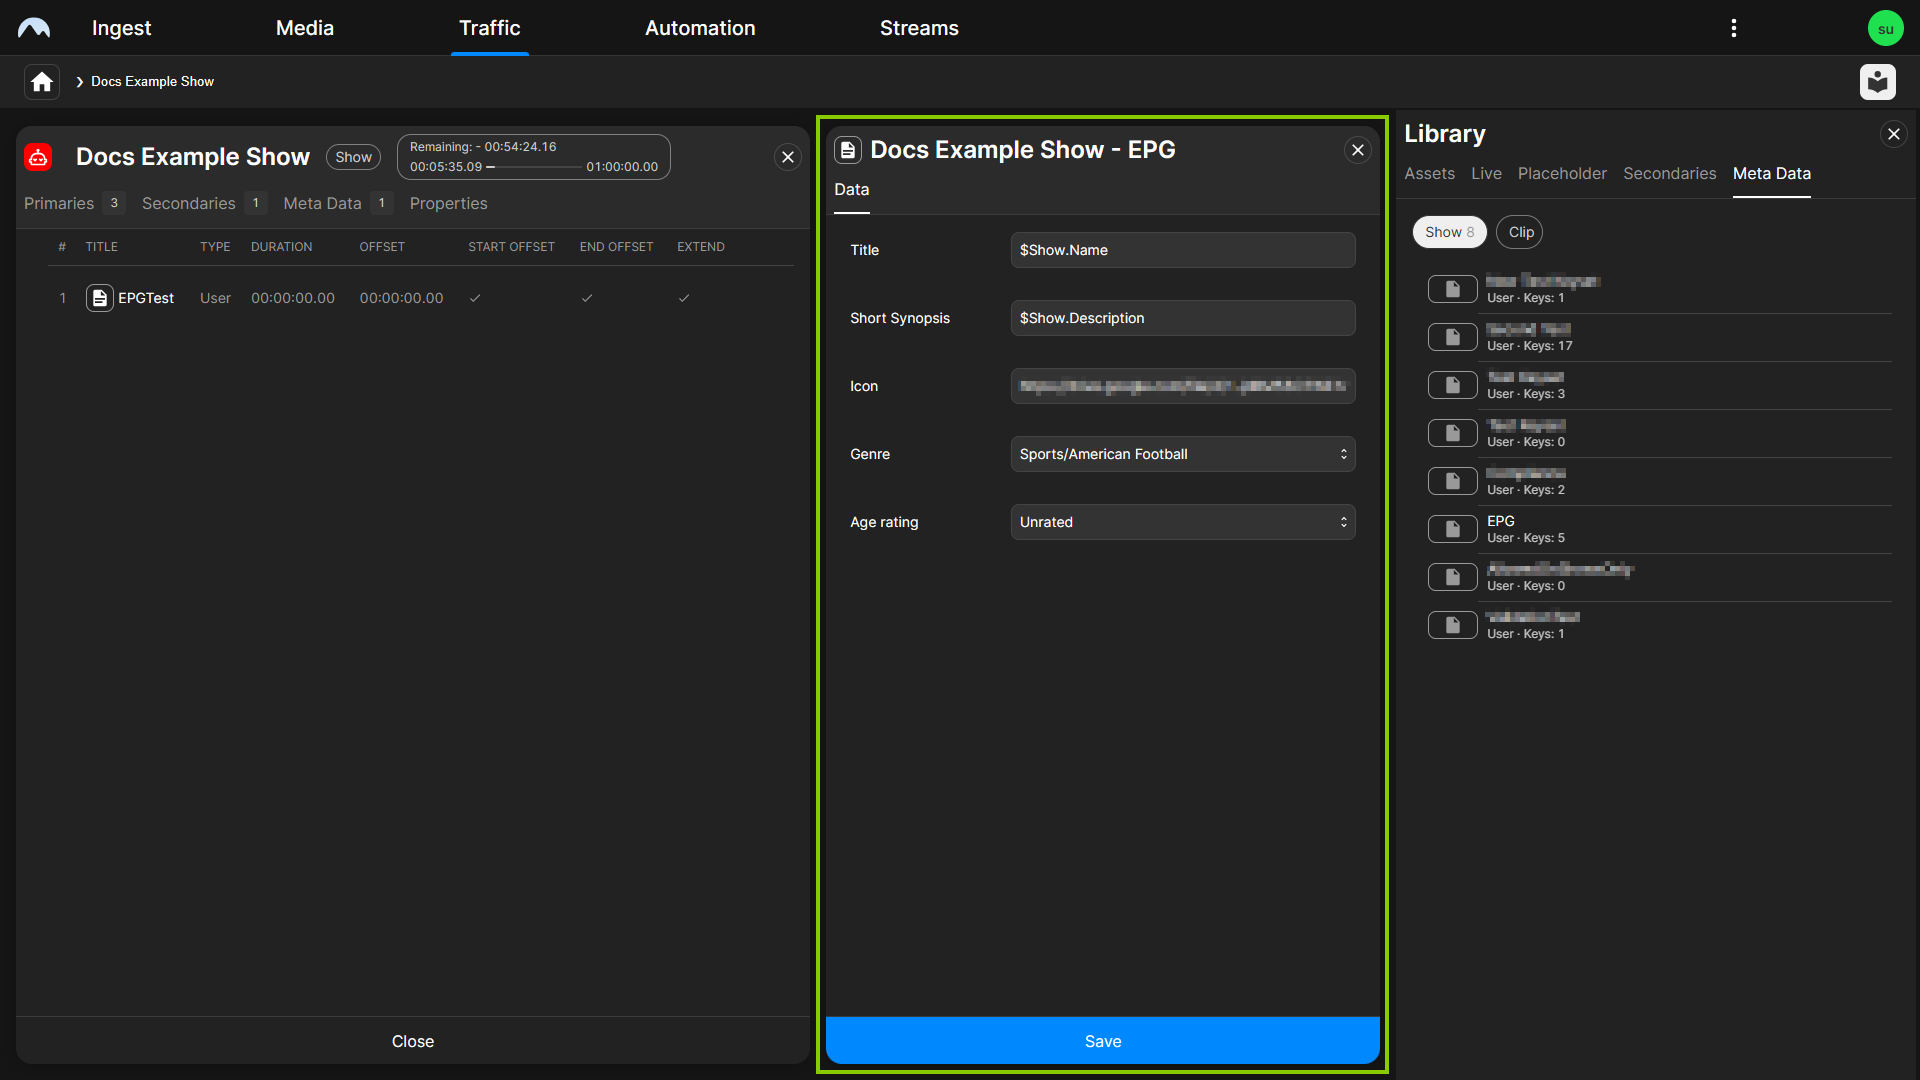
(Optional) To edit the properties of the added metadata keyset, select the Meta Data tab in the show information area. All added metadata keysets are listed below. Click Open at the right end of the row of the metadata keyset to be edited. The metadata keyset properties are displayed on the right side. Edit the properties as required and apply your changes by clicking Save.
Traffic - Edit metadata properties Tip
To delete an added metadata keyset, proceed as follows:
1 - Click the Delete icon
 at the right end of the corresponding metadata keyset row.
2 - In the subsequently displayed dialog, click Remove.
-
The show's properties and contents are saved. It can be added to a playlist, sent to playout, and used in a rundown.
Editing a show
To edit a show, proceed as follows:
-
In the sidebar on the left, select Shows.
All available shows of the currently selected channel are listed in the middle.
-
Select the show to be edited and click Open on the right side of the corresponding row.
The show details are displayed.
-
Edit the show, assigned secondary events, and/or metadata as described in section Creating a show.
The show is saved automatically.
Editing a clip
To edit a clip, proceed as follows:
-
In the left sidebar, select Shows.
All available shows of the currently selected channel are listed in the middle.
-
Select the show that contains the clip to be edited and click Open on the right side of the corresponding row.
The show details are displayed.

Traffic - Show details -
(Optional) Add secondary events to the clip by selecting a secondary event in the library and dragging it on the corresponding clip.

Traffic - Add secondary event to a clip The secondary event is added to the clip. The total number of secondary events added is displayed to the right of the clip name.

Traffic - Secondary event added to a clip -
(Optional) To edit the properties of the added secondary event, proceed as follows:
-
In the clip list, select the clip to be edited and click Open on the right side of the corresponding row.
The clip details and preview are opened on the right side.
-
In the clip details, select the Secondaries tab.
All secondary events currently added to the clip are listed below.
-
In the secondary event list, select the event to be edited and click Open on the right side of the corresponding row.
The secondary event properties are opened on the right side.
-
Edit the properties as required.
-
Confirm your changes by clicking Save.
-
-
(Optional) Add metadata to the clip by selecting a metadata keyset in the library under Meta Data > Clip and dragging it on the corresponding clip.

Traffic - Add metadata to a clip The metadata keyset is added to the clip. The total number of metadata keysets added is displayed to the right of the clip name.

Traffic - Metadata added to a clip -
(Optional) To edit the start time of a clip, proceed as follows:
-
Click the Clock icon
 in the Start column of the corresponding clip.
 -
In the Set fixed time dialog, edit the Start Time.
-
Click Confirm.
The start time of the clip is updated accordingly.
Tip
To deactivate the fixed start time afterward, click the Clock icon
 again. As a result, the clip start time is set automatically so that it starts right after the previous clip ends. If there is a gap between the clip and the previous clip, it is automatically closed.
 -
-
(Optional) To edit the planned duration of a live clip, proceed as follows:
-
Hover your mouse over the corresponding clip, click the Options icon
 , and select Edit.
 -
Edit the Live duration value.
-
Confirm the new duration by clicking OK.
The duration of the live clip is updated accordingly.
-
-
To edit the clip properties, proceed as follows:
-
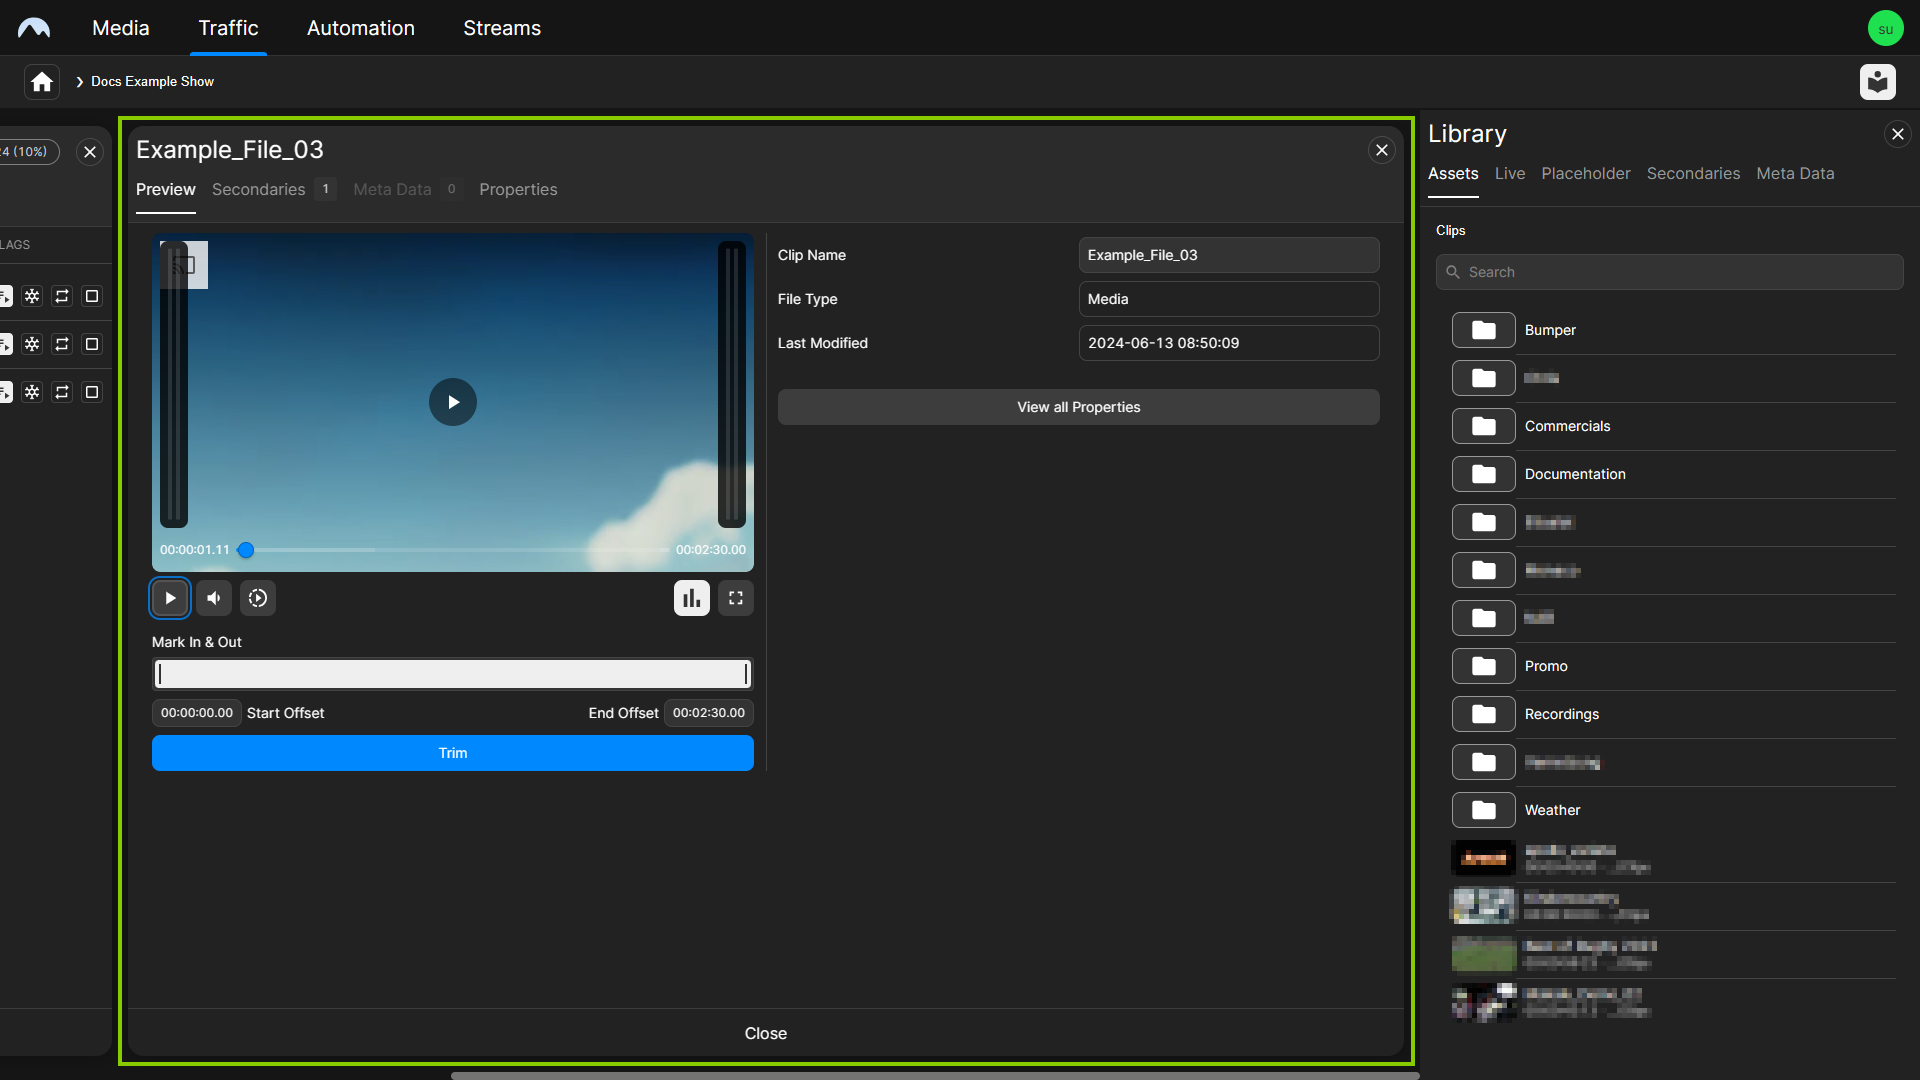
In the clip list, select the clip to be edited and click Open on the right side of the corresponding row.

Traffic - Select clip The clip details and preview are opened on the right side.
Traffic - Clip details -
Edit the clip properties.
Tip
You can edit the clip name in the Preview tab. Alternatively, you can edit additional properties (e.g. clip description) that are available in the Properties tab.
-
-
(Optional) Trim the clip.
-
To save your changes, click Apply Changes at the bottom of the clip details area.
The clip properties are saved.
Trimming a clip
To trim a clip, proceed as follows:
-
In the left sidebar, select Shows.
All available shows of the currently selected channel are listed in the middle.
-
Select the show that contains the clip to be edited and click Open on the right side of the corresponding row.
The show details are displayed.

Traffic - Show details -
In the clip list, hover your mouse over the clip to be trimmed and click Open on the right side of the corresponding row.

Traffic - Select clip The clip details and preview are opened on the right side.
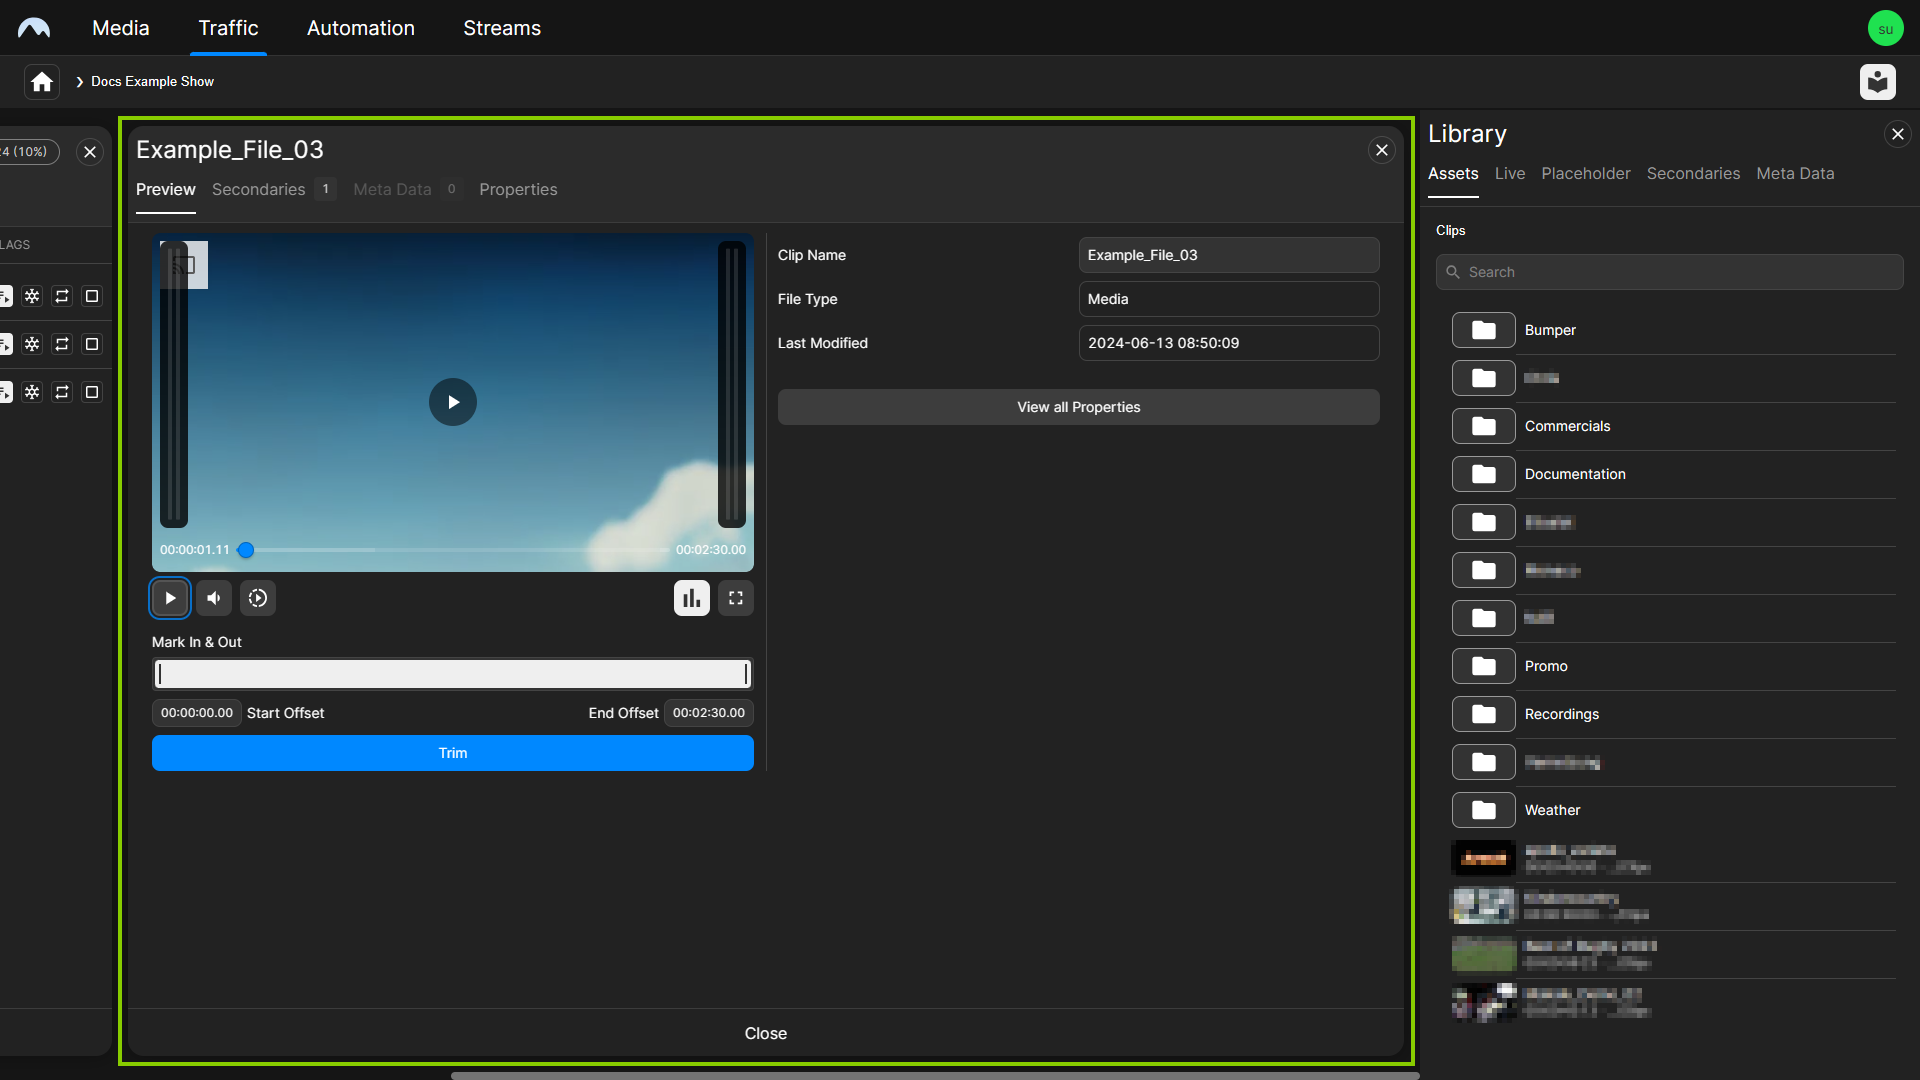
Traffic - Clip details -
Set the mark in point by either dragging the left handle of the trim bar (1) to the corresponding time or by entering the timecode to be used in the Start Offset field (2).
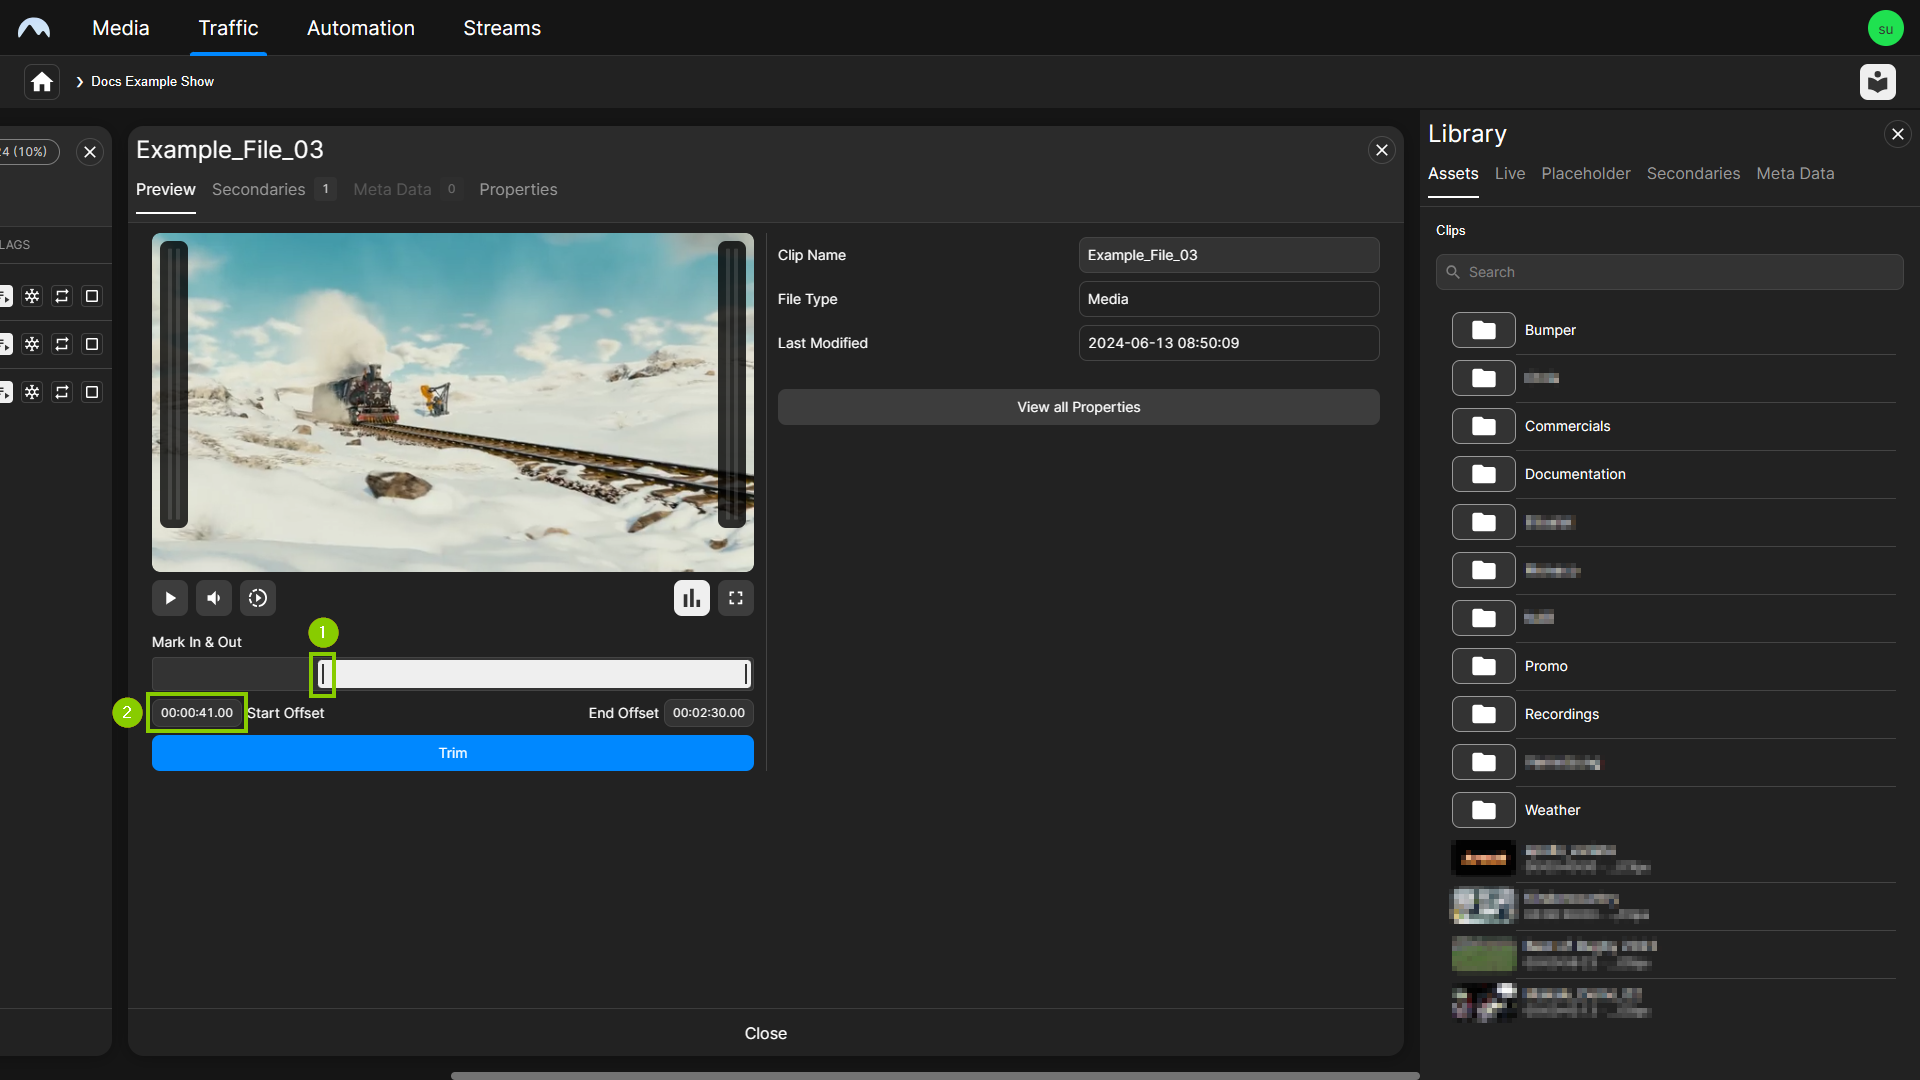
Traffic - Trim clip - Set mark in Tip
Alternatively, you can also use the preview player controls to select the mark in point. To do this, proceed as follows:
1 - Either use the handle of the progress bar or click the Next Frame icon
 or the Previous Frame icon
  to jump to the corresponding time.
2 - Click the Mark In icon
 .
.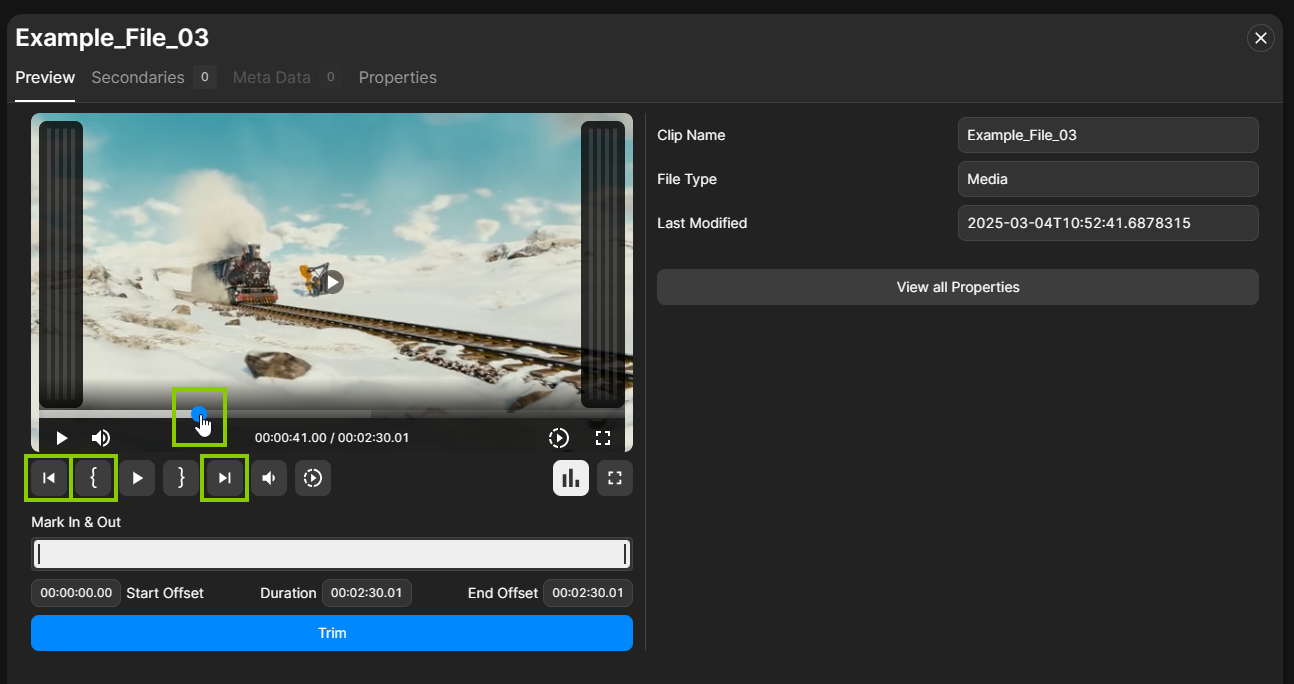
Traffic - Trim clip - Set mark in via preview player controls -
Set the mark out point by either dragging the right handle of the trim bar (3) to the corresponding time or by entering the timecode to be used in the Duration or End Offset field (4).
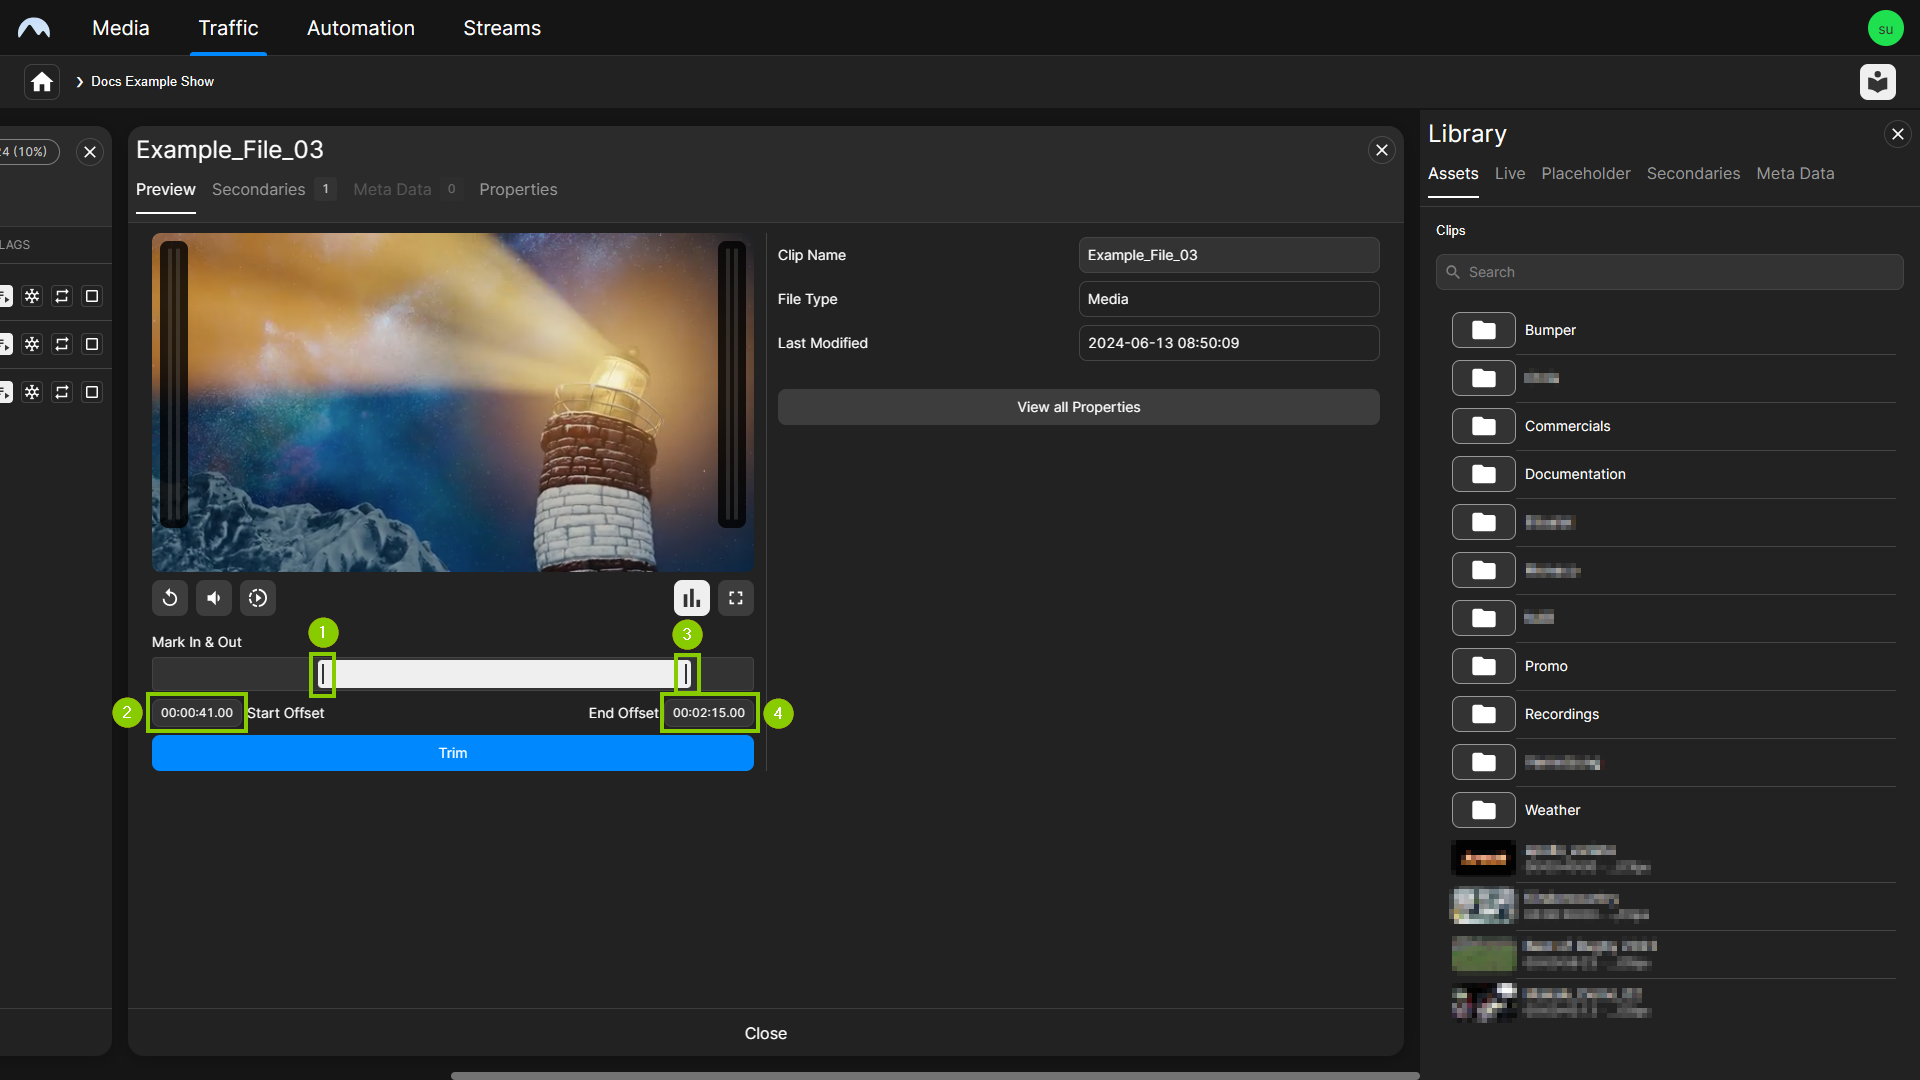
Traffic - Trim clip - Set mark out Tip
Alternatively, you can also use the preview player controls to select the mark out point. To do this, proceed as follows:
1 - Either use the handle of the progress bar or click the Next Frame icon
 or Previous Frame icon
  to jump to the corresponding time.
2 - Click the Mark Out icon
 .
.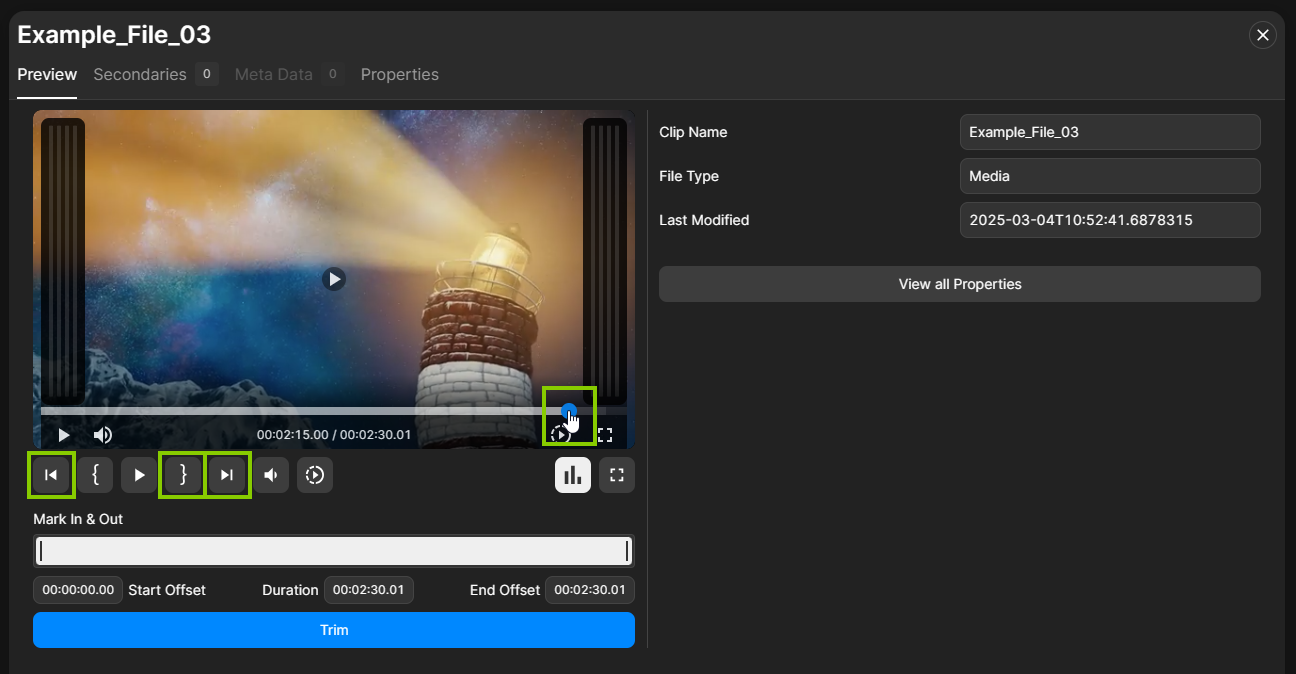
Traffic - Trim clip - Set mark out via preview player controls -
To confirm your changes, click Trim.
The clip is trimmed. The duration displayed in the clip list is updated accordingly. When the clip is played, only the trimmed section will be used.
Deleting a clip
To delete a clip from a show, proceed as follows:
-
In the sidebar on the left, select Shows.
All available shows of the currently selected channel are listed in the middle.
-
Select the show to be edited and click Open on the right side of the corresponding row.
The show details are displayed.
-
To delete one or more clips from the show, proceed as follows:
-
To delete a single clip, hover your mouse over the clip. On the right side of the corresponding row, click the Options icon
 and select Remove.
Tip
Alternatively, you can also delete a clip by selecting it and pressing [Del] on your keyboard.

Traffic - Delete a single clip Confirm the following dialog by clicking Delete.
-
To delete multiple clips, hold either [Ctrl] or [Shift] and select the corresponding clips. Then click the Delete icon
 at the bottom of the screen.
Tip
Alternatively, you can also delete multiple clips by selecting them and pressing [Del] on your keyboard.
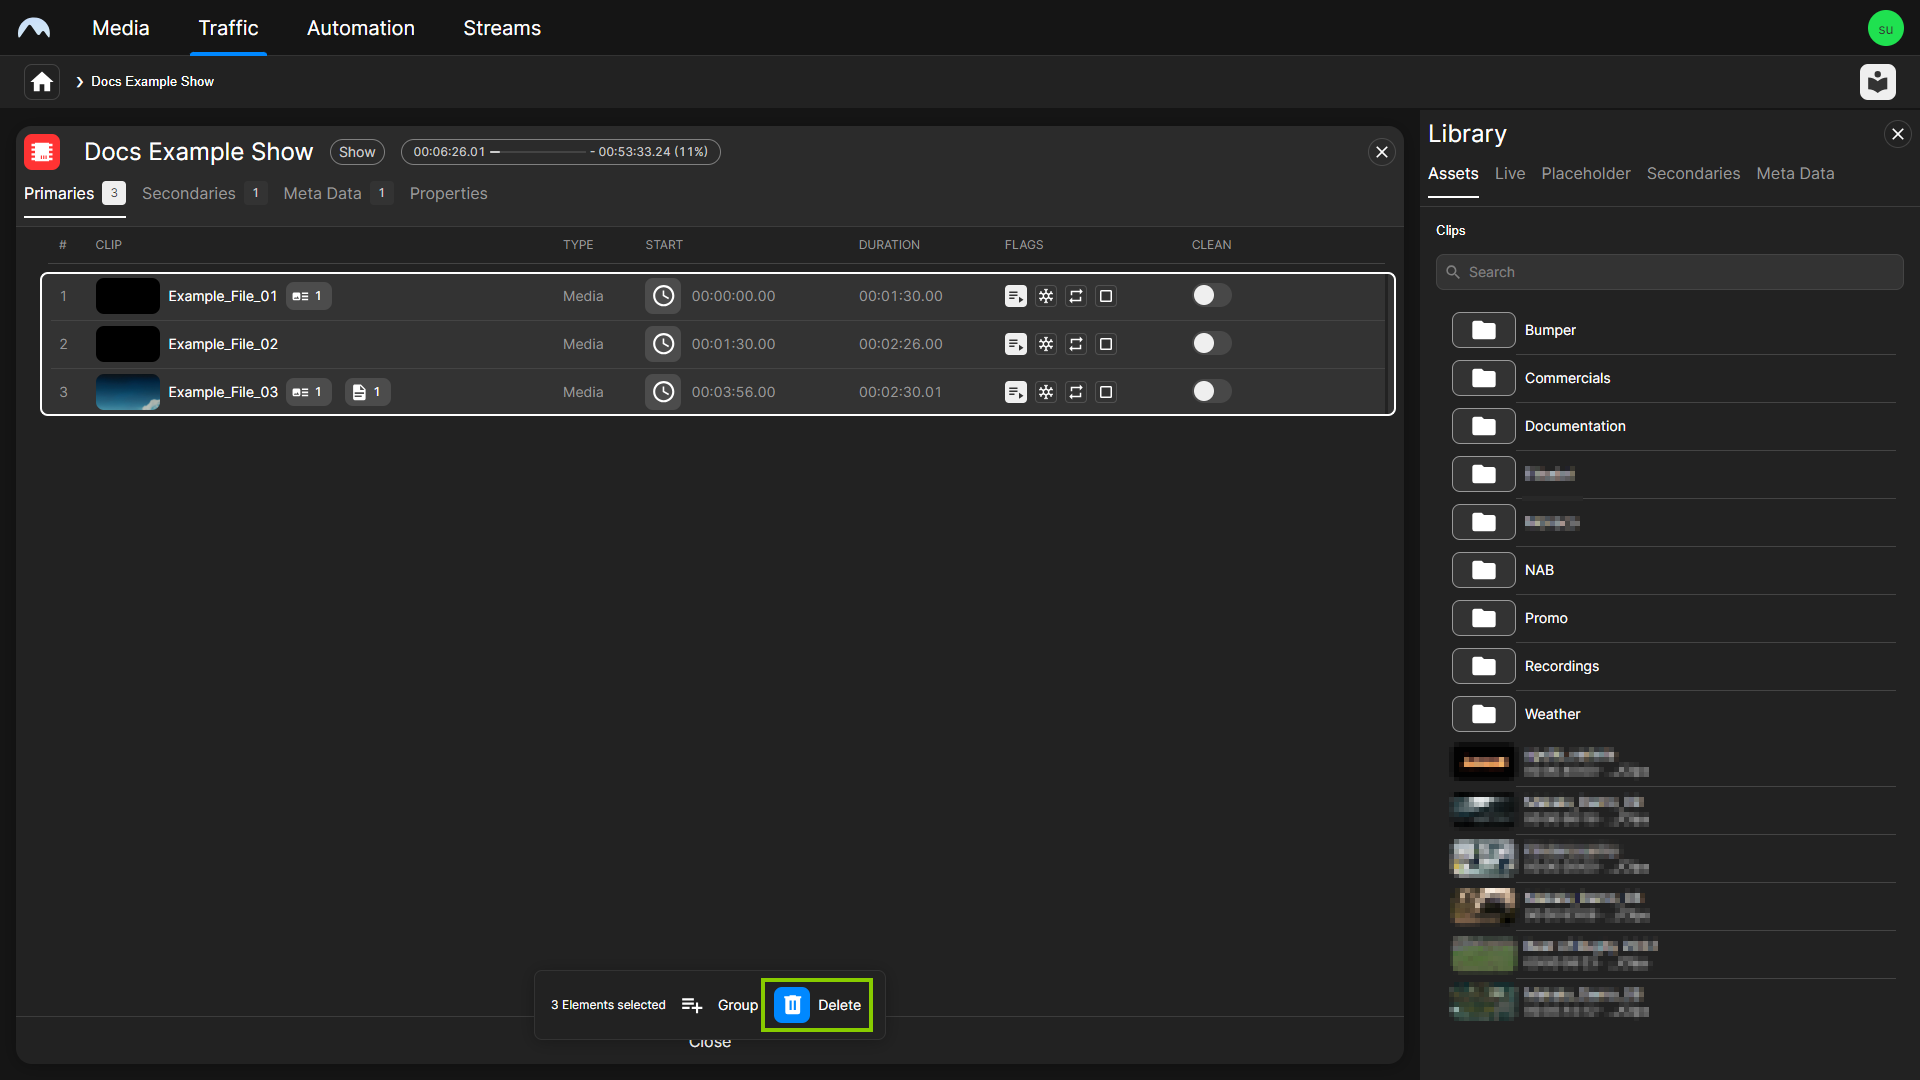
Traffic - Delete multiple clips Confirm the following dialog by clicking Delete.
-
The selected clips are deleted from the show.
Creating a placeholder
When you create a program schedule, you can reuse a placeholder in shows (including reruns). You can later replace it with the corresponding physical file in the Automation UI or Traffic UI when it becomes available.
To create a placeholder, proceed as follows:
-
In the left sidebar, select Shows.
All available shows of the currently selected channel are listed in the middle.
-
Select a show and click Open on the right side of the corresponding row.
The show details are displayed.
-
In the library on the right side, select the Placeholder tab.
Tip
If the library is not displayed, click the Library icon
 at the top right to enable it.
All available placeholders are listed.
-
At the bottom left of the library click Create placeholder.
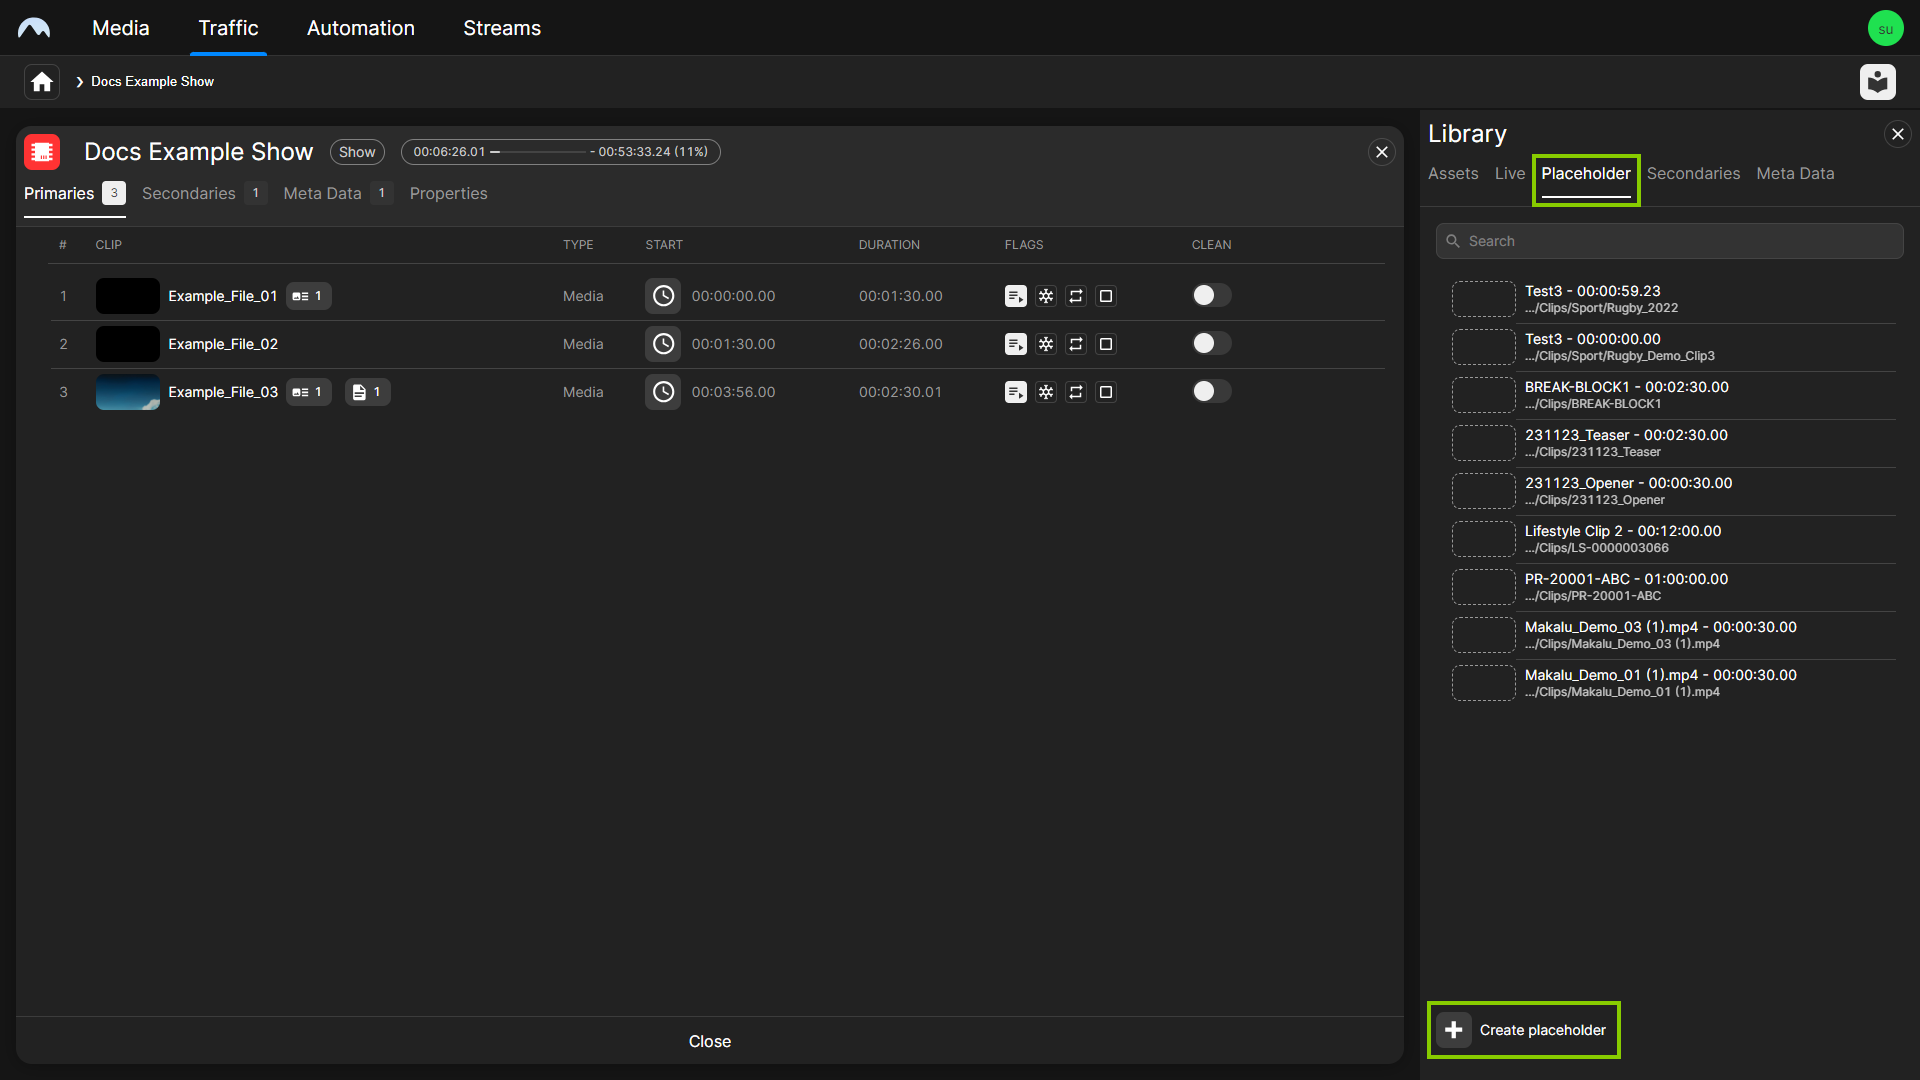
Traffic - Create placeholder The Create Placeholder menu opens.
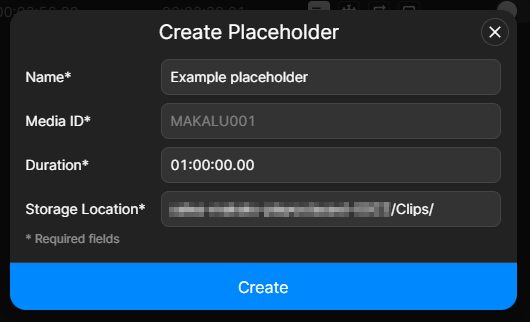
Traffic - Create placeholder menu -
Edit the placeholder properties as required by entering its Name, Media ID, Duration, and Storage Location.
-
To confirm the creation, click Create.
The placeholder is created with the selected properties and added to the list of available placeholders in the library. It can be added to a show.
Duplicating a show
To duplicate a show, proceed as follows:
-
In the left sidebar, select Shows.
All available shows are listed.
-
Hover your mouse over the show to be duplicated. On the right side of the corresponding row, click the Options icon
 and select Duplicate.
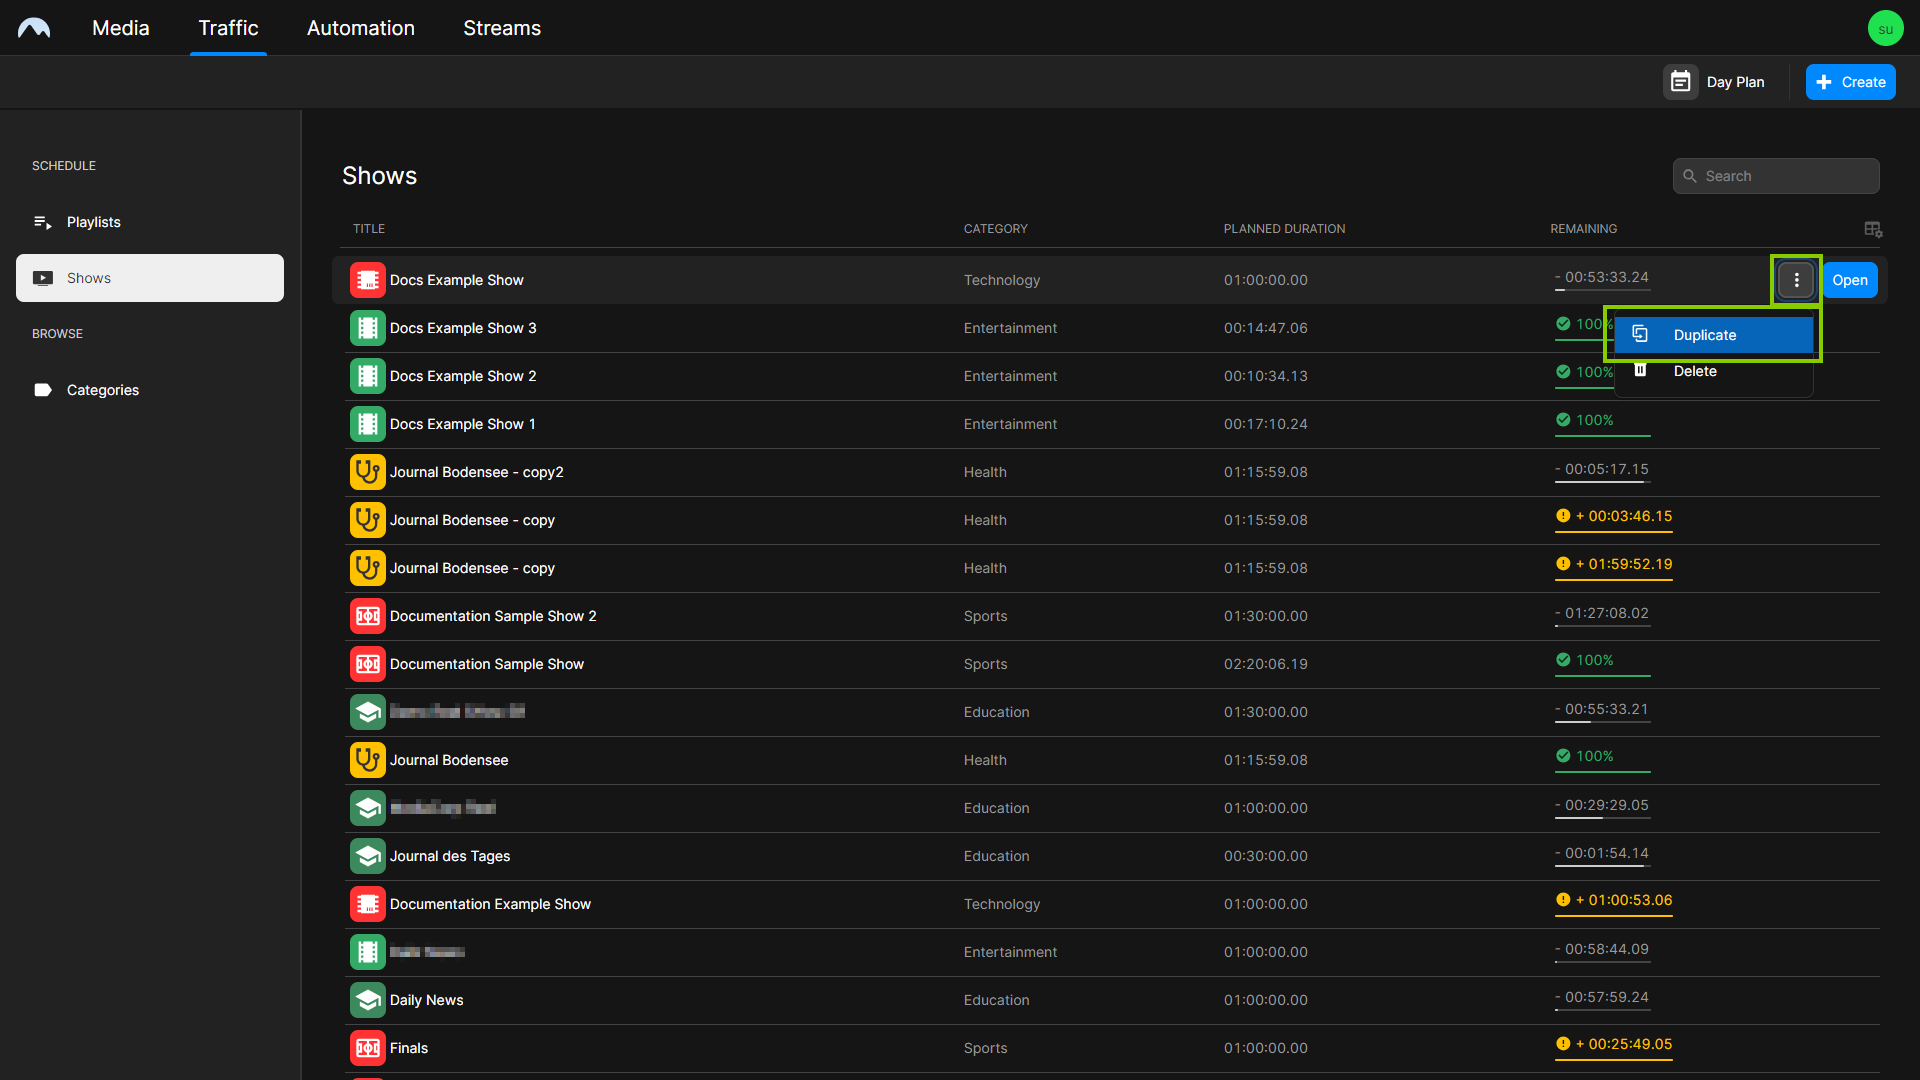
Traffic - Duplicate show The Duplicate Show menu opens.
-
Enter the name of the duplicated show.
-
Click Confirm.
A copy of the show (including all properties, primary, and secondary events) is created.
-
Edit the show properties, primary and/or secondary events as required as described in section Editing a show.
Deleting a show
To delete a single show, proceed as follows:
-
In the left sidebar, select Shows.
All available shows are listed.
-
Hover your mouse over the show to be deleted. On the right side of the corresponding row click the Options icon
 and select Delete.
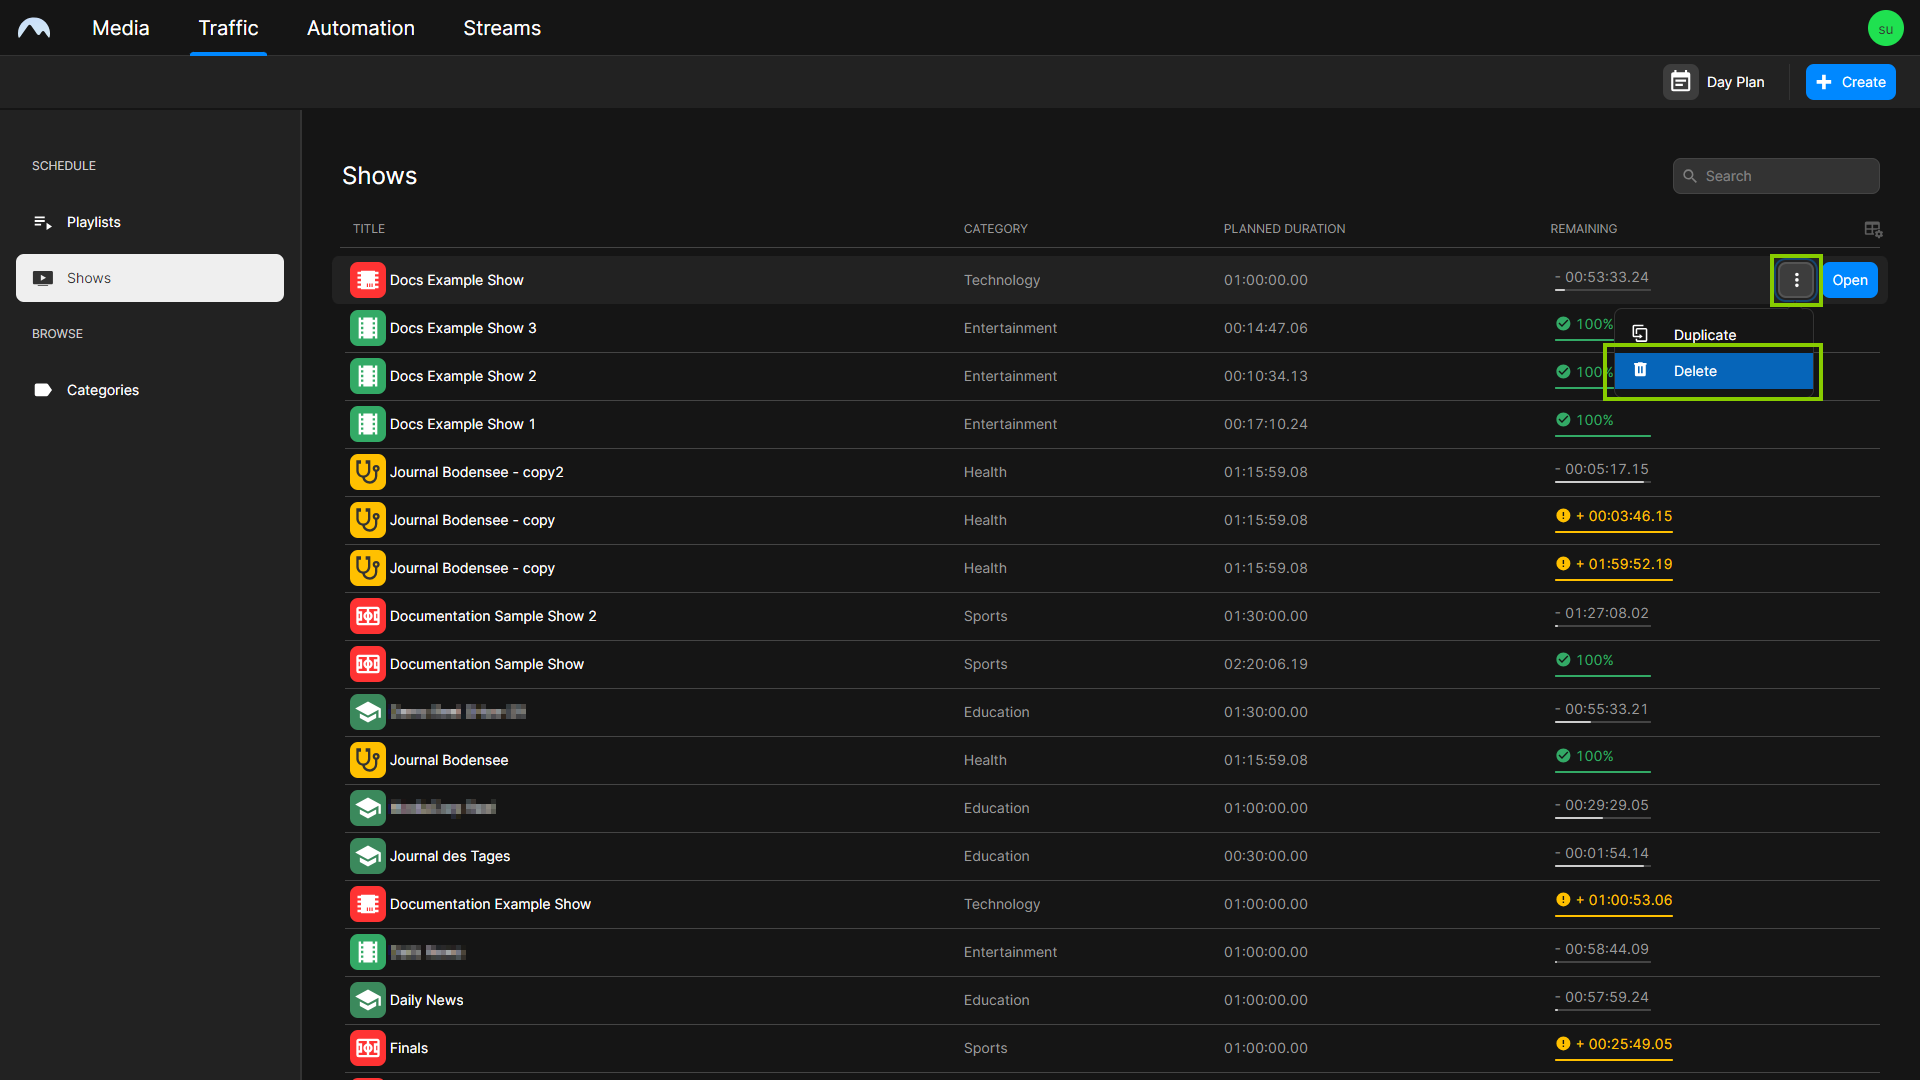
Traffic - Delete show A confirmation dialog is displayed.
-
To delete the show, click Confirm.
The show is deleted.
To delete multiple shows, proceed as follows:
-
In the left sidebar, select Shows.
All available shows are listed on the right side.
-
Hold either [Ctrl] or [Shift] and select the corresponding shows.
-
Click the Delete icon
 at the bottom of the screen.
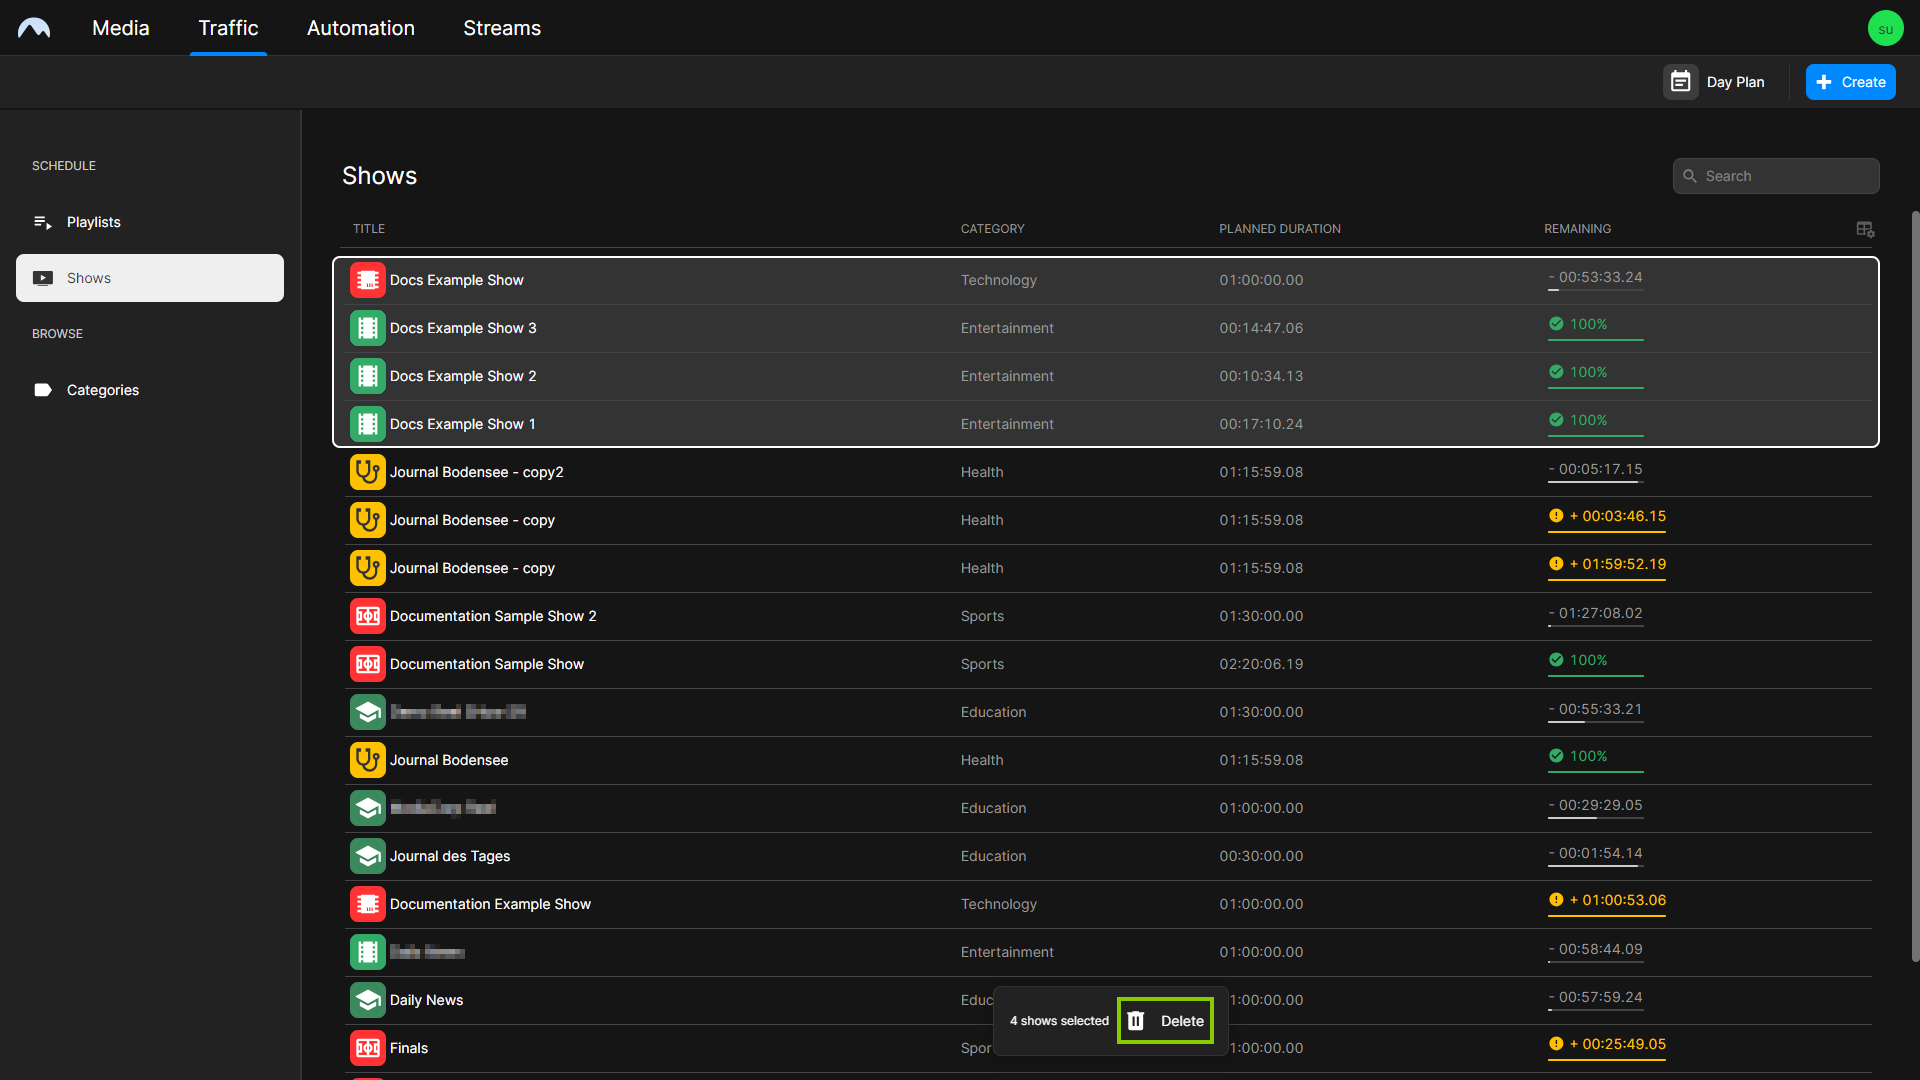
Traffic - Delete multiple shows A confirmation dialog is displayed.
-
To delete the selected shows, click Confirm.
The selected shows are deleted.
Show properties
The following table provides an overview of all available show properties:
Notice
Time-related properties use a frame-accurate notation in the format hh:mm:ss.ff. The frame rate time base is part of the global system configuration. Makalu supports the frame rates 25, 29.97, 30, 50, and 60 fps.
| Property | Description |
|---|---|
| Category | Content category |
| Show Title | Name of the show |
| Planned Duration | Planned duration of the show |
| Description | Text description for the show |
Clip flags
Each clip within a show has a set of flags that define how it should be played by the automation, particularly how the start and end of each clip should be handled.
The following table provides an overview of all available clip flags:
Notice
Some of the listed clip flags are only available in Makalu Traffic, and others only in the rundown in the Makalu Automation detailed channel view (see Channel rundown).
Notice
Deactivated flags are displayed in gray, activated flags are highlighted in white.
Flag icon | Flag name | Description |
|---|---|---|
Auto Follow | When the playback of the previous clip is finished, the playback of the current clip starts automatically. Notice: By default, the Auto Follow flag is initially activated for every clip. | |
Open End | The clip is played permanently until the operator manually triggers the start of the next clip. Notice: This flag is only available for clips of type live source. | |
Freeze Last | When the playback of the clip is finished, the last frame stays displayed. | |
Freeze Black | When the playback of the clip is finished, a black image stays displayed. Notice: The image to be displayed is configurable. | |
Loop | The clip is played in a loop until the operator manually triggers the start of the next clip. Tip: If the loop flag is activated for the last clip in a group, the whole group is played in a loop. | |
 | Auto Cue (Cue Next) | The next clip is automatically prepared for playback, but the first frame stays displayed until the operator manually triggers the start of the next clip. |
 | Clean | The clip is played without graphics add-ons, even if graphics are assigned to it. Notice: This also applies to cases where graphics add-ons of the previous clip would normally extend beyond the regular end of the previous clip. Depending on how the duration of the graphics add-on is set, graphics of the previous clip can stay displayed even after the next clip starts. But if the clean flag is activated for the next clip, graphics are not displayed. |
